
Owner's manual


Setup Guide:
Sensor3 Battery Backup Unit
Sensor3 Battery Backup Unit Installation Guide Page 4 of 4 Electronic Theatre Controls, Inc.
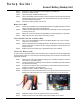
Install Battery Pack(s)
Make sure you have made the necessary connections inside of the battery pack before installing it
in the unit (see Connect the Battery Leads on page 2).
Step 1: Hold the battery so that the LED indicators are on the top of the battery pack.
Step 2: Insert the flanges on the bottom of the pack into the slots in the unit. If you are only
installing one battery pack, use the “A” (left) side of the unit.
Step 3: Raise the pack until it is upright inside of the unit, making sure that the connector on
the rear of the pack is firmly seated on the mount behind it.
Step 4: Secure the battery pack in place using the provided thumbscrew.
Step 5: Repeat this procedure for the “B” (right) side if a second battery pack is being used.
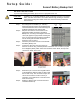
Finishing Touches
Step 1: Verify all wire terminations and connections are intact.
Step 2: Remove any debris or other foreign material from inside of the unit and dimmer
rack(s).
Step 3: Replace all dimmer modules removed from the Sensor3 rack(s) during installation.
Step 4: Reconnect power to the Sensor3 racks. The battery LED indicators may flash for a
few moments as the unit boots.
Step 5: Verify that the LEDs on the battery pack(s) are lit and in either the “READY” (Green)
state or the “CHARGING” (Amber) state.
If the “CHARGING” LED is lit, be sure to check the unit again in a few hours to verify
that “READY” is indicated. If the unit is still charging, or if the “CHARGE FAULT”
(Red) LED is lit, you may have a drained or defective battery. Contact ETC Technical
Services at the appropriate office indicated at the bottom of page 1.
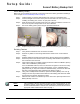
Step 6: Using a No. 2 Phillips head screwdriver, replace the Battery Backup Unit cover by
sliding it onto the six provided screws. Make sure the battery pack LEDs are visible
through the cover window. Tighten the screws.
Step 7: Write the rack number of the backed up rack or racks in the spaces provided on the
Battery Backup Unit cover.
Note:
Check the Battery Backup Unit LEDs monthly to verify that the batteries are still
accepting a charge. If your battery constantly indicates a “CHARGING” state or if
the red “CHARGING FAULT” indicator is lit, contact ETC Technical Services at the
appropriate office indicated at the bottom of page 1.