
Assembly Guide User Manual


6 Electronic Theatre Controls, Inc.
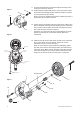
9. Insert the knurled head screw (13) through the housing socket
casting (1) as shown in figure 4.
10. Install the ground spring (23) onto the screw and secure it with
the Southco flat retaining ring (14). Install the Southco ring with
its prongs away from the casting.
Note: Use pliers to straighten the Southco retaining ring (14) if it
bends when you install it on the bolt.
11. Lay the leads in the bottom half of the cable clamp, making sure
that the fiberglass sleeving extends slightly past the screw holes
in the housing socket casting, install new sleeving if necessary,
then route the wires as shown in figure 5.
Important: You must follow the wire routing diagram to ensure
that the socket leads do not interfere with the lamp focus
mechanism.
12. Install the top half of the cable clamp (17) and secure it with the
two screws (18) as shown in figure 6. Tighten the screws
alternately to ensure a solid connection.
Note: To ensure that the clamp holds the cable tightly, flatten
the cable, then fold over the sleeving before you install the top
half of the clamp. Make sure the top edge of the cable clamp is
even with the edge of the socket to prevent interference with
lamp focus movement. Make sure sleeving is not pinched.
Safety wire
Blue wire
w/sleeve
Green/yellow
wire
Green/yellow
wire
Brown wire
w/sleeve
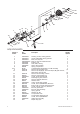
1
8
2
12
13
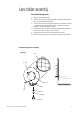
Figure 4
Figure 6
Figure 5
17
18
19
13
14
23
4
6 (index hub)
3
1