CE User Manual Production Dates: September 2004 - Present Copyright © 2008 Electronic Theatre Controls, Inc. All Rights reserved. P r o d u c t i n f o r m a t i o n a n d s p e c i fi c a t i o n s s u b j e c t to c h a n g e . P a r t N u m b e r : 7062M1210-06.
Table of Contents Declaration of Conformity . . . . . . . . . . . . . . . . . . . . . . . . . . . . . . . . . .1 Source Four jr / jr Zoom CE Guidelines . . . . . . . . . . . . . . . . . . . . . . .2 Basic Assembly . . . . . . . . . . . . . . . . . . . . . . . . . . . . . . . . . . . . . . . . .3 Luminaire information . . . . . . . . . . . . . . . . . . . . . . . . . . . . . . . . .3 Colour frame holder . . . . . . . . . . . . . . . . . . . . . . . . . . . . . . . . . . .4 Replacing the HPL lamp . . . . . .
English Declaration of Conformity We, Electronic Theatre Controls, Europe Ltd.
English Source Four jr / jr Zoom CE Guidelines The Source Four jr / jr Zoom CE is intended for professional use only. Read the entire User Guide before using equipment. WARNING: Please note the following safety precautions. • Do not mount the Source Four jr / jr Zoom CE on or near a flammable surface. • Use the Source Four jr / jr Zoom CE in dry locations only, where humidity does not exceed 90 percent. • The luminaire is for indoor use only and is not intended for outdoor use.
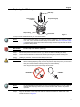
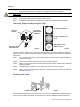
English Basic Assembly C-clamp mounting Yoke Pattern holder slot Lamp housing Drop-in iris slot cover Color frame retaining gel clip Barrel Gel frame Yoke locking knob Zoom rear focus knob Beam focus knob (Zoom front focus) Figure 1 WARNING: Please note the following safety warnings before use: Do not mount the luminaire on or near combustible surfaces. Do not operate the luminaire without a lens installed. Always hang the luminaire with the colour frame retaining clip in the locked position.
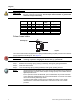
English HPL lamp table CAUTION: The Source Four jr is rated for 575w maximum lamp. Do not use lamps other than the HPL in Source Four fixtures. Use of lamps other than HPL or greater than 575w will void your warranty. Lamp code Watts Volts Initial Lumen Colour temp.
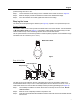
English Replacing the HPL lamp HPL lamp Lamp retention brackets Lamp housing Lamp retaining clip Knurled bolt Figure 3 A lamp must be installed before you use the luminaire. Note: Verify that the HPL lamp you intend to install is suitable for your facility’s voltage; 115-, 120-, 230-, and 240-volt HPL lamps are available. See HPL lamp table, page 4. Operating HPL lamps above their rated voltage reduces lamp life and can cause premature lamp failure. WARNING: Let the lamp cool before replacing.
English Step 5: Push down on the lamp base until the lamp seats firmly. When properly installed, the top of the lamp’s base will be even with he top edges of the retention brackets. CAUTION: Improperly installed lamps cause premature lamp failure and socket problems. Step 6: Press lamp retaining clip across lamp base to secure. Step 7: Reinstall the lamp housing by aligning the bolt hole and tightening the knurled bolt.
English beam focus knobs to set the beam’s spread and to focus the edge of the beam. The Zoom lens provide a range from 25° to 50°. Step 1: Loosen the beam focus knob(s) on the underside of the barrel as shown in Figure 6. Step 2: Slide the lens(es) forward or backward to achieve the desired beam edge. Step 3: Once the luminaire is focused, tighten the beam focus knob(s). Shaping the beam The beam can be shaped using the shutters (see Figure 8), a pattern or an optional drop-in iris.
English Step 4: Slide the slot cover back toward the shutters until it meets the iris handle. Leave enough space to move the iris handle. Step 5: Secure the drop-in iris slot cover by tightening the screws. Adjusting the yoke position The Source Four jr / jr Zoom provides multi-positioning capabilities within its yoke for overall luminaire height and angle.
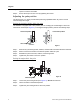
English Switching lens assemblies Follow these procedures to replace a fixed field lens with Zoom lens. Lens tray Light baffle and retaining screw Figure 11 Step 1: Loosen the screw at the front of the baffle. See Figure 11. Step 2: Pull the light baffle out of the barrel. Step 3: Remove the beam focus knob from the bottom of the barrel and slide the lens assembly from the barrel. Step 4: Slide the Zoom lens rear assembly into the barrel and install its beam focus knob.
English Cleaning the reflector WARNING: Unplug the fixture before attempting to clean the reflector. WARNING: Do not use ammonia-based or other harsh commercial cleaners. Clean reflector only as directed. Commercially available glass cleaning agents should be avoided as they may contain ammonia, other harsh chemical detergents or abrasive agents. These cleaners may damage the glass surface and the Anti-Reflective coatings. Do not immerse or soak the glass in any cleaning solution.
English Portable appliance test (PAT) The Portable Appliance Test is a set of tests that must be administered to electrical equipment in the UK and some locations in Europe to ensure safety.The tests are typically carried out using a small PAT device. The PAT device connects to a power source and then attaches to the product via an electrical outlet and test probes. The PAT provides a simple pass or fail result, allowing rapid testing of large inventories.
English This page intentionally left blank.
English This page intentionally left blank.
Corporate Headquarters 3031 Pleasant View Road, P.O.