ETEKCITY Smart LED Dimmable Light Bulb Model No.: ESL100 Questions or Concerns? Mon-Fri 9:00 AM - 5:00 PM PST/PDT support@etekcity.
Thank you for purchasing the Smart LED Dimmable WiFi Bulb by Etekcity. Your smart Bulb allows you to control electrical appliances, such as lights, fans, and kitchen appliances with your Android™ or iOS™ devices. Pair your smart Bulb with the Etekcity VeSync app to use your phone to control your connected electrical appliances anywhere, at any time. Set up your smart Bulb with the IFTTT™ (if this then that) app to program your smart home.
Table of Contents 1. 2. 3. 4. 5. 6. 7. 8. 9. Product Introduction ...................................................................................................................................... 3 Package Contents ......................................................................................................................................... 3 Specifications ..................................................................................................................................
1. Product Introduction Package Contents 1 x Voltson Smart WiFi Bulb ESL100 1 x Quick Start Guide Specifications Communication Mode IEEE802.11b/g/n (WiFi) Communication Frequency 2.
pursuant to Part 15 of the FCC Rules. These limits are designed to provide reasonable protection against harmful interference in a residential installation. This equipment generates, uses, and can radiate radio frequency energy and, if not installed and used in accordance with the instructions, may cause harmful interference to radio communications. However, there is no guarantee that interference will not occur in a particular installation.
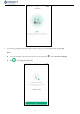
2. Add Device VeSync App Setup Note: The VeSync app and IFTTT app user interfaces may appear slightly different. A. Connect your mobile device to a 2.4GHz WiFi network. Note: The smart outlet will only setup on a 2.4GHz network B. Scan the QR code or download the VeSync app from the App Store® or the Google Play™ store. Note: For Android users, you must select “Allow” to use VeSync. C. Open the VeSync app. Tap Sign Up to create a new account. D.
Note: You must create your own VeSync account to use third-party services and products, such as the Amazon® Echo™, Google Home™, and IFTTT™. The guest account will not work for this. With a VeSync account, you can also allow your family or friends to control your smart Bulb. Configuration Add the smart bulb to your app A. Tap the + button to add your smart Bulb. B. Tap Light. C. Tap Etekcity Dimmable Bulb. D. Tab Start Setup.
E. Turn on the light switch, and the smart bulb flashes 5 times (1 blink per second), indicating that your smart bulb is in Configuration Mode.. If the smart bulb is blinking, tap Next. If the smart bulb is not blinking, tap My LED light is not blinking. follow the prompts please turn power on and off 3 times ,then wait until your smart bulb starts blinking. Note: The timeout for configuring the network is 10 minutes. F.
G. Tap Set WiFi Now and select the WiFi network that reads “VeSync_xxxx”. H. The bulb will take a few seconds to connect. To return to the “Add Device” page, tap <.
I. Your setup is complete! Give your bulb a unique name, or use the default name and tap Ok. Note: You can change the device name and icon at any time.Tap Tap to change the outlet icon. 9 , then tap Device Settings.
3. Functions Turning Devices On/Off On the “My Home” page or the smart bulb page, tap to turn the devices on or off. NOTE: The bulb will remain connected to the internet even when it is turned off. Device is Off Device is On Create Schedule Tap to the smart bulb in the device list, Go to the smart bulb page. A. Tap “Schedule” Access the bulb Settings page. B. Tap + to create a scheduled time for the smart bulb to turn on and/or off. C. Go to the Settings page and set the working time of the bulb.
① .To set a start time: a. Tap Start to set the start time. b. Scroll up and down to select time. Alternatively, tap < for Sunrise and > for Sunset. c. Tap √ to confirm. ② .To set end time: a. Tap End to set the end time.
b. Scroll up and down to select time. Alternatively, tap < for Sunrise and > for Sunset. c. Tap √ to confirm. Note: You must allow the VeSync app to access your location to determine when Sunrise and Sunset are for your area. ③ . Select days you want this task to repeat. a. You can choose once or Weekly .choosing Weekly requires the number of days to be repeated. b. Tap √ to confirm.
④ . Go to the schedule list page to open or close the schedule. Tap ﹀ Pack up the list . ⑤ . Swipe left to remove the added schedule. ⑥ .Go back to the main interface and you can see an added schedule. Set Timer You can create a timer to turn your smart bulb on and off. A. Tap Timer. Then, Set Timer.
B. Tap + Enter the timer Settings page. C. Scroll up and down to set time and select On or Off. Tap√to set successful. D. Tap to cancel the timer. Tap to restart the timer. Tap ﹀ to return to the main interface. E. Swiping left removes the added timer.
Note: If you selected On, the timer will turn on after the timer ends To remove the timer entry, tap on the timer entry, then tap Delete. way Mode When you have a light plugged into your smart bulb, you can use the Away Mode timer to turn your light on and off to give the appearance that someone is home. A. Tap Away, then Set Away Mode. B. Tap + Enter the away Settings page.
① . To set a start time a. Tap Start to set the start time. b. Scroll up and down to select time. c. Tap √ to confirm. ② .To set a end time a. Tap End to set the end time. b. Scroll up and down to select time. c. Tap √ to confirm.
③ . Select days you want this task to repeat. a. You can choose once or Weekly .choosing Weekly requires the number of days to be repeated. b. .Tap √ to confirm. ④ . Go to the away list page to open or close the away. Tap ﹀ Pack up the list . ⑤ . Swipe left removes the added away mode. ⑥ .Go back to the main interface and you can see an added away.
Add Favorite A. Tap Favorite, then Add Favorite. B. Tap + Enter the favorite Settings page. C. Enter Settings, gives this favorite a name and Set brightness. Click √ when setup is complete.
D. Tap Apply Let the Settings take effect. E. Swipe left to remove added favorites. Smart Bulb Settings Tap to see Device Settings.
A B A. Edit your smart outlet name. B. Edit your smart outlet picture C. urn smart outlet notifications on/off. C D. Share your smart bulb. D E. Upgrade Firmware(Tap to update firmware). E F. Delete your smart bulb. F Share Your Smart Bulb Use Share Device to allow someone else to control your smart bulb (such as family, friends, roommates, or anyone you choose). Note: People who you share your smart bulb with cannot edit or delete any of your device settings. A. Tap +. B.
A B C Delete Smart Bulb A. You can delete your smart bulb from the VeSync app from the “Device Settings” screen. To delete your device, tap Delete Device. B. You can also delete your smart outlet from the “My Home” screen in the VeSync app. a. iOS™: Swipe left on the smart outlet’s name to delete. b. Android™: Press and hold for 2 seconds on the smart outlet’s name to delete. 4. More Features On the “My Home” page, tap More, for more features.
Connecting with Google Home™ To view instructions on the VeSync app, tap More, then tap Link to Google Assistant. Note: You must create your own VeSync account to connect with Google Home. Log Out A. On the “My Home” screen, tap More. B. Tap your profile, then tap Log Out. Note: You do not need to log out if you are not using a VeSync account 5. IFTTT Pairing Your Smart Outlet with IFTTT A. Download the IFTTT app from the App Store or Google Play store. B. Open the app and tap sign up or sign in.
C. Tap . D. Enter “VeSync” and tap Services. E. Tap Connect. F. Enter your VeSync account details and tap Authorize.
Create an Applet Using Existing VeSync Templates. A. Open the IFTTT app and tap My Applets. B. Tap Services and tap VeSync.
C. Scroll to search for an applet you want to use, such as “Turn on a VeSync smart device at sunrise“ or“Activate a device every day at a specific time“. D. Slide the toggle switch to turn on the applet. E. Under Device, select the smart bulb that you want the applet to apply to and tap Save. F.
Create a Custom Applet A. On the My Applets screen, tap + . B. Tap this to add a Trigger Service. Example: To trigger a service everyday at 11:45 PM: a. Tap the Date & Time icon. b. Tap Every day at. c. Under “Time”, select 11:45 PM. Note: Popular Trigger Services include Date & Time, Location, and an Alexa or Google Home Command. Different Trigger Services have different user interfaces.
C. After selecting the Trigger Service, tap this to enter an Action Service. D. Tap the VeSync icon.
E. Tap Activate a Device. F. Select the smart bulb and status you would like to activate (turn on or turn off). Tap Create Action. G. Tap Finish.
6. Maintaining Your Smart Bulb Firmware Updates To keep the smart bulb up-to-date with the latest improvements and fixes, you should always update the firmware when available. On the Device Settings screen, tap Upgrade Firmware. Factory Reset Factory resetting the smart bulb can help you troubleshoot any issues you may have. Please keep in mind that factory resetting a device will erase all of your custom settings and restore the factory default settings.
50 meters in an environment without obstacles and less than 30 meters in an environment with obstacles. Q: My smart bulb is offline. Delete the offline bulb from the VeSync app. Swipe left (iOS) or tap and hold (Android), and tap Delete. Please make sure that the router connected to the smart bulb is connected to the Internet.Please confirm whether the network connection of mobile phone mobile terminal is normal.
8. Warranty Information Terms & Policy Etekcity warrants all products to be of the highest quality in material, craftsmanship, and service, effective from the date of purchase to the end of the warranty period. Etekcity will replace any product found to be defective due to manufacturer flaws based on eligibility. Refunds are available within the first 30 days of purchase. Refunds are only available to the original purchaser of the product.
9. Customer Support If you encounter any issues or have any questions regarding your new product, please contact our helpful Customer Support Team. Your satisfaction is our goal! Etekcity Corporation 1202 N. Miller St., Suite A Anaheim, CA 92806 Email: support@etekcity.com Toll-Free: (855) 686-3835 Support Hours Monday - Friday 9:00 am - 5:00 pm PT Please have your order confirmation number ready before contacting customer support.