产 品 说 明 书 Product Instruction Manual 产品名称: LED 高棚灯 Product Name:LED HIGH‐BAY 型号编码: 50242161 Model No.
目录 1.产品简介-------------------------------------------------------3 1.1 产品描述: ‐‐‐‐‐‐‐‐‐‐‐‐‐‐‐‐‐‐‐‐‐‐‐‐‐‐‐‐‐‐‐‐‐‐‐‐‐‐‐‐‐‐‐‐‐3 1.2 产品示意图‐‐‐‐‐‐‐‐‐‐‐‐‐‐‐‐‐‐‐‐‐‐‐‐‐‐‐‐‐‐‐‐3 1.3 安装工具‐‐‐‐‐‐‐‐‐‐‐‐‐‐‐‐‐‐‐‐‐‐‐‐‐‐‐‐‐‐‐‐‐‐‐‐‐3 2.产品特性---------------------------------------------------------------------------------4 2.1 产品特点‐‐‐‐‐‐‐‐‐‐‐‐‐‐‐‐‐‐‐‐‐‐‐‐‐‐‐‐‐‐‐‐‐‐‐‐‐‐‐‐‐‐‐‐‐4 2.2 技术参数‐‐‐‐‐‐‐‐‐‐‐‐‐‐‐‐‐‐‐‐‐‐‐‐‐‐‐‐‐‐‐‐‐‐‐‐‐‐‐‐‐‐‐‐‐‐‐‐‐‐‐‐‐‐‐‐4 2.3.配光性能 ‐‐‐‐‐‐‐‐‐‐‐‐‐‐‐‐‐‐‐‐‐‐‐‐‐‐‐‐‐‐‐‐‐‐‐‐‐‐‐‐‐‐‐‐‐‐‐‐‐5 2.4.
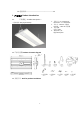
82 包装清单‐‐‐‐‐‐‐‐‐‐‐‐‐‐‐‐‐‐‐‐‐‐‐‐‐‐‐‐‐‐‐‐‐‐‐‐‐‐‐‐‐‐‐‐‐‐‐‐‐‐‐‐‐‐‐15 1. 产品简介 Product Introduction 1.1. 产品描述:Product Description : 1. 外形尺寸:621*323*63mm. Dimension: 621*323*63mm. 2. 外壳为:SPCC+PC 扩散板 Housing :SPCC+PC 扩散板 3. 内置电源. Built-in driver 4. 高亮 LED 灯珠. High efficacy LED (配实物图 with physical map) 1.2 产品示意图 Product schematic diagram 1.
2. 产品特性 Product features 2.1. 产品特点 Product characteristic : a. 长寿命 5 万小时以上; Long lifetime (above 50,000hrs) b. 高效节能环保; High efficiency, energy saving, environmental friendly c. 耐冲击,抗震能力强,无紫外线和红外线辐射; Impact resistant, shock resistant, no UV and IR radiation d. 绿色环保,无有害气体排放,使用热量低,安全可靠。 Green Initiative, no harmful gas is emitted, low heat is generated while used, safe and reliable . e.
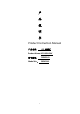
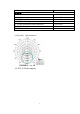
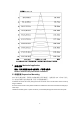
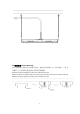
光束角 Beam Angle 物理参数 Physical information 材质 Material 工作温度 operating temperature 储存温度 storage temperature 防护等级 IP rating 灯具规格(L×W×H)/mmLuminaire dimension 净重/g Net weight 设计寿命 /hrs Lifetime/hrs 2.3 配光曲线 Light distribution 2.4.照度分布Polar diagram 5 NA SPCC\PC -40℃~+45℃ -40~+80℃ IP20 621*323*53mm 3.
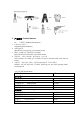
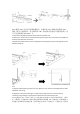
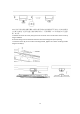
3 安装方法 Method of application 注意:灯具安装前务必将电源切断,严禁带电操作! Caution: disconnect the power before installation. 3.1 吊链安装 Suspension Mounting 3.1.1 取下电源盒盖板,用螺丝刀扭掉敲掉箭头所示敲落孔,把软管(带 1/2″或 3/4″接头, 用户自备)内的线穿过电源盒盖板,软管卡入刚刚敲落的孔; a. Remove the driver box cover plate, punch out the knock out in the direction of the arrow by using screwdriver. b. Put the screws aside as they will be needed to reattach the driver box to the fixture body (A) in a later step. c.
→ 3.1.2.铁线(DD)穿过灯具两端的腰型孔;金属吊线(AA)的S钩穿过铁线(DD), 用钳子使开口挂钩闭合,将金属吊线(AA)的S挂钩分别套进天花板的挂钩(用 户自备,挂钩圆径¢3‐4mm)上; a. Insert the V clip (DD) into the two holes of the end of driver box. b. Attach the S‐hook on one end of the mounting chain (AA) to the center of the V clip (DD) and close the hook with pliers to secure it. c. Repeat these steps with the second V clip (DD) and mounting chain (CC) on the opposite end of the fixture body (A). 3.1.3 a.
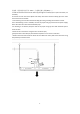
是地线,紫色线是调光正极(DIM+),灰色线是调光负极(DIM‐)。] a. Feed the electrical wires from the fixture (A) through the conduit (1/2in or 3/4in connector, not included). b. Connect the hot and neutral (black and white) wires from the fixture body (A) to the same color wires from the conduit. c. Connect the green wire from the fixture body (A) to the grounding wire from the conduit. d. If 0‐10v dimming circuit is available, connect the purple and gray wires from the power supply box to the same color wires from the flexible pipe.
3.2 吸顶安装 Surface Mounting 3.2.1 把接线盒中的线材从中间圆孔中掏出,把吸顶支架用螺钉(II)安装在墙壁上;用 4 个螺钉(JJ)将吸顶支架盖固定在吸顶支架两侧。 Feed the wiring out through the center hole of the electrical box. Install the surface mounting bracket to the wall using screws (II), then lock the surface mounting bracket cover plate using four screw(JJ) as the direction of arrow.
3.2.2 将灯具的电源盒盖板用螺丝刀拆掉(吸顶安装时电源盒盖板不用安装);将市电线缆从 方孔放入电源盒,把灯具挂进已装好的吸顶支架上,用配件螺钉(JJ)在两边的 4 个位置紧 固,如下图。 a. Remove the driver box cover plate, punch out the knock out in the direction of the arrow by using screwdriver. b. Feed the wiring from the electrical box to the driver box through the square opening. c. Install the fixture (A) to the surface mounting bracket, tighten the surface mounting bracket using four screws(JJ).
3.2.3 打开面板,将市电线缆与灯具输入线(1 根黑色,1 根白色,2 根绿色)按照颜色用接线 帽(CC)连接起来,再将线缆塞回电源盒,按照原样装回面板,吸顶安装完成。 说明:黑色线是 L,白色线是 N,绿色线是地线。 a. Feed the electrical wires from the fixture (A) through the cover plate. b. Connect the hot and neutral (black and white) wires from the fixture body (A) to the same color wires from the electrical box. c. Connect the green wire from the fixture body (A) to the grounding wire from the electrical box. d. Cover the wire connections using the wire connectors (CC). e.
3.3 吊杆安装 Downrod Mounting 3.3.1 把灯具的电源盒盖板用螺丝刀拆掉(吊杆安装时电源盒盖板不用安装),把吸顶 支架(EE)穿过吊杆(这里以 3/4″管为例),使用螺母(用户自备)将吸顶支架(EE)固 定在吊杆上。 a. Remove the screws that attach the driver box to the LED fixture body (A) using the screwdriver. b. Make surface mounting bracket through rigid pipe (3/4”, not included), and fix the bracket to the rigid pipe using screw nut (not included). 3.3.2 将市电线缆从方孔放入电源盒,把灯具挂进已装好的吸顶支架(EE)上,用配件螺钉(JJ)在 两边的 4 个位置紧固,如下图;用 4 个螺钉(JJ)将吸顶支架盖固定在吸顶支架两侧。 a.
as the direction of arrow. 3.3.3 打开面板,将市电线缆与灯具输入线(1 根黑色,1 根白色,2 根绿色)按照颜色用接线 帽(CC)连接起来,再将线缆塞回电源盒,按照原样装回面板,吸顶安装完成。 说明:黑色线是 L,白色线是 N,绿色线是地线。 a. Feed the electrical wires from the fixture (A) through the cover plate. b. Connect the hot and neutral (black and white) wires from the fixture body (A) to the same color wires from the electrical box. c. Connect the green wire from the fixture body (A) to the grounding wire from the electrical box. d. Cover the wire connections using the wire connectors (CC). e.
3.4.维护说明 *为延长使用寿命请勿使用酒精等挥发性溶剂擦拭灯体; *Do Not use volatile solvent such as alcohol to clean the troffer. *清洁时可以使用柔棉布沾肥皂水拧干后擦拭灯体; *Use soft cotton cloth with suds to clean the troffer . *非专业人士请勿拆修灯具; *Non‐profecssional do Not attempt to take apart and repair the troffer . *不可拆卸软缆或软线,如果损坏须请专业人士或制造厂商更换。 *No disassemble the soft cord, if broken, please invite professional personnel or ask the manufacturer to change 4. 兼容功能 Compatible Function 4.
使用环境温度 Operating temperature:‐40~+45℃; 存贮环境温度 Storage temperature:‐40~80℃。 6.产品执行标准 Product carried standard UL1598 7.警告 Warning • Risk of fire/electric shock. • Ground fixture to avoid potential electric shock. • Turn off the power at fuse or circuit breaker box before installation and maintenance. • Edges may cut. Handle with care. FCC STATEMENT This device complies with Part 15 of the FCC rules.
Cet appareil contient des émetteurs / récepteurs exemptés de licence conformes aux RSS (RSS) d'Innovation, Sciences et Développement économique Canada. Le fonctionnement est soumis aux deux conditions suivantes : (1) Cet appareil ne doit pas causer d'interférences. (2) Cet appareil doit accepter toutes les interférences, y compris celles susceptibles de provoquer un fonctionnement indésirable de l'appareil. 8.包装说明 Package instruction 8.1 包装规格 Package specification 包装盒尺寸 Package size 灯具数量/箱 Lamp Qty.