
Operation Manual


44
HOW TO USE THE GAS OR ELECTRIC
GRILL
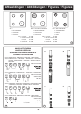
- fi t the knob guard (see fi g. 10);
- ignite the burner and wait a few minutes to
allow it to warm up, or switch on the heating
element;
- place the foods on the chrome-plated shelf;
- insert on the highest runner;
- insert the drip tray on the bottom runner;
- gently close the oven door, resting it against
the knob guard;
- after a few minutes, turn the food to expose
the other side to the infrared radiation (the
cooking time depends on the type of food
and personal taste).
N.B.: the fi rst time the grill is used smoke will
come out of the oven. Before inserting foods
for cooking, wait until any oil residues on the
burner have completely burnt away.
The grill must only be used at its full rated
heat.
IMPORTANT
: accessible parts may be hot
when the grill is in use! Keep children well
away.
The grill element in the top of the oven is
switched on by turning the thermostat knob
clockwise to the grill symbol on the control
panel.The red light will come on to show the
element is in operation.
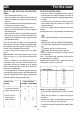
The table below will serve as a guide; bearing
in mind that cooking times and temperatures
may vary depending on the type and amount
of foods cooked and personal taste.
Food to be
Time (minutes)
grilled
1st side
2nd side
Thin pieces of meat 6 4
Fairly thick pieces of
meat 8 5
Thin fi sh or fi sh
without scale 10 8
Fairly thick fi sh 15 12
Sausages 12 10
Toasted sandwiches 5 2
Small poultry 20 15
STATIC ELECTRIC OVEN
- The oven shelf is designed to take normal
oven dishes for cooking sweets or roasts, or
is used without a pan for cooking foods under
the grill.
- The drip tray is only there to collect any juice
from foods and must never be used as a
cooking surface.
There is a single control knob for the oven
or grill.
Starting from the 0 (off) position, the knob can
be turned clockwise to the following settings:
-
be turned clockwise to the following settings:
symbol: oven lamp on (it will remain on
symbol: oven lamp on (it will remain on
even if the knob pointer is turned to the other
settings).
- Setting from 1 to 8 (or from 60 to 250 degrees
C): oven heat settings, with thermostat con-
trol.
-
symbol: grill on (in roof of oven)
symbol: grill on (in roof of oven)
-
symbol: rotisserie start with grill on.
symbol: rotisserie start with grill on.
Turn the knob anti-clockwise to return to the
0 (off) position.
N.B. - The yellow light switches on and off as
the thermostat is tripped.
Before placing food inside, allow the oven to
heat up for at least 10 minutes.
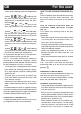
Thermostat Temperature
knob setting in°C
1 60
2 80
3 110
4 140
5 170
6 200
7 220
8 250
HOW TO USE THE ROTISSERIE
- fi t the control knob guard as shown in fi gure
11.
- ignite the grill burner, or switch on the grill
element;
- impale the meat for cooking on the spit and
fi x it in the centre of the two forks;
- insert the end of the spit into the motor drive
socket;
Small poultry 20 15
Thin pieces of meat 6 4
meat 8 5
without scale 10 8
Fairly thick fi sh 15 12
Sausages 12 10
Toasted sandwiches 5 2
Small poultry 20 15
Thin pieces of meat 6 4
meat 8 5
without scale 10 8
Fairly thick fi sh 15 12
Sausages 12 10
Toasted sandwiches 5 2
Small poultry 20 15
knob setting in°C
1 60
2 80
3 110
4 140
5 170
6 200
7 220
8 250
Thermostat Temperature
knob setting in°C
1 60
2 80
3 110
4 140
5 170
6 200
7 220
8 250
For the user
GB