GEBRUIKSAANWIJZING Het toestel-identificatieplaatje bevindt zich aan de binnenkant van het toestel. La plaque d’identification de l’appareil se trouve sur l’intérieur de l’appareil. Das Gerätetypenschild befindet sich an der Innenseite des Gerätes. The appliance identification card is located on the inside of the appliance. MODE D’EMPLOI BEDIENUNGSANLEITUNG INSTRUCTIONS FOR USE Houd, wanneer u contact opneemt met de serviceafdeling, het complete typenummer bij de hand.
NL Handleiding NL 3 - NL 25 FR Notice d’utilisation FR 3 - FR 25 DE Anleitung DE 3 - DE 25 EN Manual Gebruikte pictogrammen - Pictogrammes utilisés Benutzte Piktogramme - Pictograms used Belangrijk om te weten - Important à savoir Wissenswertes - Important information Tip - Conseil - Tipp - Tip EN 3 - EN 25
INHOUDSOPGAVE Uw combi-magnetron Inleiding Beschrijving Bedieningspaneel 4 5 6 Materialen 7 Vóór het eerste gebruik 8 Veiligheid Gebruik Bediening Klok instellen Kookwekker Magnetronfunctie Snelstart Stop Grillfunctie Combifunctie Ovenfunctie met voorverwarmen Ovenfunctie Ontdooien op gewicht Ontdooien op tijd Koken in fasen Auto cook Kinderslot Kooktips 9 9 9 10 11 11 12 13 14 14 15 15 16 17 18 Onderhoud Reinigen 21 Storingen 22 Technische gegevens 23 Milieuaspecten Afvoeren toestel en verpa
UW COMBI-MAGNETRON Inleiding U heeft gekozen voor een combi-magnetron van Etna. Optimaal gebruikscomfort en een eenvoudige bediening stonden voorop bij de ontwikkeling van dit product. De combi-magnetron verenigt de eigenschappen van een magnetron met die van een traditionele oven. De uitgebreide instelmogelijkheden maken het mogelijk exact die bereidingswijze te kiezen die u voor ogen staat. De bediening is niettemin eenvoudig, mede dankzij de automatische kook- en ontdooiprogramma’s.
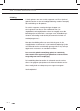
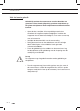
UW COMBI-MAGNETRON Beschrijving 1 1. 2. 3. 4. 5. 6. 7. 8. 2 3 Deurvergrendeling Deur Ruit Glazen draaiplateau Geleidering Aandrijving Bedieningspaneel Rooster 4 5 6 7 8 De magnetron mag niet gebruikt worden zonder geleidering en draaiplateau. Het draaiplateau moet met de uitsparing voor de aandrijving naar beneden geplaatst worden.
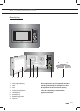
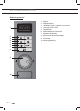
UW COMBI-MAGNETRON Bedieningspaneel 1 2 3 4 5 6 7 8 9 10 NL 6 1. Display 2. Magnetrontoets 3. Combitoets (grill, magnetron, hete lucht) 4. Oventoets (hete lucht) 5. Ontdooitoets 6. Kookwekkertoets/Timertoets 7. Stoptoets/Kinderslot 8. Starttoets/Snelstart/Bevestigen 9. Instelknop 10.
VEILIGHEID Lees voor gebruik eerst de separate veiligheidsvoorschriften! Als u besluit het toestel, vanwege een defect, niet langer te gebruiken, adviseren wij u, nadat u de stekker uit het stopcontact heeft verwijderd, het snoer af te knippen. Breng het toestel naar de betreffende afvalverwerkingsafdeling van uw gemeente. Materialen Niet alle materialen kunnen in de magnetron. In de onderstaande tabel is aangegeven welke materialen u wel en niet kunt gebruiken.
GEBRUIK Vóór het eerste gebruik Gebruik bij voorkeur het ovenrooster voor het bereiden van gerechten. Plaats koude (diepvries) gerechten nooit direct op het glazen draaiplateau. Door temperatuurverschillen kan deze barsten! • Open de deur, verwijder al het verpakkingsmateriaal en controleer de magnetron op beschadigingen. Installeer de magnetron niet als deze beschadigd is, maar neem contact op met uw leverancier. • Verwijder de beschermfolie van de ommanteling.
BEDIENING Klok instellen Wanneer het toestel voor de eerste keer op het elektriciteitsnet wordt aangesloten, moet u eerst de klok instellen. In de display staat ‘0:00’. De klok loopt zolang de combimagnetron op netspanning is aangesloten. 1. Druk 2 keer op de timertoets. In de display knipperen de uren. 2. Draai aan de instelknop om de uren in te stellen. In de display verschijnen de uren die zijn ingesteld. 3. Druk weer op de timertoets. In de display knipperen minuten. 4.
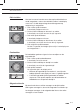
BEDIENING Display Vermogen Gerecht P100 100 % - 900 W - Water koken, opwarmen - Koken van kip, vis en groenten P 80 80 % - 720 W - Opwarmen - Koken van paddenstoelen en schaaldieren - Koken van gerechten die ei en kaas bevatten P 50 50 % - 450 W - Koken van rijst en soep P 30 30 % - 270 W - Ontdooien - Chocola en boter smelten P 10 10 % - 90 W - Ontdooien van gevoelige/kwetsbare gerechten Ontdooien van onregelmatig gevormde gerechten Consumptie-ijs zacht maken Laten rijzen van deeg 1.
BEDIENING Stop U kunt een lopend programma stoppen of annuleren door de deur te openen of op de stoptoets te drukken. Om het programma weer te starten, drukt u op de starttoets. • Wanneer u het programma helemaal wilt annuleren, drukt u nogmaals op de stoptoets. In de display verschijnt de huidige tijd. Grillfunctie Met de grillfunctie kunt u gerechten verhitten en van een bruin korstje voorzien, zonder gebruik te maken van microgolven. 1. Druk 1 keer op de combitoets. In de display knippert ‘G-1’.
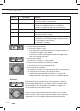
BEDIENING Combifunctie Er zijn 4 verschillende combifuncties. In de volgende tabel kunt u zien welke functies u kunt kiezen en waar ze voor gebruikt worden. Display Functie Beschrijving C-1 Magnetron + hete lucht C-2 Magnetron + grill Deze functie is geschikt voor grotere stukken (geroosterd) vlees zoals halve haan, hele kip, en voor hele vis en gegratineerde schotels. C-3 Grill + hete lucht Gebruik deze functie om gerechten gelijkmatig te braden en tegelijkertijd een bruin korstje te geven.
BEDIENING Ovenfunctie met voorverwarmen Met de oven kunt u gerechten bereiden op dezelfde manier als in een traditionele oven. De magnetron wordt hierbij niet gebruikt. U wordt geadviseerd de oven voor te verwarmen tot de juiste temperatuur voordat u het gerecht in de oven plaatst. 1. Druk op de oventoets. In de display knippert ‘130’. • Druk nogmaals (meerdere keren) op de oventoets als u een andere temperatuur in wilt stellen. U kunt een temperatuur instellen van 130 °C tot 220 °C.
BEDIENING Ovenfunctie 1. Druk op de oventoets. In de display knippert ‘130’. • Druk nogmaals (meerdere keren) op de oventoets als u een andere temperatuur in wilt stellen. U kunt een temperatuur instellen van 130 °C tot 220 °C. • U kunt ook met de instelknop een andere temperatuur kiezen door aan de knop te draaien. 2. Druk op de starttoets. De gekozen temperatuur is nu bevestigd. 3. Draai aan de instelknop om de tijd in te stellen (maximaal 95 minuten). In de display verschijnt de ingestelde tijd. 4.
BEDIENING Ontdooien op tijd Met deze functie hoeft u alleen maar de ontdooitijd van het voedsel in te stellen. 1. Druk 2 keer op de ontdooitoets. In de display knippert ‘d-2’. 2. Draai aan de instelknop om de ontdooitijd in te stellen (maximaal 95 minuten). In de display verschijnt de ingestelde tijd. 3. Druk op de starttoets. De magnetron schakelt in en de ingestelde tijd in de display telt af. Het ontdooisymbool in de display knippert.
BEDIENING 4. Druk op de starttoets. Het gekozen vermogen is nu bevestigd. 5. Draai aan de instelknop om 7 minuten in te stellen. In de display verschijnt de ingestelde tijd. 6. Druk weer op de starttoets. De magnetron schakelt in en de ingestelde tijd van de eerste fase in de display telt af. Het ontdooisymbool in de display knippert. • Wanneer de ingestelde tijd verstreken is, verschijnt de ingestelde tijd van de tweede fase in de display en knippert het magnetronsymbool.
BEDIENING 1. Draai de instelknop rechtsom om een auto cook programma te kiezen. In de display verschijnt het gekozen programma. 2. Druk op de starttoets. Het gekozen programma is nu bevestigd. 3. Draai aan de instelknop om het gewicht in te stellen. In de display verschijnt het ingestelde gewicht. 4. Druk weer op de starttoets. De magnetron schakelt in en de ingestelde tijd in de display telt af. Diverse symbolen knipperen in de display.
KOOKTIPS Opwarmen en koken • De magnetron verwarmt altijd met dezelfde intensiteit. Hoe meer u in de magnetron plaatst, des te langer de kooktijd. • Vlakke en platte gerechten zijn sneller warm dan smalle, hoge gerechten. • Gerechten afdekken met magnetronfolie of een passende deksel voorkomt spetteren, verkort de gaartijd en helpt de vochtigheidsgraad te behouden. Na afloop de folie of het deksel voorzichtig verwijderen.
KOOKTIPS • Bij het ontdooien van onregelmatig gevormde gerechten kunt u dunne delen na de helft van de ontdooitijd afdekken of omwikkelen met aluminiumfolie. Factoren die van invloed zijn op het kookproces • De temperatuur van ingrediënten is van invloed op de bereidingstijd. Een koude maaltijd heeft een langere kooktijd nodig dan een maaltijd op kamertemperatuur. • Lichte gerechten garen sneller dan zware en massieve gerechten, zoals stoofgerechten of rollades.
KOOKTIPS • Controleren • Gerechten garen snel. Controleer ze daarom regelmatig. Haal gerechten net voordat ze gaar zijn uit de magnetron. • Nagaren • Laat gerechten, nadat u ze uit de magnetron hebt gehaald, over het algemeen 3 tot 10 minuten afgedekt staan. De gerechten garen dan na. Gerechten met een droge korst, zoals cake, niet afdekken.
ONDERHOUD Reinigen • GEBRUIK GEEN schuurmiddelen of metalen schrapers voor het reinigen van de glazen ovendeur. Het oppervlak raakt hierdoor bekrast, waardoor het glas kan barsten. • GEBRUIK GEEN hogedruk- of stoomreiniger om de magnetron schoon te maken. • Maak de binnenzijde direct na gebruik schoon. Gebruik een vochtige doek om condens, overgekookt vocht en voedselresten te verwijderen. Achtergebleven kruimels en vocht absorberen magnetronenergie en verlengen de kooktijden.
STORINGEN Wanneer u twijfelt over de goede werking van uw toestel, betekent dit niet automatisch dat er een defect is. Controleer in elk geval de volgende punten. Bel de servicedienst indien onderstaande adviezen niet helpen.
TECHNISCHE GEGEVENS Technische gegevens Op het gegevensplaatje worden de totale aansluitwaarde, de vereiste spanning en de frequentie aangegeven. Dit toestel voldoet aan alle relevante CE richtlijnen. Aansluiting Vermogen magnetron Vermogen grill Vermogen oven Max. totaalvermogen Inhoud Diameter draaiplateau Gewicht CM125HRVS 230V~50Hz 0,9 kW 1,1 kW 2,5 kW 3,6 kW 25 liter 315 mm 21 kg Elektrische aansluiting Voor dit toestel is een netvoeding vereist van 230V, 50 Hz wisselstroom.
TECHNISCHE GEGEVENS Let op: de magnetron moet aan de voorkant in de kast worden vastgeschroefd. Schuif de magnetron in de kast. Open de deur van de magnetron. Aan de voorkant in het midden zit een ronde opening waar een schroef doorheen moet. Schroef de magnetron vast en dek de schroef af met een dopje. • Dek de ventilatie-openingen niet af. • Plaats de magnetron niet in de buurt van warmtebronnen.
MILIEUASPECTEN Afvoeren toestel en verpakking Bij de vervaardiging van dit toestel is gebruik gemaakt van duurzame materialen. Dit toestel moet aan het eind van zijn levenscyclus op verantwoorde wijze worden afgevoerd. De overheid kan u hierover informatie verschaffen. De verpakking van het toestel is recyclebaar. Gebruikt kunnen zijn: • karton; • polyethyleenfolie (PE); • CFK- vrij polystyreen (PS- hardschuim). Deze materialen dient u op verantwoorde wijze en conform de overheidsbepalingen af te voeren.
NL 26
SOMMAIRE Votre four à micro-ondes combiné Introduction Description Panneau de commande 4 5 6 Connexion et réparations 7 Avant la première utilisation 8 Sécurité Utilisation Commande Réglage de l'horloge Minuteur Fonction micro-ondes Démarrage rapide Arrêt Fonction grill Fonctions combinées Fonction four avec préchauffage Fonction four Décongélation selon le poids Décongélation selon le temps Cuisson par phases Auto cook Sécurité enfants Conseils de cuisson 9 9 9 10 11 11 12 13 14 14 15 15 16 17 18
VOTRE FOUR À MICRO-ONDES COMBINÉ Introduction Vous avez choisi un four à micro-ondes combiné Etna. La souplesse et la simplicité de l'utilisation sont les principes qui ont guidé son développement. Le four à micro-ondes combiné réunit les propriétés d'un four à micro-ondes à celles d'un four traditionnel. Ses réglages très divers vous permettent de choisir exactement le mode de préparation que vous envisagez.
VOTRE FOUR À MICRO-ONDES COMBINÉ Description 1 1. 2. 3. 4. 5. 6. 7. 8. 2 3 Verrouillage de la porte Porte Vitre Plateau tournant en verre Anneau à roulettes Propulsion Panneau de commande Grille 4 5 6 7 8 Le four à micro-ondes ne doit pas être utilisé sans anneau à roulettes et plateau tournant. Le plateau tournant doit être placé avec la rainure prévue pour la propulsion vers le bas.
VOTRE FOUR À MICRO-ONDES COMBINÉ Panneau de commande 1 2 3 4 5 6 7 8 9 10 FR 6 1. Écran 2. Touche micro-ondes 3. Touche fonctions combinées (grill, micro-ondes, air chaud) 4. Touche four (air chaud) 5. Touche de décongélation 6. Touche du minuteur/de l'horloge 7. Touche d'arrêt/sécurité enfants 8. Touche de démarrage/démarrage rapide/confirmation 9. Bouton de réglage 10.
SÉCURITÉ Veuillez lire les consignes de sécurité fournies séparément avant la première utilisation de l’appareil ! Si les instructions de sécurité et les avertissements ne sont pas respectés, le fabriquant décline toute responsabilité pour les dommages qui peuvent s'ensuivre. Si vous décidez de ne plus utiliser l'appareil parce qu'il est défectueux, nous vous conseillons de couper le cordon après avoir retiré la fiche de la prise du secteur. Apportez l'appareil dans un centre communal de collecte sélective.
UTILISATION Avant la première utilisation Utilisez de préférence la grille du four pour préparer des plats. Ne placez jamais de plats froids (congelés) directement sur le plateau tournant en verre. Des différences de température peuvent provoquer des fissures! • Ouvrez la porte, retirez l'emballage et vérifiez que le four à micro-ondes n'est pas endommagé. N'installez pas le four à micro-ondes s'il est endommagé. Prenez contact dans ce cas avec votre fournisseur.
COMMANDE Réglage de l'horloge Lorsque l'appareil est raccordé au réseau électrique pour la première fois, vous devez régler l'horloge. L'écran affiche « 0:00 ». L'horloge fonctionne tant que le four à micro-ondes combiné est raccordé au secteur. 1. Appuyez 2 fois sur la touche de l'horloge. Les heures clignotent sur l'écran. 2. Tournez le bouton de réglage pour sélectionner les heures. L'écran affiche les heures programmées. 3. Appuyez à nouveau sur la touche de l'horloge.
COMMANDE Écran Puissance Plat P100 100 % - 900 W - Faire bouillir, réchauffer de l'eau - Cuire du poulet, du poisson et des légumes P 80 80 % - 720 W - Réchauffer - Cuire des champignons et des crustacés - Cuire des plats à base d'œufs et de fromage P 50 50 % - 450 W - Cuire du riz et de la soupe P 30 30 % - 270 W - Décongélation - Faire fondre du chocolat et du beurre P 10 10 % - 90 W - Décongeler des produits délicats/fragiles Décongeler des produits de forme irrégulière Faire ramollir d
COMMANDE Arrêt Vous pouvez arrêter ou annuler un programme en cours en ouvrant la porte ou en appuyant sur la touche d'arrêt. Pour lancer le programme à nouveau, appuyez sur la touche de démarrage. • Pour annuler le programme, appuyez encore une fois sur la touche d'arrêt. L'heure actuelle s'affiche sur l'écran. Fonction grill La fonction grill permet de chauffer et de dorer des plats, sans utiliser les micro-ondes. 1. Appuyez une fois sur la touche fonctions combinées. « G-1 » s'affiche sur l'écran.
COMMANDE Fonctions combinées Il y a 4 fonctions combinées différentes. Le tableau suivant détaille les différentes fonctions et indique quand les utiliser. Écran Fonction Description C-1 Micro-ondes + air chaud Utilisez cette fonction pour faire cuire des plats rapidement. Convient pour les pâtisseries aux fruits, le pain, les plats gratinés (nécessitant normalement une durée de cuisson longue).
COMMANDE Fonction four avec préchauffage La fonction four permet de préparer des plats comme dans un four traditionnel. La fonction micro-ondes n'est pas utilisée en l'occurence. Il est recommandé de préchauffer le four à la bonne température avant d'enfourner le plat. 1. Appuyez sur la touche four. « 130 » s'affiche sur l'écran. • Appuyez encore une fois (plusieurs fois) sur la touche four pour programmer une autre température. Il est possible de régler une température comprise entre 130 °C et 220 °C.
COMMANDE Fonction four 1. Appuyez sur la touche four. « 130 » s'affiche sur l'écran. • Appuyez encore une fois (plusieurs fois) sur la touche four pour programmer une autre température. Il est possible de régler une température comprise entre 130 °C et 220 °C. • Il est également possible de sélectionner une autre température en tournant le bouton de réglage. 2. Appuyez sur la touche de démarrage. La température sélectionnée est maintenant confirmée. 3.
COMMANDE Utilisez de préférence la grille du four pour préparer des plats. Ne placez jamais de plats froids (congelés) directement sur le plateau tournant en verre. Des différences de température peuvent provoquer des fissures! Décongélation selon le temps En utilisant cette fonction, vous n'aurez qu'à programmer la durée de décongélation. 1. Appuyez 2 fois sur la touche de décongélation. « d-2 » s'affiche sur l'écran. 2.
COMMANDE • Appuyez encore une fois sur la touche micro-ondes pour programmer une puissance de 80 %. • Il est également possible de régler la puissance de 80 % en tournant le bouton de réglage. 4. Appuyez sur la touche de démarrage. La puissance sélectionnée est maintenant confirmée. 5. Tournez le bouton de réglage pour programmer une durée de 7 minutes. La durée programmée s'affiche sur l'écran. 6. Appuyez encore une fois sur la touche de démarrage.
COMMANDE 1. Tournez le bouton de réglage vers la droite pour sélectionner un programme auto cook. Le programme sélectionné s'affiche sur l'écran. 2. Appuyez sur la touche de démarrage. Le programme sélectionné est maintenant confirmé. 3. Tournez le bouton de réglage pour programmer le poids. Le poids programmé s'affiche sur l'écran. 4. Appuyez encore une fois sur la touche de démarrage. Le four à micro-ondes s'enclenche et le décompte de la durée programmée s'affiche sur l'écran.
CONSEILS DE CUISSON Réchauffer et cuire • L'intensité de chauffage du four à micro-ondes est toujours la même. Plus la quantité placée dans le four est importante, plus la durée de cuisson sera longue. • Les produits plats sont plus vite chauds que les produits étroits et hauts. • Le fait de recouvrir les plats d'un film à micro-ondes ou d'un couvercle approprié évite les projections d'aliments, diminue la durée de cuisson et permet de conserver l'humidité des aliments.
CONSEILS DE CUISSON • En cas de décongélation de produits de forme irrégulière, couvrez ou enveloppez de papier aluminium les parties fines pendant la seconde moitié de la durée de décongélation. Les facteurs qui ont une influence sur le processus de cuisson • La température des ingrédients a une influence sur la durée de préparation. Un repas froid nécessite une durée de cuisson plus longue qu'un repas qui se trouve à température ambiante.
CONSEILS DE CUISSON • Contrôler • Les produits cuisent rapidement. C'est pourquoi il faut les contrôler régulièrement. Sortez les produits du four à microondes avant qu’ils ne soient cuits à point. • Poursuite de la cuisson • Après avoir sorti les produits du four à micro-ondes, laissezles reposer, à couvert, pendant 3 à 10 minutes. Les produits poursuivent leur cuisson. Ne couvrez pas les produits qui ont une croûte sèche (comme un cake).
ENTRETIEN Nettoyage • N'UTILISEZ PAS de produits à récurer ni de grattoirs métalliques pour nettoyer la porte du four en verre. Ceux-ci risquent de rayer la surface et faire éclater le verre. • N'UTILISEZ PAS de jet à haute pression ou de machine à vapeur pour nettoyer le four à micro-ondes. • Nettoyez directement l'intérieur après usage. Utilisez un chiffon humide pour éliminer la condensation, le liquide qui a débordé et les résidus alimentaires.
PANNES • Les sauces acides comme le ketchup et la moutarde ou les aliments salés (comme le petit salé) contiennent des ingrédients qui peuvent affecter la surface. Nettoyez toujours le compartiment de cuisson après chaque utilisation.Si vous avez un doute quant au bon fonctionnement de votre appareil, ceci ne signifie pas automatiquement qu'il est défectueux. Vérifez en tout cas les points suivants. Appelez le service après-vente si les conseils ci-dessous ne vous aident pas.
SPÉCIFICATIONS TECHNIQUES Spécifications techniques La plaquette signalétique indique la valeur nominale totale, la tension d'alimentation et la fréquence nécessaires. Cet appareil est conforme à toutes les directives CE applicables.
SPÉCIFICATIONS TECHNIQUES Attention : le four à micro-ondes doit être fixé avec une vis à l'avant dans le placard. Faites glisser le four à micro-ondes dans le placard. Ouvrez la porte du four à micro-ondes. À l'avant, au milieu, vous apercevrez une ouverture ronde destinée à une vis. Fixez le four à l'aide de la vis et recouvrez celle-ci avec un bouchon. • Ne recouvrez pas les ouvertures de ventilation. • Ne placez pas le four à micro-ondes à proximité d'une source de chaleur.
ENVIRONNEMENT Élimination de l'appareil et de l'emballage Des matériaux durables ont été utilisés dans la fabrication de cet appareil. Cet appareil doit être éliminé de façon appropriée à la fin de son cycle de vie. Les autorités peuvent vous renseigner à ce sujet. L'emballage de l'appareil est recyclable. Peuvent être utilisés : • du carton ; • de la feuille de polyéthylène (PE) ; • du polystyrène sans CFC (mousse rigide PS).
FR 26
INHALTSVERZEICHNIS Ihre Kombi-Mikrowelle Einleitung Beschreibung Bedientafel 4 5 6 Materialien 7 Vor der ersten Inbetriebnahme 8 Sicherheit Gebrauch Bedienung Uhr einstellen Kochwecker Mikrowellenfunktion Schnellstart Stopp Grillfunktion Kombifunktion Ofenfunktion mit Vorwärmen Ofenfunktion Auftauen nach Gewicht Auftauen nach Zeit Kochen in Phasen Auto-Cook Kindersicherung Kochtipps 9 9 9 10 11 11 12 13 14 14 15 15 16 17 18 Wartung Reinigung 21 Störungen 22 Technische Daten 23 Umweltschutz En
IHRE KOMBI-MIKROWELLE Einleitung Sie haben sich für eine Kombi-Mikrowelle von Etna entschieden. Ein optimaler Anwendungskomfort und eine einfache Bedienung standen bei der Entwicklung dieses Produkts an erster Stelle. Die Kombi-Mikrowelle verbindet die Eigenschaften einer Mikrowelle mit denen eines herkömmlichen Ofens. Die umfangreichen Einstellungsoptionen ermöglichen es Ihnen, genau die Zubereitungsweise zu wählen, die Sie wünschen.
IHRE KOMBI-MIKROWELLE Beschreibung CM125HRVS 1 1. 2. 3. 4. 5. 6. 7. 8. 2 3 Türverriegelung Türe Scheibe Gläserne Drehplattform Gleitring Antrieb Bedientafel Rost 4 5 6 7 8 Die Mikrowelle darf nicht ohne Gleitring und Drehplattform verwendet werden. Die Drehplattform muss mit der Aussparung für den Antrieb nach unten platziert werden.
IHRE KOMBI-MIKROWELLE Bedientafel 1 2 3 4 5 6 7 8 9 10 DE 6 1. Display 2. Mikrowellentaste 3. Kombitaste (Grill, Mikrowelle, Heißluft) 4. Ofentaste (Heißluft) 5. Auftautaste 6. Kochweckertaste/Timertaste 7. Stopptaste/Kindersicherung 8. Starttaste/Schnellstart/Bestätigen 9. Einstelltaste 10.
SICHERHEIT Bitte lesen Sie die gesonderten Sicherheitsvorschriften bevor Sie das Gerät in Betrieb nehmen! Wenn die Sicherheitsanweisungen und Warnungen nicht befolgt werden, kann der Hersteller nicht für den dadurch entstandenen Schaden haftbar gemacht werden. Wenn Sie beschließen, das Gerät aufgrund eines Defekts nicht länger zu verwenden, raten wir Ihnen, die Schnur abzutrennen, nachdem Sie den Stecker aus der Steckdose gezogen haben.
GEBRAUCH Vor der ersten Inbetriebnahme Verwenden Sie vorzugsweise den Herdrost zum Zubereiten von Speisen. Stelllen Sie kalte (Tiefkühl-) Speisen niemals unmittelbar auf den Glasdrehteller. Dieser kann durch Temperaturunterschiede zerspringen! • Öffnen Sie die Tür, entfernen Sie das gesamte Verpackungsmaterial und überprüfen Sie die Mikrowelle auf Beschädigungen. Installieren Sie die Mikrowelle nicht, wenn sie beschädigt ist, sondern wenden Sie sich an Ihren Lieferanten.
BEDIENUNG Uhr einstellen Wenn das Gerät zum ersten Mal an das Stromnetz angeschlossen wird, müssen Sie erst die Uhr einstellen. Auf dem Display erscheint ‘0:00’. Die Uhr läuft solange, wie die Kombi-Mikrowelle an das Stromnetz angeschlossen ist. 1. Drücken Sie zweimal auf die Timertaste. Auf dem Display blinken die Stunden. 2. Drehen Sie den Einstellschalter, um die Stunden einzustellen. Auf dem Display erscheinen die Stunden, die eingestellt sind. 3. Drücken Sie wieder auf die Timertaste.
BEDIENUNG Display P100 Leistung 100 % - 900 W P 80 80 % - 720 W P 50 P 30 50 % - 450 W 30 % - 270 W P 10 10 % - 90 W Gericht - Wasser kochen, aufwärmen - Kochen von Huhn, Fisch und Gemüse - Aufwärmen - Kochen von Pilzen und Schalentieren - Kochen von Gerichten, die Käse und Butter enthalten - Kochen von Reis und Suppe - Auftauen - Schokolade und Butter schmelzen - Auftauen von empfindlichen Gerichten - Auftauen von unregelmäßig geformten Gerichten - Speiseeis aufweichen - Teig aufgehen lassen 1.
BEDIENUNG Stopp Sie können ein laufendes Programm stoppen oder löschen, indem Sie die Tür öffnen oder auf die Stopptaste drücken. Um das Programm wieder zu starten, drücken Sie auf die Starttaste. • Wenn Sie das Programm ganz löschen möchten, drücken Sie nochmals auf die Stopptaste. Auf dem Display erscheint die aktuelle Zeit. Grillfunktion Mit der Grillfunktion können Sie Gerichte erhitzen und mit einer braunen Kruste versehen, ohne Mikrowellen zu verwenden. 1. Drücken Sie einmal auf die Kombitaste.
BEDIENUNG Kombifunktion Es gibt 4 verschiedene Kombifunktionen. In der folgenden Tabelle können Sie sehen, welche Funktionen Sie wählen können und wozu diese verwendet werden. Display Funktion Beschreibung Mikrowelle + Heißluft Verwenden Sie diese Funktion, um schnell Gerichte zu braten. Geeignet für Obstgebäck, Brot und gratinierte Aufläufe (die normalerweise eine lange Zubereitungszeit erfordern).
BEDIENUNG Ofenfunktion mit Vorwärmen Mit dem Ofen können Sie Gerichte auf dieselbe Art zubereiten wie in einem herkömmlichen Ofen. Die Mikrowelle wird hierbei nicht verwendet. Es empfiehlt sich, den Ofen auf die richtige Temperatur vorzuwärmen, bevor Sie das Gericht in den Ofen stellen. 1. Drücken Sie auf die Ofentaste. Auf dem Display blinkt ‘130’. • Drücken Sie nochmals (mehrmals) auf die Ofentaste, wenn Sie eine andere Leistungsstufe einstellen möchten.
BEDIENUNG Ofenfunktion 1. Drücken Sie auf die Ofentaste. Auf dem Display blinkt ‘130’. • Drücken Sie nochmals (mehrmals) auf die Ofentaste, wenn Sie eine andere Leistungsstufe einstellen möchten. Sie können eine Temperatur von 130 °C bis 220 °C einstellen. • Sie können auch mit dem Einstellschalter eine andere Temperatur auswählen, indem Sie den Schalter drehen. 2. Drücken Sie auf die Starttaste. Die ausgewählte Temperatur ist jetzt bestätigt. 3.
BEDIENUNG Verwenden Sie vorzugsweise den Herdrost zum Zubereiten von Speisen. Stelllen Sie kalte (Tiefkühl-) Speisen niemals unmittelbar auf den Glasdrehteller. Dieser kann durch Temperaturunterschiede zerspringen! Auftauen nach Zeit Bei dieser Funktion müssen Sie nur noch die Auftauzeit des Lebensmittels einstellen. 1. Drücken Sie zweimal auf die Auftautaste. Auf dem Display blinkt ‘d-2’. 2. Drehen Sie den Einstellschalter, um die Auftauzeit einzustellen (maximal 95 Minuten).
BEDIENUNG • Drücken Sie nochmals auf die Mikrowellentaste, um 80 % Leistung einzustellen. • Sie können auch mit dem Einstellschalter 80 % Leistung auswählen, indem Sie den Schalter drehen. 4. Drücken Sie auf die Starttaste. Die ausgewählte Leistung ist jetzt bestätigt. 5. Drehen Sie den Einstellschalter, um 7 Minuten einzustellen. Auf dem Display erscheint die eingestellte Zeit. 6. Drücken Sie wieder auf die Starttaste.
BEDIENUNG 1. Drehen Sie den Einstellschalter rechts herum, um ein AutoCook-Programm zu wählen. Im Display erscheint das gewählte Programm. 2. Drücken Sie auf die Starttaste. Das ausgewählte Programm ist jetzt bestätigt. 3. Drehen Sie den Einstellschalter, um das Gewicht einzustellen. Auf dem Display erscheint das eingestellte Gewicht. 4. Drücken Sie wieder auf die Starttaste. Die Mikrowelle schaltet sich ein und die eingestellte Zeit wird auf dem Display abgezählt.
KOCHTIPPS Aufwärmen und kochen • Die Mikrowelle erhitzt immer mit derselben Intensität. Je mehr Sie in die Mikrowelle stellen, desto länger die Kochzeit. • Flache und breite Gerichte sind schneller warm als schmale, hohe Gerichte. • Das Zudecken der Gerichte mit Mikrowellenfolie oder einem passenden Deckel verhindert Spritzen, verkürzt die Garzeit und hilft, den Feuchtigkeitsgrad beizubehalten. Nach Ablauf die Folie oder den Deckel vorsichtig entfernen.
KOCHTIPPS • Beim Auftauen von unregelmäßig geformten Gerichten können Sie dünne Teile nach der Hälfte der Abtauzeit abdecken oder mit Aluminiumfolie umwickeln. Faktoren, die auf den Kochvorgang Einfluss haben • Die Temperatur von Zutaten hat Einfluss auf die Zubereitungszeit. Eine kalte Mahlzeit braucht immer eine längere Kochzeit als eine auf Zimmertemperatur. • Leichte Gerichten garen schneller als schwere und massive Gerichte wie Ofengerichte oder Rouladen.
KOCHTIPPS • Gerichte garen schnell. Kontrollieren Sie sie daher regelmäßig. Holen Sie die Gerichte kurz bevor Sie gar sind, aus der Mikrowelle. • Nachgaren • Lassen Sie Gerichte, nachdem Sie sie aus der Mikrowelle geholt haben, im Allgemeinen 3 bis 10 Minuten zugedeckt stehen. Die Gerichte garen dann nach. Gerichte mit einer trockenen Kruste, wie Kuchen, nicht zudecken.
WARTUNG Reinigung • VERWENDEN SIE KEINE Scheuermittel oder Metallschaber zum Reinigen der Glastür des Ofens. Die Oberfläche erhält dadurch Kratzer, wodurch das Glas zerspringen kann. • VERWENDEN SIE KEINEN Hochdruck- oder Dampfreiniger, um die Mikrowelle zu reinigen. • Reinigen Sie das Innere sofort nach Gebrauch. Verwenden Sie ein feuchtes Tuch, um Kondens- oder übergekochtes Wasser und Speisereste zu entfernen.
STÖRUNGEN Wenn Sie zweifeln, ob Ihr Gerät korrekt funktioniert, bedeutet dies nicht zwangsläufig, dass ein Defekt vorliegt. Kontrollieren Sie in jedem Fall die folgenden Punkte. Wenden Sie sich an den Kundendienst, wenn die unten aufgeführten Hinweise nicht helfen.
TECHNISCHE DATEN Technische Daten Auf dem Typenschild stehen der Gesamtanschlusswert, die erforderliche Spannung und die Frequenz. Dieses Gerät entspricht den CE-Richtlinien. CM125HRVS Anschluss Leistung Mikrowelle Leistung Grill Leistung Ofen Max. Gesamtleistung Inhalt Durchmesser Drehscheibe Gewicht 230V~50Hz 0,9 kW 1,1 kW 2,5 kW 3,6 kW 25 Liter 315 mm 21 kg Stromanschluss Für dieses Gerät ist eine Netzspannung von 230 V, 50 Hz Wechselstrom erforderlich.
TECHNISCHE DATEN Achtung: die Mikrowelle muss an der Vorderseite im Schrank festgeschraubt werden. Schieben Sie die Mikrowelle in den Schrank. Öffnen Sie die Tür der Mikrowelle. An der Vorderseite befindet sich in der Mitte eine runde Öffnung, durch die eine Schraube geführt werden muss. Schrauben Sie die Mikrowelle fest und decken Sie die Schraube mit einer Kappe ab. • Decken Sie die Lüftungsöffnungen nicht ab. • Platzieren Sie die Mikrowelle nicht in der Nähe von Wärmequellen.
UMWELTSCHUTZ Entsorgung des Geräts und der Verpackung Bei der Herstellung des Geräts wurden dauerhafte Materialien verwendet. Am Ende seines Lebenszyklus muss das Gerät auf verantwortliche Weise entsorgt werden. Einschlägige Informationen erhalten Sie bei den zuständigen Behörden. Die Verpackung des Geräts kann dem Recycling zugeführt werden. Folgende Materialien können verwendet worden sein: • Karton; • Polyethylenfolie (PE); • FCKW-freies Polystyrol (PS-Hartschaum).
DE 26
CONTENTS Your combi-microwave Introduction Description Control panel 4 5 6 Materials 7 Prior to first use 8 Safety Use Controls Set the time Kitchen timer Microwave function Quick start Stop Grill function Combi function Oven function with pre-heat Oven function Defrosting according to weight Defrosting according to time Cooking in phases Auto cook Child lock Cooking tips 9 9 9 10 11 11 12 13 14 14 15 15 16 17 18 Maintenance Cleaning 21 Faults 22 Technical data 23 Environmental aspects Disp
YOUR COMBI-MICROWAVE Introduction You have opted to purchase an Etna combi-microwave. Optimum user comfort and easy operation were paramount during the development of this product. The combi-microwave combines the properties of a microwave with those of a traditional oven. The wide range of programming options make it possible to choose your preparation method precisely. However, the controls are still simple, partly because of the automatic cooking and defrosting programmes.
YOUR COMBI-MICROWAVE Description 1 1. 2. 3. 4. 5. 6. 7. 8. 2 3 Door lock Door Window Glass turntable Guiding ring Drive shaft Control panel Rack 4 5 6 7 8 The microwave may not be used without the guiding ring and turntable. The turntable should be fitted with the opening for the drive shaft facing downwards.
YOUR COMBI-MICROWAVE Control panel 1 2 3 4 5 6 7 8 9 10 EN 6 1. Display 2. Microwave button 3. Combination button (grill, microwave, hot air) 4. Oven button (hot air) 5. Defrost button 6. Kitchen timer button/timer button 7. Stop button/Child lock 8. Start button/Quick start/Confirm 9. Setting dial 10.
SAFETY Read the separate safety instructions before using the device! If the safety functions and warnings are not followed, the manufacturer cannot be held responsible for any resulting damage. If you decide not to use the appliance because of a fault, we advise you to cut off the cable after removing the plug from the plug socket. Take the appliance to the municipality's waste disposal site. Materials Not all materials can be used in the microwave.
USE Prior to first use Preferably use the oven grid when preparing meals. Never place cold (frozen) meals directly on the glass turntable. The difference in temperature may cause it to crack! • Open the door, remove the packaging and check the microwave for damage. Don't install the microwave if it is damaged, contact your supplier. • Remove the protective film from the casing. • Clean the oven interior and accessories with a damp cloth. Don't use any abrasive cleaner or strong-smelling cleaning products.
CONTROLS Set the time When the appliance is connected to the network for the first time, you need to set the time. The display reads '0:00'. The clock runs as long as the combi-microwave is connected to the network. 1. Press twice on the timer button. The hours flash in the display. 2. Turn the control dial to set the hours. The set hours appear in the display. 3. Press the timer button again. The minutes flash in the display. 4. Turn the control dial to set the minutes.
CONTROLS Display Power output Food P100 100 % - 900 W - Boiling water, warming up - Cooking chicken, fish and vegetables P 80 80 % - 720 W - Warming up - Cooking mushrooms and seafood - Cooking dishes containing egg and cheese P 50 50 % - 450 W - Cooking rice and soup P 30 30 % - 270 W - Defrosting - Melting chocolate and butter P 10 10 % - 90 W - Defrosting delicate/fragile dishes Defrosting irregularly-formed dishes Making ice-cream softer Allowing dough to rise 1.
CONTROLS Stop You can stop or cancel a running programme by opening the door or pressing the stop button. In order to start the programme again, press the start button. • If you want to cancel the programme entirely, press the stop button again. The current time appears in the display. Grill function You can heat dishes with the grill function and brown them without using the microwaves. 1. Press once on the combi button. 'G-1' flashes in the display.
CONTROLS Combi function There are four different combi functions. In the following table you can see which functions you can select and for what they should be used. Display Function C-1 Microwave + hot air C-2 Microwave + grill C-3 Grill + hot air C-4 Microwave + grill + hot air Description Use this function to bake food quickly. Suitable for fruit cake, bread and gratinated dishes (that normally need a longer preparation time).
CONTROLS Oven function with pre-heat You can prepare dishes in the oven in the same way as in a traditional oven. The microwave is not used. You are advised to pre-heat the oven to the required temperature before placing food in the oven. 1. Press the oven button. '130' flashes in the display. • Press again (a number of times) on the oven button if you wish to set another temperature. You can set a temperature from 130 °C to 220 °C.
CONTROLS Oven function 1. Press the oven button. '130' flashes in the display. • Press again (a number of times) on the oven button if you wish to set another temperature. You can set a temperature from 130 °C to 220 °C. • You can use the control dial to select another temperature by turning the dial. 2. Press the start button. The selected temperature is now confirmed. 3. Turn the control dial to set the time (maximum 95 minutes). The display indicates the set time. 4. Press the start button again.
CONTROLS Defrosting according to time With this function you only need to set the defrost time of the food. 1. Press twice on the defrost button. 'd-2' flashes in the display. 2. Turn the control dial to set the defrost time (maximum 95 minutes). The display indicates the set time. 3. Press the start button. The microwave switches on and the set time counts down in the display. The defrost symbol flashes in the display.
CONTROLS 4. Press the start button. The selected power is now confirmed. 5. Turn the control dial to set 7 minutes. The display indicates the set time. 6. Press the start button again. The microwave switches on and the set time for the first phase counts down in the display. The defrost symbol flashes in the display. • When the set time is reached, the set time of the second phase appears in the display and the microwave symbol flashes.
CONTROLS 1. Turn the control dial to the right to select an auto cook programme. In the display you will see the selected programme. 2. Press the start button. The selected programme is now confirmed. 3. Turn the control dial to set the weight. In the display you will see the set weight. 4. Press the start button again. The microwave switches on and the set time counts down in the display. Various symbols flash in the display.
COOKING TIPS Warming up and cooking • The microwave always heats with the same intensity. The more you place in the microwave, the longer the cooking time. • Flatter dishes heat up more quickly than thin, tall dishes. • Covering dishes with microwave film or a fitting lid prevents spattering, reduces cooking time and helps retain moisture levels. After cooking remove the foil or cover carefully. Please note! The steam released can be extremely hot! • Dishes that dry out quickly can be moistened.
COOKING TIPS Factors that influence the cooking process • The temperature of the ingredients influences the preparation time. A cold meal needs more cooking time than a meal at room temperature. • Lighter dishes cook faster than heavier and solid dishes, such as stews or rolled meats. Take care in preparing light, porous dishes. The edges will quickly become dry and tough. • Smaller dishes are warmed more evenly if you place them in the microwave separate from each other, preferably in a circle.
COOKING TIPS • Freezing • When freezing you should take defrosting in the microwave into account, by not using aluminium foil or trays and by freezing in flat portions. Cooking vegetables • If possible, always use fresh vegetables. If vegetables have become a little limp because they've been left for too long, you can place them in cold water for a while so that they absorb moisture. • Use a large dish to cook vegetables, so that the dish base is covered with a not too thick layer.
MAINTENANCE Cleaning • DON'T USE any abrasive cleaners or metal scrapers to clean the glass door. This will scratch the surface which can break the glass. • DON'T USE high pressure or steam cleaners to clean the microwave. • Clean the interior directly after use. Use a damp cloth to remove condensation, boiled over liquid and food remnants. Remnants of crumbs and moisture absorb microwave energy and increase cooking time.
FAULTS If you are uncertain about whether your appliance is working properly, this does not automatically mean there is a defect. Try to deal with the problem yourself first by checking the points mentioned below: If the recommendations below do not solve your problem, telephone our service department.
TECHNICAL DATA Technical data The data plate indicates the total nominal load, the required voltage and the frequency. This appliance meets all relevant CE guidelines. CM125HRVS Connection Microwave power Grill power output Oven power Maximum total power Capacity Diameter of turntable Weight 230V~50Hz 0.9 kW 1.1 kW 2.5 kW 3.6 kW 25 litres 315 mm 21 kg Electrical connection For this appliance a mains supply of 230V, 50 Hz AC is needed. The appliance has a mains lead with an earthed plug.
TECHNICAL DATA Please note: the microwave needs to be screwed on the front in the cupboard. Slide the microwave into the cupboard. Open the door of the microwave. There is a round opening at the front middle for inserting a screw. Screw the microwave and cover the screw with the cap. • Never cover the ventilation opening. • Do not place the microwave in the vicinity of heat sources. • Send and receive equipment such as radios and TVs can influence the working of the microwave.
ENVIRONMENTAL ASPECTS Disposal of the appliance and packaging Sustainable materials have been used during manufacture of this appliance. This appliance must be disposed of responsibly at the end of its service life. The government can provide you with information about this. The appliance packaging is recyclable. The following may have been used: • cardboard; • polyethylene film (PE); • CFC-free polystyrene (PS hard foam).