GEBRUIKSAANWIJZING Het toestel-identificatieplaatje bevindt zich aan de binnenzijde van het toestel. La plaque d’identification de l’appareil se trouve sur l’intérieur de l’appareil. Das Gerätetypenschild befindet sich an der Innenseite des Gerätes. The appliance identification card is located on the inside of the appliance. MODE D’EMPLOI BEDIENUNGSANLEITUNG Houd, wanneer u contact opneemt met de serviceafdeling, het complete typenummer bij de hand.
NL Handleiding 3 - 27 FR Notice d’utilisation 3 - 27 DE Anleitung 3 - 27 EN Manual Gebruikte pictogrammen - Pictogrammes utilisés Benutzte Piktogramme - Pictograms used Belangrijk om te weten - Important à savoir Wissenswertes - Important information Tip - Conseil - Tipp - Tip 3 - 27
INHOUD Uw combi-magnetron Inleiding Bedieningspaneel Toestelbeschrijving 4 5 6 Vóór het eerste gebruik De klok instellen Magnetron gebruik 7 7 8 Vóór gebruik Bediening Algemeen Magnetronfuncties Ovenfuncties Combimagnetronfuncties Automatische kookprogramma’s Voorverwarmen Kinderslot Pauze 10 13 14 15 16 18 19 19 Opwarmen en koken Ontdooien Factoren die van invloed zijn op het kookproces Basistechnieken Koken van groente Koken van vis 20 20 21 22 23 23 Houd uw toestel mooi 24 Wat moet ik doen als
UW COMBI-MAGNETRON Inleiding Koken in uw nieuwe combi-magnetron is veilig en comfortabel. U zet binnen een handomdraai de lekkerste gerechten op tafel. Het toestel is uiterst simpel te bedienen, mede dankzij de automatische kook- en ontdooiprogramma’s. In deze handleiding vindt u informatie over de installatie, veiligheid, bediening en het onderhoud van uw combi-magnetron.
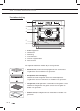
UW COMBI-MAGNETRON Bedieningspaneel 01 02 03 04 05 06 07 08 09 10 11 1. Magnetron functietoets 2. Ontdooitoets 3. Oven functietoets 4. Automenutoets 5. Combi functietoets (magnetron + oven) 6. Snel voorverwarmen toets 7. Kloktoets 8. Selectietoetsen 9. Insteltoets (temperatuur/vermogen/gewicht) 10.Stoptoets (stop/pauze/kinderslot) 11.
UW COMBI-MAGNETRON Toestelbeschrijving 1 2 3 4 2 1 5 6 1. 2. 3. 4. 5. 6. Bedieningspaneel Grillelement Verlichting Inschuifniveau’s Glasruit magnetrondeur Deurscharnier De volgende toebehoren worden bij uw oven geleverd: • Rond rooster; wordt voornamelijk gebruikt voor ovenfuncties. Te gebruiken voor het bakken van gerechten. • Draaiplateau met aandrijving; Gebruik de combi-magnetron alleen met het draaiplateau. Te gebruiken voor het verwarmen en ontdooien van gerechten.
VÓÓR GEBRUIK Vóór het eerste gebruik • Open de deur, verwijder al het verpakkingsmateriaal en controleer de combi-magnetron op beschadigingen. • Gebruik de combi-magnetron niet als deze beschadigd is, maar neem contact op met uw leverancier. • Verwijder de beschermfolie van de ommanteling. • Reinig de ovenruimte en het toebehoren met een vochtige doek. Gebruik geen schuurmiddel of sterk geurende schoonmaakmiddelen.
VÓÓR GEBRUIK Magnetron gebruik Microgolven zijn hoogfrequente elektromagnetische golven. De energie maakt het mogelijk om voedsel te garen of op te warmen zonder de vorm of kleur aan te tasten. De magnetron wordt gebruikt bij: • Magnetronfunctie • Combi-functie Kookprincipe 1. De microgolven die door de magnetron worden gegenereerd, worden gelijkmatig verspreid door middel van een distributiesysteem. Het voedsel wordt zo gelijkmatig gegaard. 2.
VÓÓR GEBRUIK Kookgerei Aluminiumfolie Magnetronbestendig Opmerkingen Kan in kleine hoeveelheden worden gebruikt om te voorkomen dat bepaalde delen van het voedsel te gaar worden. Vonkontlading kan voorkomen als de folie zich te dicht bij de ovenwand bevindt of als er te veel folie wordt gebruikt. Porselein en aardewerk Porselein, aardewerk, geglazuurd aardewerk en ivoorporselein zijn doorgaans geschikt, tenzij ze zijn voorzien van een metalen randje.
GEBRUIK Algemeen Magnetronvermogens In onderstaande tabel ziet u uit welke vijf magnetronvermogens u kunt kiezen en voor welke gerechten de vermogens geschikt zijn. Tijdens gebruik is het mogelijk het vermogen te wijzigen door op de desbetreffende toets te drukken.
GEBRUIK Oven en magnetron standen Raadpleeg onderstaande tabel voor het kiezen van de juiste ovenstand. Lees ook de instructies op de verpakking voor het bereiden van het gerecht. Functie Magnetron Oven Modus Magnetron Hetelucht Grill met ventilator Hetelucht + Onderwarmte Grill Magnetron • Gebruik de magnetronfunctie om groenten, aardappelen, rijst, vis en vlees te koken en op te warmen. Hetelucht • Met de hetelucht oven kunt u gerechten bereiden op dezelfde manier als in een traditionele oven.
GEBRUIK Functie Magnetron + Oven Modus Hetelucht Magnetron + Hetelucht • Gebruik deze functie om snel gerechten te braden. Grill + Ventilator Magnetron + Grill + Ventilator • Gebruik deze combinatie voor kleinere porties vlees, vis en groenten. • Het bereiden gaat snel en het voedsel krijgt een lekker bruin, knapperig korstje. Magnetron + Hetelucht + Onderwarmte • Gebruik deze combinatie voor gerechten die snelle garing nodig hebben en waarvan de bodem extra verwarmd moet worden.
GEBRUIK Magnetronfuncties • Waarschuwing! Verhitting van vloeistoffen in de magnetron kan resulteren in kookpuntvertraging. Dit houdt in dat de vloeistof pas na verwijdering uit de magnetron heftig kan gaan koken met het risico dat u zich brandt. Het effect van kookpuntvertraging kunt u opheffen door een kunststof of glazen lepeltje in de vloeistof te zetten alvorens de vloeistof op te warmen in de magnetron.
GEBRUIK Ovenfuncties 1. Druk op de oven functietoets om de ovenfunctie in te schakelen. Het ‘heteluchtsymbool’ knippert. Tijd en temperatuur verschijnen in de display en het ovenfunctie icoon is zichtbaar. 2. Kies met de selectietoetsen een ovenmodus (zie de tabel op pagina 11). Als het symbool stopt met knipperen, is de gekozen modus actief. 3. U kunt nu bij elke modus (indien gewenst) de tijd en/of de temperatuur wijzigen (bij de grill; stand 1, 2 of 3, waarbij 3 de hoogste stand is).
GEBRUIK Combi-functies 1. Druk op de Combi-functietoets om de combi-magnetronfunctie in te schakelen. Het ‘heteluchtsymbool’ knippert. Tijd en temperatuur verschijnen in de display en het magnetronfunctie icoon en ovenfunctie icoon zijn zichtbaar. 2. Kies met de selectietoetsen een modus (zie de tabel op pagina 12). Als het symbool stopt met knipperen, is de gekozen modus actief. 3.
GEBRUIK Automatische kookprogramma’s Er zijn 13 automatische kookprogramma’s en 2 automatische ontdooiprogramma’s te kiezen. U hoeft alleen maar het programma te kiezen en vervolgens het gewicht in te stellen. In het gekozen programma zijn het vermogen, de tijd en de temperatuur al vastgelegd.
GEBRUIK • Na het voorverwarmen klinkt er een geluidsignaal en knippert het voorverwarmsymbool. • Plaats het gerecht op de glazen bakplaat in de oven op inschuifniveau 1 en druk op de Starttoets. • Bij de programma’s met ** wordt alleen gebruik gemaakt van de magnetronfunctie. 1. Druk op de Automenutoets of de Ontdooitoets. Tijd, gewicht en P01 of d01 verschijnen in de display. 2. Kies met de selectietoetsen een automatisch kookprogramma (zie de tabel op pagina 16).
GEBRUIK Voorverwarmen De voorverwarmfunctie kan ingeschakeld worden vanuit de volgende functie’s: Magnetronfuncties Ovenfuncties Combi-functies Modus Magnetron Hetelucht Grill met Hetelucht Hetelucht + Onderwarmte Grill Magnetron + Hetelucht Voorverwarmen x x x x Magnetron + Grill met x ventilator Magnetron + Onderwarmte x + Hetelucht Magnetron + Grill • De voorverwarmfunctie werkt alleen indien één van bovenstaande functies reeds gekozen is. Tijdens het voorverwarmen werkt de magnetron niet.
GEBRUIK Kinderslot U kunt uw combi-magnetron ‘op slot’ zetten, zodat het ongewenst starten van de combi-magnetron wordt voorkomen. Let op: • Het kinderslot kan alleen ingeschakeld worden als de combimagnetron uitgeschakeld is. De (huidige) tijd is zichtbaar in de display. In werking stellen van het kinderslot: • Druk op de Stoptoets en houd deze ingedrukt totdat er een geluidssignaal klinkt In de display verschijnt een sleutel icoon. Alle bedieningsfuncties zijn buiten werking gesteld.
KOOKTIPS Opwarmen en koken • De combi-magnetron verwarmt altijd met dezelfde intensiteit. Hoe meer u in de combi-magnetron plaatst, des te langer de kooktijd. • Vlakke en platte gerechten zijn sneller warm dan smalle, hoge gerechten. • Gerechten afdekken met combi-magnetronfolie of een passende deksel voorkomt spetteren, verkort de gaartijd en helpt de vochtigheidsgraad te behouden. Na afloop de folie of het deksel voorzichtig verwijderen.
KOOKTIPS • • • Las, bij grote stukken vlees en compacte gerechten, tweemaal een pauze in. Bij het ontdooien van onregelmatig gevormde gerechten kunt u dunne delen na de helft van de ontdooitijd afdekken of omwikkelen met aluminiumfolie. Gebruik bij voorkeur het ovenrooster voor het bereiden van gerechten. Plaats koude (diepvries) gerechten nooit direct op het glazen draaiplateau.
KOOKTIPS Basistechnieken • Plaatsen ▷ Plaats dikkere stukken aan de buitenkant op het draaiplateau. Gerechten die aan de buitenkant op het draaiplateau geplaatst worden ontvangen de meeste microgolven. • Roeren ▷ Door gerechten regelmatig te roeren verspreidt u de opgeslagen warmte. Roer altijd van buiten naar binnen, aangezien de buitenkant van het gerecht altijd het eerste warm wordt. • Omdraaien ▷ Grote, dikke gerechten regelmatig omdraaien. Ze garen dan regelmatiger en sneller.
KOOKTIPS Koken van groente • Gebruik indien mogelijk verse groenten. Als groenten al wat slap zijn geworden doordat ze te lang gelegen hebben kunt u ze een tijdje in koud water leggen, zodat ze zich weer vol kunnen zuigen. • Gebruik voor het koken van groente een ruime schaal, zodat de schaalbodem bedekt wordt met een niet al te dikke laag. • Kook groente bij voorkeur met aanhangend water. • Dek de schaal altijd af met een deksel of combi-magnetronfolie. • Voeg geen zout toe.
ONDERHOUD Houd uw toestel mooi • De ovenruimte van uw apparaat is geëmailleerd. Door onjuist onderhoud kan roest in de ovenruimte ontstaan. Neem de aanwijzingen in de gebruiksaanwijzing voor onderhoud en reiniging in acht. • Zout is erg agressief. Wanneer dit zich in de ovenruimte afzet, kunnen plaatselijk roestplekken ontstaan. • Scherpe sauzen zoals ketchup en mosterd of gezouten gerechten, bijv. pekelvlees, bevatten ingrediënten die het oppervlak kunnen aantasten.
STORINGEN Wat moet ik doen als... Als de kookresultaten niet naar wens zijn, er vonken overspringen in de combi-magnetron, de combi-magnetron niet start etc., probeer dan eerst zelf de oorzaak van de storing te vinden voordat u de servicedienst belt.
TECHNISCHE SPECIFICATIES Op het gegevensplaatje aan de binnenzijde van het toestel worden de totale aansluitwaarde, de vereiste spanning en de frequentie aangegeven. Productspecificaties Afmetingen toestel (bxdxh) 593-595 mm x 550 mm* x 460 mm Inbouwmaten 560 mm x 550 mm x 450 mm Combimagnetron inhoud 44 liter Diameter draaiplateau 360 mm Netvoeding 230 V / 50 Hz Aansluitwaarde 3350 W Combimagnetronvermogen 900 W * Diepte is exclusief 20 mm dikte van het dashboard.
UW OVEN EN HET MILIEU Afvoer van het apparaat en de verpakking Dit product is gemaakt van duurzame materialen. Aan het einde van zijn nuttige leven moet het apparaat echter op een verantwoorde manier worden afgevoerd. De overheid kan u hierover informeren. De verpakking van het apparaat kan worden gerecycled.
NL 28
INDICE Votre four à micro-ondes multicuisson Introduction Panneau de commande Description de l’appareil 4 5 6 Avant la première utilisation Programmation de l’horloge Utilisation micro-ondes 7 7 8 Avant utilisation Opération Général Fonctions du four à micro-ondes Fonctions du four Fonctions du four à micro-ondes multicuisson Programmes de cuisson automatiques Préchauffage Sécurité enfants Pause 10 13 14 15 16 18 19 19 Conseils de cuisson Réchauffer et cuire Décongélation Facteurs qui ont une influen
VOTRE FOUR À MICRO-ONDES MULTICUISSON Introduction Cuisiner avec votre nouveau four à micro-ondes multicuisson est simple et sûr. Vous servirez en un tour de main des plats délicieux. Le four est ultrasimple à utiliser, grâce aux programmes de cuisson et de décongélation automatiques. Vous trouverez dans ce manuel des informations à propos de l’installation, des mesures de sécurité, de l’utilisation et de l’entretien de votre four à micro-ondes.
VOTRE FOUR À MICRO-ONDES MULTICUISSON Panneau de commande 01 02 03 04 05 06 07 08 09 10 11 1. Touche fonction micro-ondes 2. Touche de décongélation 3. Touche fonction four 4. Touche auto-menu 5. Touche fonction combiné (micro-ondes + four) 6. Touche de préchauffage rapide 7. Touche horloge 8. Touches de sélection 9. Touche de réglage (température/puissance/poids) 10.Touche d’arrêt (arrêt/pause/sécurité enfants) 11.
VOTRE FOUR À MICRO-ONDES MULTICUISSON Description de l’appareil 1 2 3 4 2 1 5 6 1. 2. 3. 4. 5. 6. Panneau de commande Elément de grille La lumière Niveau d’étagère La vitre de la porte La charnière Les accessoires suivants sont fournis avec le four : • Grille ronde ; est utilisée principalement pour les fonctions du four. À utiliser pour cuire les plats. • Plateau tournant avec propulsion ; N’utilisez jamais le four à micro-ondes combiné sans le plateau tournant.
AVANT UTILISATION Avant la première utilisation • Ouvrez la porte. Enlevez l’emballage. et vérifiez que le four à microondes n’est pas endommagé. • Utilisation pas le four à micro-ondes s’il est endommagé. Contactez dans ce cas votre fournisseur. • Enlevez le film de protection de l’enceinte du four. • Nettoyez l’enceinte du four et les accessories avec un chiffon humide. N’utilisez pas d’abrasif ou de produits d’entretien dégageant une forte odeur.
AVANT UTILISATION Utilisation « Micro-ondes » Les micro-ondes sont des ondes électromagnétiques à haute fréquence. L’énergie libérée permet de cuire ou de réchauffer des aliments sans qu’ils ne changent de forme ou de couleur. Vous pouvez utiliser votre four à micro-ondes en : • Mode micro-ondes • Mode combiné Principe de cuisson 1. Les micro-ondes générées par le four à micro-ondes sont distribuées uniformément grâce au système de distribution. Les aliments sont ainsi cuits uniformément. 2.
AVANT UTILISATION Adapté Ustensile aux mi- Remarques cro-ondes Peut être utilisé en petite quantité pour empêcher certaines parties d’un plat de trop cuire. Des arcs électriques peuvent se former lorsque le papier aluminium est placé trop près des parois du four ou s’il est utilisé en trop grande quantité. Porcelaine et faïence La porcelaine, la poterie, la faïence émaillée et la porcelaine tendre sont adaptées, si elles ne comportent pas d’ornement métallique.
OPÉRATION Général Puissances pour le four à micro-ondes Dans le tableau ci-dessous, vous pouvez voir quelles sont les 5 puissances micro-ondes que vous pouvez sélectionner et les produits qui sont appropriés pour telle puissance. Lors de l’utilisation, il est possible de modifier la puissance en appuyant sur la touche correspondante.
OPÉRATION Toute la functions Function Micro-ondes Four Microondes Air chaud Gril avec ventilateur Air chaud + Chaleur par le bas Gril Mode Micro-ondes • La fonction micro-ondes permet de cuisiner et de réchauffer des légumes, des pommes de terre, du riz, du poisson et de la viande. Air chaud • Le four à air chaud vous permet de préparer des plats de la même manière que dans un four traditionnel. La fonction micro-ondes n’est alors pas utilisée.
OPÉRATION Function Micro-ondes + Four Air chaud Gril avec ventilateur Air chaud + Chaleur par le bas Gril Auto programmes P01 - P13 Décongélation d01 + d02 Mode Micro-ondes + Air chaud Cette fonction vous permet de faire cuire rapidement des plats. Micro-ondes + Gril + Ventilateur • Cette fonction s’utilise pour toutes les sortes de viandes, la viande en daube, les légumes, les gâteaux, le pain et les gratins (c’est-à-dire les plats nécessitant une durée de cuisson plus longue).
OPÉRATION Fonctions du four à micro-ondes • Avertissement ! Si vous souhaitez faire bouillir un liquide (par exemple, de l’eau), mettez une petite cuiller synthétique dans la tasse. Le liquide peut bouillir sans que vous puissiez voir une formation de bulles. A sa sortie du four, le liquide peut brusquement se mettre à bouillir et gicler, risquant ainsi de vous brûler.
OPÉRATION Fonctions du four 1. Appuyez sur la touche fonction four pour activer la fonction four. Le « symbole air chaud » clignote. L’heure et la température apparaissent sur l’affichage et l’icône de la fonction four est visible. 2. Avec les touches de sélection, sélectionnez un mode de four (veuillez consulter le tableau à la page 11). ALorsque le symbole cesse de clignoter, le mode sélectionné est actif. 3.
OPÉRATION Fonctions du four à micro-ondes multicuisson 1. Appuyez sur la touche fonction combiné pour activer la fonction micro-ondes combiné. Le « symbole air chaud » clignote. L’heure et la température apparaissent sur l’affichage et les icônes de la fonction micro-ondes et de la fonction four sont visibles. 2. Avec les touches de sélection, sélectionnez un mode (veuillez consulter le tableau à la page 12). Lorsque le symbole cesse de clignoter, le mode sélectionné est actif. 3.
OPÉRATION Programmes de cuisson automatiques Vous avez 13 programmes de cuisson automatiques et 2 programmes de décongélation automatiques à choix. Il vous suffit de sélectionner le programme et de programmer ensuite le poids. La puissance, la durée et la température sont déjà réglées dans le programme sélectionné.
OPÉRATION • Après le préchauffage, un signal sonore est émis et le symbole de préchauffage clignote. • Enfournez le plat sur la plaque de cuisson en verre au niveau 1, puis appuyez sur la touche de démarrage. • Les programmes suivis de ** utilisent uniquement la fonction microondes. 1. Appuyez sur la touche auto-menu ou sur la touche de décongélation. La durée, le poids et P01 ou d01 apparaissent sur l’affichage. 2.
OPÉRATION Préchauffage Il est possible d’activer le préchauffage à partir des fonctions suivantes : Fonctions du four à micro-ondes Fonctions du four Fonctions du four à micro-ondes multicuisson Mode Micro-ondes Préchauffage Air chaud Gril avec Air chaud Air chaud + Chaleur par le bas Gril Micro-ondes + Air chaud x x x Micro-ondes + Gril avec ventilateur Micro-ondes + Chaleur par le bas + Air chaud Micro-ondes + Gril x x x • Le préchauffage ne fonctionne que lorsqu’une des fonctions ci-dessus est
OPÉRATION Sécurité enfants Vous pouvez verrouiller votre micro-ondes pour éviter toute mise en service. Attention : • Le dispositif de sécurité enfant ne peut être activé que lorsque le four à micro-ondes est éteint. L’heure s’affiche à l’écran. Mise en service de la sécurité enfants : • Appuyez sur la touche d’arrêt et maintenez-la enfoncée jusqu’au signal sonore. L’écran indique une ‘ serrure ’. Toutes les fonctions de commande sont mises hors service.
CONSEILS DE CUISSON Réchauffer et cuire • ’intensité de chauffage du four à micro-ondes est toujours la même. Le temps de cuisson sera plus long plus la quantité placée dans le micro-ondes est importante. • Les produits plats sont souvent plus vite chauds que les produits petits et hauts. • Couvrez de préférence les produits avec, par exemple, un film à micro-ondes ou un couvercle adéquat. Enlevez prudemment le film ou le couvercle.
CONSEILS DE CUISSON • Insérez deux pauses en cas de grosses pièces de viande et de produits compacts. • En cas de décongélation de produits ayant des formes inégales, couvrez les parties fines après que la moitié du temps de décongélation soit passée. • Utilisez de préférence la grille du four pour préparer des plats. Ne placez jamais de plats froids (congelés) directement sur le plateau tournant en verre.
CONSEILS DE CUISSON Techniques de base • Placement ▷ Placez sur le plateau pivotant les pièces plus grosses vers l’extérieur. Les produits qui se trouvent sur la partie extérieure du plateau pivotant, reçoivent le plus grand nombre de microondes. • Mélanger ▷ En mélangeant régulièrement les produits, vous répartissez la chaleur stockée. Mélangez toujours de l’extérieur vers l’intérieur vu que la partie extérieure est toujours la première à être chaude.
CONSEILS DE CUISSON Cuisson des légumes • Utilisez si possible des légumes frais. Si les légumes sont un peu fanés du fait que vous les avez depuis un certain temps, mettez-les dans l’eau froide pendant quelques instants pour qu’ils reprennent de la vigueur. • Utilisez un grand plat pour la cuisson des légumes. Répartissez les légumes sur ce plat de telle manière que vous n’ayez pas une grosse épaisseur. • Faites cuire les légumes avec un petit d’eau à moins.
ENTRETIEN Entretien de votre appareil • Le compartiment de cuisson de votre appareil est en émail. Un entretien incorrect peut provoquer la corrosion du compartiment de cuisson. Consultez les instructions d’entretien et de nettoyage présentées dans le manuel d’instructions. • Le sel est très abrasif. Si du sel se dépose dans le compartiment de cuisson, de la rouille peut se développer dans divers endroits.
PANNES Que faire si... Si les résultats de cuisson ne vous satisfont pas, si des étincelles se produisent dans le four microondes, si l’appareil ne fonctionne pas, etc., essayez d’abord de chercher les causes de la panne avant d’appeler le service après-vente.
INSTRUCTIONS D’INSTALLATION La valeur totale de raccordement, la tension exigée et la fréquence sont indiquées dans l’intérieur de l’appareil sur la plaque d’identification de l’appareil.
VOTRE FOUR ET L’ENVIRONNEMENT Que faire de l’emballage et de l’appareil usé Des matériaux durables ont été utilisés pour la fabrication de cet appareil. Il doit être mis au rebut de façon appropriée à la fin de son cycle de vie. Les pouvoirs publics peuvent vous fournir des informations à ce sujet. L’emballage de l’appareil est recyclable. Les matériaux suivants ont été utilisés : • carton ; • feuille de polyéthylène (PE) ; • polystyrène exempt de CFC (mousse rigide PS).
FR 28
Inhaltsverzeichnis Ihre Kombimikrowelle Einleitung Bedienfeld Beschreibung 4 5 6 Bevor Sie die Mikrowelle benutzen Bevor Sie die Mikrowelle benutzen Die Uhr einstellen Mikrowellen gebrauch 7 7 8 Bedienung Allgemein Mikrowellefunktionen Ofenfunktionen Kombimikrowellenfunktionen Automatischen Kochprogramme Vorheizen Kindersicherung Pause 10 13 14 15 16 18 19 19 Erwärmen und Garen Auftauen Faktoren, die Einfluß auf den Garvorgang haben Grundtechniken Garen von Gemüse Garen von Fisch 20 20 21 22 23 23 P
IHRE KOMBIMIKROWELLE Einleitung Das Garen in Ihrer neuen Kombimikrowelle ist sicher und komfortabel. Im Handumdrehen bringen Sie die herrlichsten Gerichte auf den Tisch. Das Gerät ist sehr einfach zu bedienen, dank seiner automatischen Gar- und Auftauprogramme. In dieser Anleitung finden Sie Informationen zur Installation, Sicherheit, Bedienung und Wartung Ihrer Kombimikrowelle.
IHRE KOMBIMIKROWELLE Bedienfeld 01 02 03 04 05 06 07 08 09 10 11 1. Mikrowellenfunktionstaste 2. Auftautaste 3. Ofenfunktionstaste 4. Auto-Menütaste 5. Kombifunktionstaste (Mikrowelle + Ofen) 6. Taste für schnelles Vorheizen 7. Uhrtaste 8. Auswahltasten 9. Einstelltaste (Temperatur/Leistung/Gewicht) 10.Stopptaste (Stopp/Pause/Kindersicherung) 11.
IHRE KOMBIMIKROWELLE Beschreibung 1 2 3 4 2 1 5 6 1. 2. 3. 4. 5. 6. Bedienfeld Grill Beleuchtung Ebene Glas Mikrowellentür Scharnier Das folgende Zubehör gehört zum Lieferumfang für Ihren Ofen: • Rundes Rost; wird hauptsächlich für Ofenfunktionen verwendet. Für das Backen von Gerichten. • Drehscheibe mit Antrieb; Verwenden Sie die Kombimikrowelle niemals ohne die Drehscheibe. Für das Erwärmen und Auftauen von Gerichten. • Ofenrost; wird in Kombination mit dem Glasbräter verwendet.
BEVOR SIE DIE MIKROWELLE BENUTZEN Bevor Sie die Mikrowelle benutzen • Öffnen Sie die Tür, entfernen Sie das Verpackungsmaterial und untersuchen Sie die Mikrowelle auf Beschädigungen. • Gebrauchen Sie die Mikrowelle nicht, wenn sie beschädigt ist, sondern wenden Sie sich an Ihren Händler. • Entfernen Sie die Schutzfolie von der Ummantelung. • Reinigen Sie den Garraum und das Zubehör mit einem feuchten Tuch. Keine Scheuermittel oder stark riechende Reinigungsmittel verwenden.
BEVOR SIE DIE MIKROWELLE BENUTZEN Mikrowellen gebrauch Bei Mikrowellen handelt es sich um hochfrequente elektromagnetische Wellen. Die Energie ermöglicht das Garen oder Aufwärmen von Lebensmitteln, ohne dass sie dabei an Form oder Farbe verlieren. Der Mikrowellenherd wird verwendet im: • Mikrowellenmodus • Kombi-Modus Garprinzip 1. Die Verteilung der von dem Mikrowellenherd erzeugten Mikrowellen erfolgt gleichmäßig. Dadurch werden die Lebensmittel entsprechend gleichmäßig gegart. 2.
BEVOR SIE DIE MIKROWELLE BENUTZEN Kochgerät Aluminiumfolie Mikrowellengeeignet Anmerkungen Kann in kleineren Mengen verwendet werden, um zu vermeiden, dass bestimmte Bereiche der Speise zu gar werden. Es kann Lichtbogenbildung entstehen, wenn sich die Folie zu nah an der Ofenwand befindet oder wenn zu viel Folie verwendet wird. Porzellan und Steingut Porzellan, Steingut, glasiertes Steingut und Bone-China sind grundsätzlich geeignet, außer es ist ein Metallrand vorhanden.
BEDIENUNG Allgemein Mikrowellenleistungsstufen In nachstehender Tabelle können Sie sehen, aus welchen 5 Mikrowellenleistungsstufen Sie wählen können und für welche Gerichte die Leistungsstufen geeignet sind. Es ist möglich, während des Betriebs die Leistung zu ändern; drücken Sie dazu auf die jeweilige Taste.
BEDIENUNG Alle Funktionen Funktion Mikrowelle Ofen Modus Mikrowelle Heißluft Grill mit Ventilator Heißluft + Unterhitze Grill Mikrowelle • Verwenden Sie die Mikrowellenfunktion, um Gemüse, Kartoffeln, Reis, Fisch und Fleisch zuzubereiten und aufzuwärmen. Heißluft • Mit dem Heißluftofen können Sie Speisen auf dieselbe Weise zubereiten, wie in einem herkömmlichen Herd. Die Mikrowellenfunktion wird dabei nicht verwendet.
BEDIENUNG Funktion Modus Mikrowelle + Heißluft Ofen Mikrowelle + Heißluft • Verwenden Sie diese Funktion, um Speisen schnell zu braten. Grill mit Ventilator Mikrowelle + Grill + Ventilator Heißluft + Unterhitze Mikrowelle + Heißluft + Unterhitze • Verwenden Sie diese Kombination für Gerichte, die schnell gegart werden müssen, und deren Boden zusätzlich erwärmt werden muss.
BEDIENUNG Mikrowellefunktionen • Warnung! Beim Kochen von Flüssigkeiten (Wasser) kann es vorkommen, daß die Siedetemperatur zwar erreicht ist, die typischen Dampfblasen aber noch nicht aufsteigen. Dieser sogenannte Siedeverzug kann bei Entnahme des Gefäßes (Erschutterung) zu einem plötzlichem Überkochen führen (Verbrennungsgefahr). Um dies zu vermeiden, sollte ein Kunststofflöffel in das Gefäß mit Wasser gegeben werden.
BEDIENUNG Wenn Sie nicht auf die Starttaste drücken, wird die Kombimikrowelle nach 15 Minuten automatisch ausgeschaltet.
BEDIENUNG Ofenfunktionen 1. Drücken Sie auf die Ofenfunktionstaste, um die Ofenfunktion einzuschalten. Das „Heißluft-Symbol“ blinkt. Zeit und Temperatur werden im Display eingeblendet und das Ofenfunktions-Symbol erscheint. 2. Wählen Sie mit den Auswahltasten einen Ofenmodus aus (siehe die Tabelle auf Seite 11). Wenn das Symbol aufhört zu blinken, ist der ausgewählte Modus aktiv. 3.
BEDIENUNG Kombimikrowellenfunktionen 1. Drücken Sie auf die Kombifunktionstaste, um die Kombimikrowellenfunktion einzuschalten. Das „Heißluft-Symbol“ blinkt. Zeit und Temperatur werden im Display eingeblendet und das Mikrowellenfunktions- und Ofenfunktions-Symbol erscheinen. 2. Wählen Sie mit den Auswahltasten einen Modus aus (siehe die Tabelle auf Seite 12). Wenn das Symbol aufhört zu blinken, ist der ausgewählte Modus aktiv. 3.
BEDIENUNG Automatischen Kochprogramme Es gibt 13 automatische Garprogramme und 2 automatische Auftauprogramme. Sie müssen nur noch das Programm auswählen und anschließend das Gewicht einstellen. Im ausgewählten Programm sind die Leistung, Zeit und Temperatur bereits festgelegt. Programm P01** P02** P03* P04* P05* P06* P07* P08** P09** P10** P11* P12* P13* Kategorie Gemüse Beilagen Beilagen Unterkategorie Frische Gemüse Gekochte Kartoffeln (Geschält) Gebacken Kartoffeln Es ertönt ein akustisches Signal.
BEDIENUNG d01 Fleisch, (auftauen)** Hähnchen und Fish d02 Brot, Kuchen (auftauen)** und Obst Es ertönt ein akustisches Signal und die Kombimikrowelle stoppt. Drehen Sie die Speisen um und drücken Sie auf die Starttaste, um das Auftauprogramm fortzusetzen. Achtung! • Bei den automatischen Kochprogrammen wird die Mikrowellenfunktion verwendet. Verwenden Sie keine Gegenstände aus Metall (vgl. S. 9 für eine Übersicht). • Bei den mit einem * gekennzeichneten Programmen wird das Gerät vorgeheizt.
BEDIENUNG wird dann automatisch ausgeschaltet. Wenn Sie nicht auf die Starttaste drücken, wird die Kombimikrowelle nach 15 Minuten automatisch ausgeschaltet.
GARTIPS Erwärmen und Garen • Die Mikrowelle erwärmt die Speisen immer mit derselben Intensität. Je mehr Gargut Sie in die Mikrowelle stellen, desto länger die Garzeit. • Flache Speisen sind schneller warm als schmale, hohe Speisen. • Gerichte vorzugsweise mit Mikrowellenfolie oder einem passenden Deckel zudecken. Nach Ablauf der Garzeit die Folie oder den Deckel vorsichtig entfernen. • Achtung! Der frei werdende Dampf kann sehr heiß sein! • Gerichte, die schnell austrocknen, eventuell anfeuchten.
GARTIPS • Legen Sie bei großen Fleischstücken und kompakten Speisen zweimal eine Pause ein. • Beim Auftauen von unregelmäßig geformten Speisen können Sie die dünnen Teile nach der Hälfte der Auftauzeit zudecken oder mit Alufolie umwickeln. • Verwenden Sie vorzugsweise den Herdrost zum Zubereiten von Speisen. Stelllen Sie kalte (Tiefkühl-) Speisen niemals unmittelbar auf den Glasdrehteller.
GARTIPS Grundtechniken • Einlegen ▷ Legen Sie dickere Stücken auf dem Drehteller nach außen. Speisen, die außen auf dem Drehteller liegen, erhalten die meisten Mikrowellen. • Rühren ▷ Durch regelmäßiges Rühren von Gerichten verbreitet sich die gespeicherte Wärme. Rühren Sie immer von außen nach innen, da die Außenseite des Gerichtes immer zuerst warm wird. • Wenden ▷ Große, dicke Speisen regelmäßig wenden. Sie garen dann regelmäßiger und schneller.
GARTIPS Garen von Gemüse • Verwenden Sie möglichst Frischgemüse. Wenn Gemüse nicht mehr knackig ist, weil es zu lange gelegen hat, können Sie es ein Weilchen in kaltes Wasser legen, so daß es sich wieder vollsaugen kann. • Benutzen Sie zum Garen von Gemüse eine große Schale, so daß der Boden mit einer nicht zu dicken Schicht bedeckt werden kann. • Garen Sie Gemüse mit dem anhängenden Tropfwasser. • Decken Sie die Schale immer mit einem Deckel oder Mikrowellenfolie zu. • Geben Sie kein Salz bei.
PFLEGE Pflege Ihres Gerätes • Der Ofenraum Ihres Geräts besteht aus Emaille. Falsche Wartung kann zu Rost im Ofenraum führen. Folgen Sie den Hinweisen zu Wartung und Reinigung der Gebrauchsanweisung. • Salz ist sehr aggressiv. Wenn sich Salz im Ofenraum absetzt, können örtlich Rostflecken entstehen. • Scharfe Saucen, wie Ketchup oder Senf, oder gesalzene Speisen wie etwa Pökelfkleisch, enthalten Inhaltsstoffen, die die Oberfläche angreifen können. Daher müssen Sie den Ofenraum nach Gebrauch immer reinigen.
STÖRUNGEN Was ist zu tun, wenn... Wenn die Garergebnisse nicht den Wünschen entsprechen, im Gerät Funken überspringen, das Gerät nicht startet usw., versuchen Sie dann erst selbst die Störungsursache zu finden, bevor Sie den Kundendienst anrufen.
INSTALLATIONSANWEISUNG Auf der Datenplakette an der Innenseite des Geräts finden Sie den Anschlusswert, die erforderliche Spannung und die Frequenz. Produktspezifikationen Maße Gerät (BxTxH) 593-595 mm x 550 mm* x 460 mm Maße für Einbauen 560 mm x 550 mm x 450 mm Mikrowellenvolumen 44 liter Durchmesser Drehscheibe 360 mm Netzspannung 230 V / 50 Hz Anschlußwert 3350 W Mikrowelleleistung 900 W * Die Tiefe schließt nicht die Dicke des Dashboards (20 mm) ein.
IHR OFEN UND DIE UMWELT Entsorgung des Geräts und der Verpackung Das Produkt wurde aus nachhaltigen Materialien hergestellt. Am Ende seiner Nutzungsdauer muss das Gerät allerdings auf eine verantwortliche Weise entsorgt werden. Die entsprechenden Behörden können Sie darüber informieren. Die Verpackung des Geräts kann recycelt werden.
DE 28
CONTENTS Your combi microwave oven Introduction Control panel Appliance description 4 5 6 Before you begin Setting the clock Microwave use 7 7 8 Before use Operation General Microwave functions Oven functions Combi microwave functions Automatic cooking programs Preheating Childlock Pause 10 13 14 15 16 18 19 19 Heating and cooking Defrosting Factors that affect the cooking process Basic techniques Cooking vegetables Cooking fish 20 20 21 22 23 23 Keeping your appliance neat 24 What to do if...
YOUR COMBI MICROWAVE OVEN Introduction Cooking with your new microwave oven is safe and relaxing. You can have the tastiest dishes on the table in no time at all. The appliance is extremely easy to use, partly thanks to the automatic cooking and defrosting programmes. You will find information about the installation, safety, operation and maintenance of your appliance in this instruction manual.
YOUR COMBI MICROWAVE OVEN Control panel 01 02 03 04 05 06 07 08 09 10 11 1. Microwave function button 2. Defrost button 3. Oven function button 4. Auto menu button 5. Combi-function button (microwave + oven) 6. Quick preheat button 7. Clock button 8. Selection buttons 9. Settings button (temperature/power/weight) 10.Stop button (stop/pause/child lock) 11.
YOUR COMBI MICROWAVE OVEN Appliance description 1 2 3 4 2 1 5 6 1. 2. 3. 4. 5. 6. Control panel Grill element Light Level Door glass Hinge The following accessories are provided with your oven: • Round wire rack; is mainly used for oven functions. To be used for baking dishes. • Turntable with shaft; Never use the combi-microwave without the turntable. To be used for heating up and defrosting dishes. • Oven Rack; is used in combination with the glass dish.
BEFORE USE Before you begin • Open the door and remove the packaging material. • Do not use the microwave oven when it is damaged, but contact the manufacturer. • Remove the protection foil from the outside of the microwave oven. • Clean the inside of the oven and the accessories with a damp cloth. Do not use abrasive cleaners or any strongly smelling detergents. • Place the turntable in the middle of the microwave oven with the indentation for the driving mechanism downwards.
BEFORE USE Microwave use Microwaves are high-frequency electromagnetic waves; the energy released enables food to be cooked or reheated without changing either the form or the colour. Microwave is used in: • Microwave mode • Combi-function Cooking Principle 1. The microwaves generated by the microwave are distributed uniformly, using a rotating distribution system to ensure that the food is cooked evenly. The food is thus cooked evenly. 2.
BEFORE USE Cookware MicrowaveSafe Aluminium Foil Comments Can be used in small quantities to protect areas against overcooking. Arcing can occur if the foil is too close to the oven wall or if too much foil is used. China and Earthenware Porcelain, pottery, earthenware and bone china are usually suitable, unless decorated with a metal trim. Disposable Polyester Cardboard Dishes Some frozen foods are packaged in these dishes. Can be used to warm food.
OPERATION General Microwave power levels You can see from the table below from which five power levels you can choose and for which foods the power levels are suitable. During use it is possible to change the power by pressing the power/weight button.
OPERATION All functions Function Microwave Oven Microwave + Oven Mode Microwave • Use the microwave function to cook and reheat vegetables, potatoes, rice, fish and meat. Hot air Hot air • With hot air you can prepare meals in the same way as you do with a conventinal oven. The microwave is not activated. You are advised to preheat the oven before putting the meal in the oven. Grill with Fan Grill with Fan • Use this function to roast meals evenly and at the same time give the meal a brown crust.
OPERATION Function Autoprograms P01 - P13 Defrost d01 + d02 Mode Automatic cooking programs • Automatic cooking programmes can be used for roasting all kinds of meat. • You can choose from 13 Auto programmes. • Select the programme and the weight of the dish. Defrost • You can choose from 2 defrost programmes. • Select the programme and the weight of the dish. Note See page 20, 21, 22 and 23 for cooking tips and information about food.
OPERATION Microwave functions • Warning! Microwave heating of liquids (such as water) can result in delayed eruptive boiling. This means that liquid starts boiling without you seeing any movement. Once removed from the oven, the liquid can start to boil rapidly and spatter out of the cup with the risk of injury. The effect of eruptive boiling can be eliminated by placing a plastic / glass spoon in the fluid before cooking it in the microwave oven.
OPERATION Oven functions 1. Press the oven function button to activate the oven function. The ‘hot air’ indicator flashes. Time and temperature appear in the display and the oven function icon is visible. 2. Use the selection buttons to select an oven mode (see table on page 11). The selected mode is active when the symbol stops flashing. 3. You can change the time and/or temperature of each mode (if desired) (for the grill; setting 1, 2 or 3, with 3 being the highest setting).
OPERATION Combi microwave functions 1. Press the Combi function button to activate the combi-microwave function. The ‘hot air’ indicator flashes. Time and temperature appear in the display and the microwave function and oven function icons are visible. 2. Use the selection buttons to select a mode (see table on page 12). The selected mode is active when the symbol stops flashing. 3.
OPERATION Automatic cooking programs You can choose from 13 automatic cooking programmes and 2 automatic defrost programmes. All you have to do is select the programme and then set the correct weight. The power, time and temperature are already set in the selected programme.
OPERATION • After preheating, you will hear an alarm and the preheating symbol will blink. • Put the dish on the glass baking tray, and insert it in the oven on level 1. Press the start button. • The programmes with ** only use the microwave function. 1. Press the Auto menu or Defrost button. Time, weight and P01 or d01 appear in the display. 2. Use the selection buttons to select an automatic cooking programme (see table on page 16). The selected programme is active when the symbol stops flashing. 3.
OPERATION Preheating The preheating function can be activated after you have chosen one of the following functions: Microwave functions Oven functions Combi microwave functions Mode Microwave Hot air Grill with Hot air Hot air + Bottom heat Grill Microwave + Hot air Microwave + Grill with fan Microwave + Bottom heat + Hot air Microwave + Grill Preheating x x x x x x • The preheating function only works if you have already chosen one of the modes above.
OPERATION Childlock You can ‘lock’ your combi microwave oven, to prefend a cooking process from starting. Attention: • You can only activate the childlock if the combi microwave oven is switched off. The (current) time appears in the display. Activating the childlock: • Press and hold the Stop button until an audio prompt is heard. In the display a key icon appears. You cannot operate the combi microwave oven. Deactivating the childlock: • Press and hold the Stop button until an audio prompt is heard.
COOKING TIPS Heating and cooking • The microwave oven always heats with the same intensity. The more you put in the microwave oven, the longer the cooking time. • Wide, flat dishes become hot more quickly than narrow, tall dishes. • Covering dishes with cling film or a suitable lid prevents spattering, shortens cooking time and helps maintaining humidity of the dish. • Caution! Remove the cling film or lid carefully afterwards.
COOKING TIPS • For large pieces of meat and dense food, introduce a couple of breaks into the defrosting process. • When defrosting irregularly shaped food, halfway through the defrosting time you can cover or wrap the thin parts with aluminium foil. • Preferably use the oven grid when preparing meals. Never place cold (frozen) meals directly on the glass turntable.
COOKING TIPS Basic techniques • Arranging food ▷ Place thicker pieces on the edge on the turntable. Foods placed on the edge of the turntable receive the most microwaves. • Stirring ▷ By stirring dishes regularly you distribute the heat stored in them. Always stir from outside to inside, since the outside of the dish always becomes hot first. • Turning ▷ Turn large, thick foods frequently. They then cook more evenly and quickly.
COOKING TIPS Cooking vegetables • Use fresh vegetables if possible. If the vegetables have become limp because they have been kept for too long, you can refresh them by soaking them in cold water for a little while. • Use a large dish to cook vegetables, so the bottom of the dish is not covered by too thick a layer. • Preferably cook vegetables with the water that clings to them. • Always cover the dish with a lid or microwave cling film. • Do not add salt.
MAINTENANCE Keeping your appliance neat • The cooking compartment in your appliance is made of enamel. Improper care can lead to corrosion in the cooking compartment. Refer to the care and cleaning instructions in the instruction manual. • Salts are very abrasive. If salt is deposited in the cooking compartment, rust could develop in places. • Acidic sauces, such as ketchup and mustard, or salted foods, e.g. cured roasts, contain chloride and acids. These affect the stainless steel surface.
FAULTS What to do if... If the microwave oven does not cook as well as it should do, if there is sparking inside it, or if it does not start, etc., first try to find the reason for the problem yourself before calling the service department.
INSTALLATION INSTRUCTIONS On the label on the inside of this equipment, you will find the total wattage, the required voltage and the frequency. Product specifications External dimensions (wxdxh) 593-595 mm x 550 mm* x 460 mm Building in dimensions 560 mm x 550 mm x 450 mm Oven capacity 44 liter Turntable diameter 360 mm Rated voltage 230 V / 50 Hz Rated input power 3350 W Rated output power 900 W * Depth excluding the 20 mm depth of the dashboard.
YOUR OVEN AND THE ENVIRONMENT Disposing of the appliance and the packaging This product is made from sustainable materials. However, it must be disposed of in a responsible manner at the end of its useful life. The government can provide you with information about this. The packaging of the appliance can be recycled.
EN 28