FilmScan35 I User Manual
Version 2.
Index I. Unpack FilmScan35I ………...……………………………….. 1 II. Install Film into Holder ………………………………………. 2 III. Connect FilmScan35I …………..…………………………… 6 IV. Install Bundled Application …………….….………………….. 7 V. Use FilmScan35I ……………………..……………………… 11 VI. Introduce User Interface ……………………………………... 15 VII. Specifications …..……………………………………………… 22 Appendix.
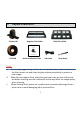
I. Unpack FilmScan35 I FilmScan35I CD ROM Negative Film Holder Quick Installation Guide Slide Film Holder USB cable Clean brush NOTE We strongly suggest using a clean, dry, non alcohol cotton swab to insert into the film scanner slot and clean the glass surface periodically to produce a clear image. Make Sure all negative films, slide films and cover trays are free of dust and dirt before inserting into the FilmScan35I as this may affect the image quality when scanning.
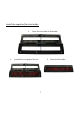
II. Install film into holder Install the slide into holder: 1. Open the slide holder as illustrated 2. Put slide into positive slide slot 3.
Install the negative film into holder: 1. Open the film holder as illustrated 2. Install film into negative film slot 3.
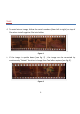
NOTE To avoid mirror image, follow the serial numbers (from left to right) on top of film when install negative film into holder. Figure 1 If the image is upside down [see fig. 2] , the image can be corrected by continuously “Rotate” function in Image Scan Tool after capture [see fig. 3].
Figure 3 5
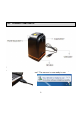
III. Connect FilmScan35I Plug in USB cable to computer without installing any necessary driver. When the status icon on the left button corner shows information “Your device is ready to use”. The scanner is now ready to use.
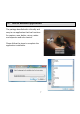
IV. Install bundled application The package bundled with a friendly and easy to use application that has functions for capture, save, delete, mirror, rotate and exposure and color control. Please follow the steps to complete the application installation.
8
9
10
V. Use FilmScan35I 1. Put Film into film holder 2. Insert the holder into FilmScan35I 3.
4. On Desktop double click on “Launch Image Scan Tool” icon 5.
6. Press “Copy” hard button to capture the image to store in thumbnail. 7. Click on function of mirror, rotate, color and brightness control to make image to prefer state.
8. Press Save to store captured images to hard disk. The images stored in thumbnail bar is cleared after save. 9. Retrieve saved images from the hard disk to further review and edit.
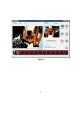
VI. Introduce user interface First step is always to select the correct Film Type.
User can either click on “Snapshot” icon or press the hard key “Copy” touch button to capture images. Captured images will be first stored in the thumbnail bar. Total of 12 thumbnail images are able to store in the bar. The image control, mirror, rotate, color and brightness in Image Scan Tool is preview instantly in Snap Shot window.