WL11000 Wireless LAN PCMCIA Adapter USER MANUAL Version 0.9.
Federal Communications Commission Statement This device complies with FCC Rules Part 15. Operation is subject to the following two conditions: This device may not cause harmful interference. This device must accept any interference received, including interference that may cause undesired operation. This equipment has been tested and found to comply with the limits for a Class B digital device, pursuant to Part 15 of the FCC Rules.
Contents Chapter 1 About the WL11000 PCMCIA Card ........................................................... 4 1-1 Features .............................................................................................................................................. 4 1-2 Applications ......................................................................................................................................... 4 1-3 Product Kit ......................................................................
Chapter 1 About the WL11000 PCMCIA Card The WL11000 IEEE 802.11 PCMCIA PC Card is compatible with any standard, notebook computer Type II or Type III PCMCIA slot. As a Plug-and-Play device, Windows 95/98 will automatically recognize the WL11000 PCMCIA card and initiate the installation process. Upon successful installation, the WL11000 PCMCIA card will communicate seamlessly with other WL11000 wireless home and office networking products. 1-1 FEATURES 1.
! Trade shows, exhibitions and construction sites that employ temporary networks. Retailers, airline and shipping companies that need additional workstations for a peak period and Auditors that require workgroups at customer sites. ! Access to database for mobile workers ! Medical, Technical and Retail specialists that require roaming access to a database or other network resources.
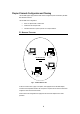
Chapter 2 Network Configuration and Planning The WL11000 supports legacy Ethernet LAN network configuration options as defined by the IEEE 802 standards committee. The WL11000 can be configured as: ! Ad-Hoc for departmental or SOHO LANs ! Infrastructure for enterprise LANs ! LAN-Interconnection for point-to-point link as a campus backbone 2-1 NETWORK TOPOLOGY Ad-Hoc Wireless LAN Fig.
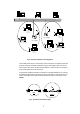
Fig. 2 - Infrastructure Wireless LAN Configuration The WL11000 provides access to a wired LAN for wireless workstations. An integrated wireless and wired LAN is called an Infrastructure configuration. A group of WL11000 PC users and an Access Point compose a Basic Service Set (BSS).
The use of a unique ID in a BSS is essential. All WL11000 equipped PCs configured without roaming options in an independent BSS must be configured with a BSS ID corresponding to the WL11000SA used in the BSS. Check your WL11000SA for its BSS ID or use the Access Point Browser Utility program to determine the BSS ID. The Infrastructure Wireless LAN configuration is appropriate for enterprise-scale wireless access to a central database, or as a wireless application for mobile users.
Chapter 3 Adapter Installation and Configuration – Windows® 98 3-1 SYSTEM REQUIREMENTS In order to install and use the WL11000 PCMCIA card your PC system must meet the following requirements: ! A PCMCIA Type II or Type III slot ! PCMCIA revision 2.
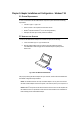
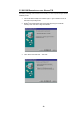
3-3 WL11000 DRIVER INSTALLATION -WINDOWS® 98 Note: Before proceeding, have the Windows® 98 CD ready, as it will be required during the software installation process. 1. Insert the WL11000 A adapter into a standard Type II or Type III PCMCIA card slot, as described in the preceding section. 2. Windows® 98 will automatically detect the WL11000 and prompt you to install the necessary driver. Click “Next” to begin the installation. 3. Check “Search for the best driver…” click “Next”.
4. Check “Floppy-disk drives” click “Browse”. Double-click the “Setup” folder icon from the list, double-click the setup.exe icon. Windows® will automatically enter the path click “Next”. 5. Windows® will then acknowledge that it has found the appropriate driver, click "Next" Windows® will now install the driver As the driver files are being copied to the appropriate location, you will be prompted to insert the Windows® 98 CD.
6. Insert the Windows® 98 CD. Select “D:\win98” from the drop down list (where “D” represents the CD-ROM drive), click “OK” NOTE: You must insert the Windows 98®CD as the driver installation requires special files that will not be available even if you have stored a copy of Windows® 98 on your hard drive. 7. After Windows® has finished installing the appropriate files click “Finish” 8. You will be prompted to restart your computer, click "YES" to complete the installation.
3-4 ADAPTER CONFIGURATION – WINDOWS® 98 After successful installation of the WL11000 and its driver, continue the installation process by configuring the WL11000 adapter properties. To configure the WL11000 Adapter complete the following steps : 1. From the Control Panel, double-click the “Network” icon 2. Select "PRISM2IEEE 802.11 PC Card Adapter" from the list and press the “Properties” button.
3. From the “Properties” menu select the “Advanced” tab. 4. Select “Channel” from the list, and choose a “Value” from the drop down list. FCC regulations require a “Value” between 1 and 11.
5. Select “Network Type”, and choose “Infrastructure” or “Ad-Hoc” as the “Value”. Note: “Infrastructure” mode allows a wireless adapter to communicate with a wired network, while “Ad-Hoc” mode allows wireless-to-wireless communication. Consult your System Administrator for information about your network communication type. For more information about Infrastructure and Ad-Hoc networks, see Chapter 2 of this manual 6. Select “Power Save Mode” and choose a “Value”.
7. Select “Power Save Mode” and choose a “Value”. NOTE: To allow uninterrupted data communication, choose “Disabled” as the “Value”. Choosing “Enabled” allows your notebook to enter “sleep” mode, however, this will interrupt data communication. Consult your System Administrator to find out the best setting for your network type. For more information about Power Save Mode, see the chapter entitled “PRISM Configuration Utility” in this manual. 8. Select “SSID”; enter a “Value” of “PRISM2”.
9. Select “Transmit Rate”, and choose a “Value”. NOTE: Fixed 11 Mb/s is the preferred “Value” for environments where the client has line of sight access and is a short distance away from the AP. Fully Auto is the recommended setting for clients that are farther away from the AP and where there may be interference between the client and the AP. 10. Select “Use Wep”, and choose a “Value”. NOTE: Wired Equivalent Privacy (Wep) is an encryption scheme used to protect wireless data communication.
11. After the configuring the “Properties”, click “OK” and continue with the Protocol Installation, described in the following section.
3-5 PROTOCOL INSTALLATION – WINDOWS® 98 Before continuing with the Protocol installation consult your System Administrator for details about your specific network. To install network protocols complete the following steps. 1. From the “Control Panel” double-click the “Network” icon. 2. Select “PRISM2 IEEE 902.11 PC Card Adapter” and click “Add”. 3.
4. Select “Microsoft” from the list of “Manufacturers” and “TCP-IP” from the list of “Network Protocols”, click “OK” 5. Select “TCP/IP “ and click “Properties”. Repeat step 2 – 5 to install other protocols such as NetBeui or IPX/SPX. NOTE: The following steps apply to DHCP servers. Consult your system administrator for specific information regarding your server type, and for help in specifying an IP address if you do not use a DHCP server and must manually enter the IP address and DNS number.
6. Check “Obtain an IP address…” and click “OK”. If you are using a DHCP server the IP address will be entered automatically. 7. From the Network menu highlight “Client from Microsoft Networks”, and click" File and Print Sharing”.
8. Check both boxes and click “OK”. 9.
10. Enter a “Computer name”, “Workgroup” and “Computer Description”, click “OK” 11. You will be prompted to restart your computer, click “Yes” to complete the installation. Note: Please see the trouble shooting if you encounter some problem while installing the PCCard card or your PC-Card is non-functional.
3-6 WL11000 SETUP FOR WINDOWS NT 4.0 Login as Administrator 1. From the desktop, select “Control Panel”, double-click “Network”, click “Adapters”, click “Add” 2. Click “Have Disk” 3. Insert the WL11000 disk; Windows NT will manually enter the path to the driver click “OK”.
4. Select your adapter from the list click “OK”. 5. Click “Close” from the “Network” dialog, Windows NT will auto-bind the new adapter with any network protocols already installed on the system.
6. After the auto-binding procedure is complete, select “Properties” from the “Network” dialog. At this point you may choose to manually specify an IP address, or automatically obtain an IP address if you are using a DHCP server. Consult your Systems Administrator for information about your server type, IP address settings and DNS number. 7. After the settings configuration is complete, confirm that the “Computer Name” and “Workgroup” designations are correct, and click “OK”.
8. You will be prompted to restart your computer, click yes to complete the installation 9. Upon restart, open the “Devices” menu from the “Control Panel”, to confirm that the driver installation was successful. Your adapters driver should now be listed in the “Devices” menu.
Chapter 4 Installing & Navigating the PRISM Configuration Utility 4-1 PRISM CONFIGURATION UTILITY - INSTALLATION 1. Insert the PRISM Network Configuration Utility disk into an available floppy disk drive. From the "Run" window type "A:\WL1100\WLU\setup.exe" (where "A" represents a floppy disk drive). 2. Click “Yes” to accept the License Agreement and continue with the installation. 3. Click “Next”.
4. Enter the System ID click “Next”. 5. Choose the Network Mode, click “Next” 6. Browse to install the utility in another folder, or confirm the installation and click “Next”.
7. You will be prompted to insert Disk 2. Insert the disk and click “Browse”. Double-click the “Setup” folder; double-click again on the “setup” icon. When the path has been automatically entered in the “Setup Needs The Next Disk” dialog, click “OK”. 8. After installation is complete, you will be prompted to restart your computer. Check “Yes” and click “Finish” to complete the installation and begin navigating the PRISM Configuration Utility.
4-2 PRISM CONFIGURATION UTILITY- NAVIGATION The following section describes and defines the various functions of the PRISM Network Configuration Utility. This utility provides quick access to all adapter settings. PRISM Quick-Launch Icon: After installation is complete, a PRISM utility icon will appear in the “Quick-Launch” menu in the lower right hand corner of the screen, near the clock.
Link Info: The Link Info menu provides information about the current link between the adapter and the base station. Configuration: Selecting this tab opens the “Configuration” menu. Here you will find options for configuring your adapter. Description of Settings Following is an explanation of each adapter setting presented by the “Configuration” menu. Mode: The Mode setting determines the architecture of your wireless LAN. Choose Ad-Hoc or Infrastructure Mode depending on your network type.
! Infrastructure: This mode allows a wireless LAN to be integrated into an existing wired network through an AP. Infrastructure type networks also permit roaming between Access Points while maintaining connection to all network resources. Infrastructure mode provides additional features, such as WEP security, power saving and extended range. SSID: An acronym for Service Set Identifier, SSID is the unique name shared among all clients and Access Points in a wireless network.
Regulatory Channel Frequency Channel Frequency FCC Canada ETSI France Spain Japan (MHZ) 1 2412 2 2417 3 2422 4 2427 5 2432 6 2437 7 2442 8 2447 9 2452 10 2457 11 2462 12 2467 13 2472 14 2484 Encryption: Selecting the Encryption tab allows you to create new WEP keys.
1. Type the exact same case sensitive text in the Passphrase entry field for each client. 2. Click, “Generate” to create the encryption keys. The Passphrase generates four (4) unique keys. 3. Select the same Default Key in the drop-down box for each client. This is the key the clients will use to encrypt data. 4. You must click “Write” to store the information in the registry. 5. Select the “Configuration” tab and enable WEP by choosing “Mandatory”. 6. Click “Apply Changes”. 7.
Appendix A Troubleshooting Problem Solving My computer does not recognize the WL11000. Probable Solution: ! The WL11000 is not properly inserted into the PCMCIA slot. ! Ensure that the WL11000 has been inserted into an available PCMCIA slot. The WL11000 does not work properly. Probable Solution: ! Insert the PCMCIA adapter into Notebook’s slot again. A beep should be heard if the adapter is properly inserted. ! Check the I/O cable that connects the RF module and the PCMCIA adapter.
PCMCIA card and then on PCMCIA Card service, you can see the status of PCMCIA card. If there are yellow sign either on adapter or PCMCIA card, please check followings. ! 2-1) Check if your Notebook supports 3.3V card. ! 2-2)Check if your Notebook has a free IRQ ! 2-3) Check that you have inserted the right card and have installed the proper driver. If the WL11000 does not function after attempting the above steps, remove the PCMCIA adapter, and do the following: ! From the run window enter, c:\windo
Appendix B Glossary Access Point - An internetworking device that seamlessly connects wired and wireless networks together. Ad-Hoc - An Ad-Hoc wireless LAN is a group of computers each with wireless adapters, connected as an independent wireless LAN. Backbone - The core infrastructure of a network, the portion of the network that transports information from one central location to another central location. The information is then off-loaded onto a local system.
Product Specifications for WL 11000 : Radio: Complies with IEEE 802.11 Frequency Band: 2400 ~ 2483.5MHz ( for US, Canada, and ETSI 2400 ~ 2497MHz (for Japan) Modulation TYPE: CCK,BPSK,QPSK Operating Channels: IEEE 802.11 compliant 11 channels (US, Canada) 13 channels (ETSI) 14 channels (Japan) Radio Technology: Direct Sequence Spread Spectrum Data Rate: 1 / 2 / 5.5 / 11 Mbps Output Power: > +13dBm Receive sensitivity: Min. -76dBm for 11Mbps; Min. -80dBm for 5.