PILOT COMPUTER OS DRIVE SCSI PC RESET Pilot Computer Manual Version 2.00 Part# 840-06265-02 rev B Publish date: August 1999 Euphonix Inc. 220 Portage Avenue Palo Alto , CA 94306 Tel: (650)855-0400 Fax: (650) 855-0410 Web Page: www.euphonix.com In the interest of continued product development, Euphonix reserves the right to make improvements in this manual and the product it describes at any time, without notice or obligation. R-1, Audio Deck, Studio Hub are trademarks of Euphonix Inc.
This page intentionally left blank ©1999 Euphonix, Inc.
TABLE OF CONTENTS TABLE OF CONTENTS ................................................................................. 3 Overview ..................................................................................................................... 4 Purpose ................................................................................................................................................ 4 Features...................................................................................................
Overview Purpose The R-1 Pilot Computer is the control and display center of the R-1 recording system. The user input from the computer keyboard, pointer device (trackball or mouse), and R-1 Remote control are all processed by the Pilot. The Pilot then acts as the data manager for the state of the R-1 machine, responding to input with display at the R-1 Remote control and in the Graphical User Interface (GUI). In standard operating modes, NO AUDIO PASSES THROUGH THE PILOT computer.
Applications The R-1 Pilot is NOT PROVIDED AS A GENERAL COMPUTER TOOL. Do not run third party software on the Pilot (unless specified or included by Euphonix), as Euphonix cannot guarantee correct and reliable operation of the R-1 under such circumstances. ©1999 Euphonix, Inc.
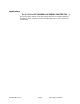
Physical Specifications Front Panel PILOT COMPUTER OS DRIVE SCSI PC RESET 252 Dimensions Height: Width: Depth: Weight: 3.5 inches 19 inches 18 inches 25 lbs Front Panel Features 3.5” Floppy Drive For upgrading system software, back up of Title files, or other system housekeeping duties. 24X CD ROM Drive For upgrading system software. OS Drive LED Indicates the Operating System (DOS) drive is active. SCSI LED Indicates Pilot SCSI network is active. This is currently not implemented.
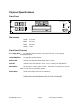
Rear Panel Remote IEEE 1394 Connect one to Hub Parallel Port NOT USED Video Monitor Attach TFT TFT REMOTE SCSI SCSI – port may be used with proper set-up Trackball & Keyboard Y-connector MOUSE KBD USB NTWK 1 NTWK 2 USB Ports NOT USED Primary Network Port Network Port NOT USED Video Connector (15 Pin D sub) The video monitor (TFT) is connected here. This video cable either be a long run (10 meters) from the Remote stand or a short run from an extender box.
Technical Specifications Performance Specifications Pentium III, 933 MHz, 256 MB RAM, 10 GB HD storage 3D/2D accelerated graphics at 1024 X 768 pixels with 16-bit color Peak Program Metering per IEC 268-10A 400 Mbit IEEE 1394 interface Ultra wide SCSI controller 10Base-T/100Base-T Ethernet network controller USB 1.
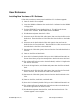
User Reference Installing New Versions of R-1 Software Follow this procedure to ensure proper installation of R-1 software upgrades: 1) Power on the R-1 Pilot computer. 2) Insert the CD ROM or diskettes that contain the R-1 software into the CD ROM or floppy drive. 3) Find the SETUP.EXE file and double click on it. This will install the new version of R-1 software. DO NOT START THE R-1 SOFTWARE 4) Exit Windows and power down the R-1 Pilot.
Network Configuration The Pilot computer Windows operating software has been made network ready by the installation of the following: 1) Client for Microsoft Networks 2) Built-in Fast Ethernet Adapter 3) TCP/IP Still it essential that if you are configuring your R-1 for use on a network, your facility’s network and systems administrator must ensure that: 1) The physical network is built properly 2) Servers and other nodes on the network are configured correctly 3) Window98 networking features on the R-1 are
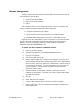
Monitor Fine Tune Here is a method of fine tuning the Hitachi TFT monitor that is part of the R-1 system. This procedure will assure that you are getting the best performance that this monitor can provide. There is a floppy diskette labeled ’Utility Disk for Windows’ that shipped with the Hitachi monitor in the bag with the monitor manual. This diskette contains a test pattern file the monitor can use to automatically optimize its settings.
Pilot boot up takes about 40 seconds. Near the end of the boot up you will see a dialog box that asks you for a network password. If you are connected to a network, enter your password now and click OK. If you are not on a network, press ESC on the keyboard. The software will finish booting. Once the Pilot has been powered on, its boot up procedure should not be interrupted.
Resetting 1394 Drivers: The 1394 Drivers may need to be reset if your R 1 is having difficulty operating properly after a crash where a 1394 error dialog was shown on the screen, or if the Pilot continues to crash every time you boot Windows. Follow these steps to reset 1394 communications. 1) Unplug all 1394 cables from the Pilot computer. 2) Make sure that there are no 1394 cables connecting the Studio Hub to any Audio Deck.
19) In the Device Manager you will see the “Euphonix R1 IEEE-1394 Drivers” appear. Left click on this and it will expand down and show its contents. You should now see the “Euphonix R1 Audio Deck”. After this appears, disconnect the Audio Deck 1394 cable from the Pilot. 20) Repeat this operation (steps 18-19) for each of the Audio Decks in your system. 21) Connect the Studio Hub to the Pilot computer with a 1394 cable. A Windows dialog may appear, stating, “Looking for Device”.
If the R-1 Operating System must be Reinstalled If your R-1 system is not working to the point where you think you need to reinstall the operating system, then you should call R-1 product support. Completely rewriting the OS disk: Your R-1 documentation and software includes a CD-ROM entitled R-1 Operating System Image and a floppy entitled R-1 Boot Disk – R-1 Recovery.
Pre-calculated waveform data will be lost. Typically this should be acceptable. The waveforms will be recalculated as needed. In many instances this will be the quickest option in that it does not require your intervention at all. However, if you think that you will save time and that waveforms are essential to a project in progress, then you may save and subsequently restore these files. Please be forewarned, waveform caching files are large – C:\EUPHONIX\SYSTEM\*.IMG ****EXCEPT DO NOT SAVE***** wboot48.
Windows 98SE Settings If Windows 98SE needs to be reinstalled on the Pilot computer for any reason, you may need to reestablish some settings that R-1 needs to run properly. The following sections will help you restore any settings that may have been changed by the reinstallation of Windows 98SE. Internet Explorer Security Settings 1) Right-click in the Internet Explorer icon and select Properties. Click on the Security tab.
8) Settings tab – under Advanced Dialog, Adjustment tab – for Display Device choose CML150X. 9) Settings tab - under Advanced Dialog choose OK at the bottom. 10) Background tab – for Wallpaper HTML or Picture select R-1 Desktop. 11) Background tab – for Wallpaper Display select Center. 12) Screen Saver tab – for Screen Saver select (None) 13) Screen Saver tab – under Energy Saving Features, click on the Settings button.
ITEM Size 3D Object Color Color 2 Font Size Color/style MS Sans Serif (Western) MS Sans Serif (Western) MS Sans Serif (Western) 8 0, 0, 0 8 0, 0, 0 8 0, 0, 0 Bold MS Sans Serif (Western) MS Sans Serif (Western) 8 255, 255, 255 8 0, 0, 0 128, 128, 128 Active Title Bar 18 0, 0, 0 Active Window Border Application Background Caption Button 1 128, 128, 128 96, 96, 96 85, 85, 85 18 Desktop 0, 0, 0 Icon 32 Icon Spacing (Horizontal) Icon Spacing (Vertical) Inactive Title Bar Inactive
Network Settings 1) Right click on the Network Neighborhood icon, select properties, and select the Identification tab. Verify the name you entered for the computer during the Windows 98 setup process. 2) Also in the Identification tab, verify the workgroup is your company name or whatever your systems administrator has assigned. 3) Click on the Access Control tab. Verify the share-level option is selected. 4) Connect the computer to the network, if available, reboot the computer, and log onto the network.
©1999 Euphonix, Inc.