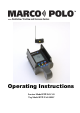
Operating Instructions Locator Model ETP-LOC-01 Tag Model ETP-TAG-01RC
This device complies with Part 15 of the FCC Rules. Operation is subject to the following two conditions: (1) this device may not cause harmful interference, and (2) this device must accept any interference received, including interference that may cause undesired operation. Changes or modifications not expressly approved by the party responsible for compliance could void the user’s authority to operate the equipment.
Marco Polo Operating Instructions Limitation of Liability The Marco Polo system (the Product) is designed and manufactured with the intended use as a tracking assistant. The Product is a supplement to the normal precautions a reasonable property owner would take to ensure the safety and security of their property.
Marco Polo Operating Instructions Contents Introduction ............................................................................ 1 User Controls and Displays .................................................... 2 System Setup .......................................................................... 3 Battery Charging ............................................................... 3 Tag Attachment ................................................................ 4 Powering On the Locator and Tag ........
Introduction The Marco Polo monitoring, tracking and recovery system is designed to help you keep track of valuable property. The system offers a unique combination of benefits including a long range of operation, light weight, and long battery life. The Marco Polo system consists of a handheld device called a “locator” and one or more small, lightweight devices called “tags” that attach items that may become lost.
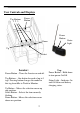
User Controls and Displays Tag Buttons 1 2 3 Power Button Power Button Down Status Light Up Select Locator: Power Button – Turns the Locator on and off. Tag Buttons – One button for each of up to 3 tags. Pressing button changes the mode for that tag from Idle to Track to Monitor. Up Button – Moves the selection cursor up one position. Select Button – Selects the item currently flashing. Down Button - Moves the selection cursor down one position. 2 Tag: Power Button – Hold down to turn power On/Off.
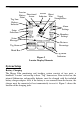
Tag Low Battery Indicator Locator Battery Directional Arrow Status Search Object Indicator Icon Signal Strength Bars Alarm Settings Setup Selections Boundary Settings Status Messages Distance Percentage Tag Alarm Mode Box Figure 2 Locator Display Elements Tag Mode Indicators System Setup Battery Charging The Marco Polo monitoring and tracking system consists of two parts: a handheld “Locator” unit and up to three “Tag” transceivers.
Charging Jack Charging Jack Figure 3 Location of Charging Jacks Charging the Tag - press and hold the power button on the tag until the red light begins to flash. The tag’s status light will flash until the charge cycle is complete and then the light will go off. The tag will not function while charging is in progress.
the tag. When the tag and locator are farther apart, more than 100 feet or so, there is only a small effect from the tag’s antenna being horizontal vs vertical. Powering On the Locator and Tag To power on the locator: Press and hold the Power button (see the User Controls and Displays section for the location of the power button) until all of the display segments flash and the locator beeps twice. To power on the tag: Press and hold the Power button until the Status light flashes.
Flashing Figure 5 Learn Mode Display (Tag 2 Shown as an Example) Labeling the Tag Buttons To help remember which objects are assigned to which of the three Tag buttons on the locator, you may fill in the included tag button labels and place them in the label wells under each button. You may wish to abbreviate the objects description to write on the small label.
Backlight Each time you press a button on the locator the display’s backlight will come on for 5 seconds. The Select button can be used to turn on the backlight for 5 seconds when needed without affecting the search or tracking functions. If you need the backlight to be on for a more extended time, short presses of the Power button will latch the backlight on or off. Keep in mind that using the backlight for extended periods will shorten the battery life of the locator.
Once the Track icon is flashing you can either start the search process immediately by pressing the Select button or you can simply wait 5 seconds and the locator will enter track mode automatically. The first thing the locator does in tracking mode is send out a signal to get the tag’s attention, a process called “searching”. Figure 7 shows the appearance of the display in searching mode.
If you wish to cancel a searching operation then press the Tag button twice until both Track and Monitor disappear from the display. Tracking Once the searching operation has been successful the tracking display will appear as shown in Figure 8.
when searching at night. To turn the beeping off, press the Down button for 2 seconds. To get the best results when tracking, always hold the locator out in front of you, waist high, level to the ground – like you are carrying a pan of water. If you and/or the tag are moving then the signal conditions are constantly changing and the information on the tracking display may be rapidly changing as well.
displayed to remind you to move the locator to a better location (see the Tracking Tips section for more information.) The Change Location display will only appear when the locator is unable to calculate a direction after four consecutive attempts. As long as a response is received from the tag the signal strength information will be updated, even if a direction can not be determined.
3. Once communications with the tag have started (i.e. the locator is beeping once every 5 seconds) use the directional display to determine which general direction to proceed. If you can not get a directional arrow take the following steps: a. Make certain you are holding the locator in front of you, waist high and level to the ground. b. If possible, move to a clear, unobstructed area away from buildings, automobiles, hills, etc. Higher ground is always better if available. c.
intersections, hold the locator up above the dashboard and see if you can get a directional arrow to guide you which way to turn. If not, choose a direction and note if the signal is getting stronger (more beeps) or weaker (fewer beeps). If you drive outside the range of the system then after 10 tries of not being able to communicate with the tag (about 50 seconds) the locator will automatically start searching for the tag again to restart communications.
Monitoring Setups The Marco Polo system allows you to select individual boundaries for up to three tags as well as select the type of notification you will receive when the tag is taken outside of that boundary area. To enter the Setup mode turn the locator on and then press and hold the Select button until Setup begins flashing on the display as shown in Figure 10. Press select again to enter setup mode.
Press the Down Arrow button to cycle through the alarm mode selections: On - When the tag is found outside of the designated area for 2 consecutive monitoring checks (40 to 80 seconds) an audible tone is generated by the locator. Remote - An audible tone is generated by the locator plus, after an additional monitoring check shows the tag is still outside the designated area, the external alarm output is activated. Please check eurekaproducts.
condominium with a small outside area. This does not mean that an alarm will necessarily sound when the tag is moved just outside of the area; it is just the smallest boundary that is practical to set without receiving false alarms. Medium - This setting will work for most homes with two stories and a medium to large yard area. This is the factory default setting. Far - This setting is for homes with very large yards or yards with obstructions, hills, etc. that may block the signals from the tag.
Monitoring mode begins just like tracking mode by searching for the selected tag. Once the searching operation is successful (10 to 30 seconds) the display will appear as shown in Figure 14. Tag Icon Flashes Every 7 Seconds Figure 14 Monitor Mode – Tag 1 In monitor mode three things are different from tracking mode: 1. The locator only communicates with the tag once every 40 seconds rather than once every 5 seconds. 2. The direction information is not calculated or displayed by the locator. 3.
Figure 15 Monitor Mode Tag 1 Outside Boundary Area If the tag is moved back into the boundary area the alarm will cancel automatically. If you wish to cancel monitor mode, press the Tag button to clear the mode display and return to idle mode. If you wish to track the tagged object then press the Tag button twice and the locator will transition directly to the tracking mode, this transition will take up 40 seconds, during which time the display will flash “Searching”.
7 sec Status of Tag 1 Status of Tag 2 Figure 16 Monitoring 3 Tags If a boundary alarm occurs for any tag the Alarm notification will stay on for that tag regardless of which tag’s information is being displayed at the moment. Figure 17 shows an example of a display where Tags 1 and 2 have boundary alarms and the display is currently showing the status of Tag 3.
press Select. Note that only one Tag may be tracked at one time so if you move a tag from idle to track or from monitor to track any other active tags will disappear from the display, this allows you to concentrate on tracking the selected tag. Low Battery Alarm Each time the locator communicates with a tag, the tag sends back its battery’s charge status to the locator. If the tag’s battery is low then the Low Battery message will appear on the display and there will be one short beep once every 5 seconds.
Troubleshooting Problem Tag or locator will not turn on. Tag will not respond to locator in searching mode when close to the locator. Tag will not respond to locator in searching mode when the tag is far away. Monitor alarm sounds when tag is in safe zone. Monitor alarm is not sounding when tag is outside of safe zone. Tag is not switching between track and monitor modes. Direction arrow is not shown when tracking. Signal strength display is erratic. Solution - Connect battery charger.
Specifications Locator Specifications Size Weight Battery Type Battery Life Range Number of Tags Alarms Weatherproofing Tag Specifications Size Weight Battery Type Battery Life Weatherproofing 6”h x 3 ½”w x 1 ½”d 8 oz. (226 grams) Rechargeable Li-ion Searching Mode - 8 Hours Tracking Mode - 3 Days Monitor Mode - 3 Days Up to 2 Miles Line-of-Sight Up to 3 Internal Audible Alarm External Siren Alarm (Optional) External Auto Dialer (Optional) Light Rain 2 ½”h x 1 ½”w x 1 ½”d 0.42 oz.
Warranty 90-Day Limited Warranty Eureka Technology Partners, LLC warrants the enclosed product against defects in materials and workmanship under normal use and service for 90 days provided it is returned in accordance with this warranty. If defective, the product will be repaired or replaced at Eureka’s option, at no charge, with dated proof of purchase. This warranty does not cover defects or damage resulting from: misuse, improper operation, unauthorized modification, or normal wear and tear.