cooking USAGE AND CARE GUIDE PRODUCT CODE: ECT60ICB
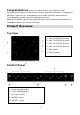
Congratulations on the purchase of your new Induction Hob. We recommend that you spend some time to read this Instruction / Installation Manual in order to fully understand how to install correctly and operate it. For installation, please read the installation section. Read all the safety instructions carefully before use and keep this Instruction / Installation Manual for future reference. Product Overview Top View 1. max. 1200/1500 W zone 2. max. 2300/2600 W zone 3. max. 1200/1500 W zone 4. max.
A Word on Induction Cooking Induction cooking is a safe, advanced, efficient, and economical cooking technology. It works by electromagnetic vibrations generating heat directly in the pan, rather than indirectly through heating the glass surface. The glass becomes hot only because the pan eventually warms it up. iron pot magnetic circuit ceramic glass plate induction coil induced currents Before using your New Induction Hob • Read this guide, taking special note of the ‘Safety Warnings’ section.
Choosing the right Cookware • Only use cookware with a base suitable for induction cooking. Look for the induction symbol on the packaging or on the bottom of the pan. • You can check whether your cookware is suitable by carrying out a magnet test. Move a magnet towards the base of the pan. If it is attracted, the pan is suitable for induction. • If you do not have a magnet: 1. Put some water in the pan you want to check. 2. If does not flash in the display and the water is heating, the pan is suitable.
Using your Induction Hob To start cooking 1. Touch the ON/OFF control . After power on, the buzzer beeps once, all displays show “ – “ or “ – – “, indicating that the induction hob has entered the state of standby mode. 2. Place a suitable pan on the cooking zone that you wish to use. • Make sure the bottom of the pan and the surface Of the cooking zone are clean and dry. 3. Select a heat setting by touching the “-“or “+” control.
When you have finished cooking 1a. Turn the cooking zone off by scrolling down to“0” or touching “-” and “+” control together. Make sure the display shows“0” 1b. Turn the whole cooktop off by touching the ON/OFF control. 2. Beware of hot surfaces H will show which cooking zone is hot to touch. It will disappear when the surface has cooled down to a safe temperature. It can also be used as an energy saving function if you want to heat further pans, use the hotplate that is still hot.
2. Touching the boost control, the zone indicator show “P.” and the power reach Max. Cancel the Boost function 1a. Touching the "Boost" control or the”-“ button to cancel the Boost function, then the cooking zone will revert to its original setting. OR 1b. Touching “-“ and “+”control together. the cooking zone switch off and the boost function cancel automatically • The function can work in any cooking zone. • The cooking zone returns to its original setting after 5 minutes.
To lock the controls Touch the key lock control. The timer indicator will show “ Lo “ To unlock the controls 1. Make sure the Induction hob is turned on. 2. Touch and hold the key lock control for a while. 3. You can now start using your Induction hob.
Using the Timer You can use the timer in two different ways: • You can use it as a minute minder. In this case, the timer will not turn any cooking zone off when the set time is up. • You can set it to turn one or more cooking zones off after the set time is up. • You can set the timer up to 99 minutes. Using the Timer as a Minute Minder If you are not selecting any cooking zone 1. Make sure the cooktop is turned on. Note: you can use the minute minder even if you’re not selecting any cooking zone. 2.
5. When the time is set, it will begin to count down immediately. The display will show the remaining time and the timer indicator will flash for 5 seconds. 6. Buzzer will beep for 30 seconds and the timer indicator shows “- - “ when the setting time is finished. Setting the timer to turn one or more cooking zones off If the timer is set on one zone: 1. Touch the”-“or ”+” of the corresponding cooking zone you want to set the timer for. 2.
4. When the time is set, it will begin to count down immediately. The display will show the remaining time and the timer indicator flash for 5 seconds. NOTE: The red dot next to power level indicator will illuminate indicating that zone is selected. 5. When cooking timer expires, the corresponding cooking zone will be switch off automatically. Other cooking zone will keep operating if they are turned on previously. If the timer is set on more than one zone: 1.
Cooking Guidelines Take care when frying as the oil and fat heat up very quickly, particularly if you’re using Power Boost. At extremely high temperatures oil and fat will ignite spontaneously and this presents a serious fire risk. Cooking Tips • When food comes to the boil, reduce the temperature setting. • Using a lid will reduce cooking times and save energy by retaining the heat. • Minimize the amount of liquid or fat to reduce cooking times.
3. Preheat the pan briefly and add two tablespoons of oil. 4. Cook any meat first, put it aside and keeps warm. 5. Stir-fry the vegetables. When they are hot but still crisp, turn the cooking zone to a lower setting, return the meat to the pan and add your sauce. 6. Stir the ingredients gently to make sure they are heated through. 7. Serve immediately. Heat Settings The settings below are guidelines only.
Care and Cleaning What? How? Important! Everyday soiling on glass (fingerprints, marks, stains left by food or non-sugary spillovers on the glass) 1. Switch the power to the cooktop off. 2. Apply a cooktop cleaner while the glass is still warm (but not hot!) 3. Rinse and wipe dry with a clean cloth or paper towel. 4. Switch the power to the cooktop back on.
Hints and Tips Problem Possible causes What to do The induction hob cannot be turned on. No power. The touch controls are unresponsive. The controls are locked. The touch controls are difficult to operate. There may be a slight film of water over the controls or you may be using the tip of your finger when touching the controls. Rough-edged cookware. Make sure the induction hob is connected to the power supply and that it is switched on. Check whether there is a power outage in your home or area.
The induction hob or a cooking zone has turned itself off unexpectedly, a tone sounds and an error code is displayed (typically alternating with one or two digits in the cooking timer display). Technical fault. Please note down the error letters and numbers, switch the power to the induction hob off at the wall, and contact a qualified technician.
Weight and Dimensions are approximate. Because we continually strive to improve our products we may change specifications and designs without prior notice. Installation Selection of installation equipment Cut out the work surface according to the sizes shown in the drawing. For the purpose of installation and use, a minimum of 5 cm space shall be preserved around the hole. Be sure the thickness of the work surface is at least 30mm.
A(mm) B(mm) C(mm) D E 650 50 mini 20 mini Air intake Air exit 5mm Before you install the hob, make sure that • the work surface is square and level, and no structural members interfere with space requirements • the work surface is made of a heat-resistant material • if the hob is installed above an oven, the oven has a built-in cooling fan • the installation will comply with all clearance requirements and applicable standards and regulations • a suitable isolating switch providing full disconnect
• there is adequate flow of fresh air from outside the cabinetry to the base of the hob • if the hob is installed above a drawer or cupboard space, a thermal protection barrier is installed below the base of the hob • the isolating switch is easily accessible by the customer Before locating the fixing brackets The unit should be placed on a stable, smooth surface (use the packaging). Do not apply force onto the controls protruding from the hob.
3. the power supply cable sections can withstand the load specified on the rating plate. To connect the hob to the mains power supply, do not use adapters, reducers, or branching devices, as they can cause overheating and fire. The power supply cable must not touch any hot parts and must be positioned so that its temperature will not exceed 75˚C at any point. Check with an electrician whether the domestic wiring system is suitable without alterations.
Safety Warnings 1.1 Safety Warnings Your safety is important to us. Please read this information before using your cooktop. 1.2 Installation 1.2.1 Electrical Shock Hazard Disconnect the appliance from the mains electricity supply before carrying out any work or maintenance on it. Connection to a good earth wiring system is essential and mandatory. Alterations to the domestic wiring system must only be made by a qualified electrician.
1.3 Operation and maintenance 1.3.1 Electrical Shock Hazard Do not cook on a broken or cracked cooktop. If the cooktop surface should break or crack, switch the appliance off immediately at the mains power supply (wall switch) and contact a qualified technician. Switch the cooktop off at the wall before cleaning or maintenance. Failure to follow this advice may result in electrical shock or death. 1.3.2 Health Hazard This appliance complies with electromagnetic safety standards.
Do not repair or replace any part of the appliance unless specifically recommended in the manual. All other servicing should be done by a qualified technician. Do not place or drop heavy objects on your cooktop. Do not stand on your cooktop. Do not use pans with jagged edges or drag pans across the Induction glass surface as this can scratch the glass. Do not use scourers or any other harsh abrasive cleaning agents to clean your cooktop, as these can scratch the Induction glass.
www.euroappliances.com.au HEAD OFFICE 65 Glynburn Road, Glyne SA 5070 Ph: 08 8165 1012 Pronto Service + Support: 1800 440 335 Email: service@eurostylegroup.com.