cooking USAGE AND CARE GUIDE PRODUCT CODE: EO60MPYX
ACKNOWLEDGMENT Thank you for purchasing our product. We hope you enjoy using the many features and benefits it provides. Before using this product please study this entire Instruction Manual carefully. Keep this manual in a safe place for future reference. Ensure that other people using the product are familiar with these instructions as well. WARNING When the oven is first switched on, it may give off an unpleasant smell. This is due to the bonding agent used for the insulating panels within the oven.
SAFETY HINTS Do not use the oven unless you are wearing something on your feet. Do not touch the oven with wet or damp hands or feet. For oven: Oven door should not be opened often during the cooking period. The appliance must be installed by an authorized technician and put into use. The producer is not responsible for any damage that might be caused by defective placement, and installation by unauthorized personnel.
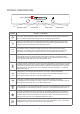
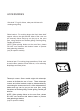
PRODUCT DESCRIPTION K1 Symbol Remind button Stop button Time button Start button K2 Function description Oven Lamp: Which enables the user to observe the progress of cooking without opening the door. Oven lamp will light for all cooking functions. (except pyrolytic function) Deforst: The circulation of air at room temperature enables quicker thawing of frozen food, (without the use of any heat).
OPERATION INSTRUCTIONS 1. Clock Setting After connectiong the unit to the power, the symbols "0:00" will be visible on the display. 1> Press " ", the hour figures will flash. 2> Rotate " K2" to adjust the hour figures, (time should be within 0--23). ", the minutes will flash. 3> Press " 4> Rotate "K2 " to adjust the minutes setting, (time should be within 0--59). 5> Press " " to finish the clock settings. ":" will flash, and the time will be illuminated. Note: The clock is 24 hours.
. Reminder Function: This function will help to remind you to start cooking in a certain time from 0:01 to 9:59. Only when oven in standby mode, the reminder can be set. Follow below to set the reminder: 1> Press reminder setting button " "; 2> Rotate " K2 " to set the hour time of reminder. (Time should be within 0--9). 3> Press reminder setting button " " again; 4> Rotate "K2 " to set minute time of reminder. (Time should be within 0--59). 5> Press " " to confirm setting. The time will count down.
Note: 1> Lamp, defrost, probe can't be reserved. 2> During the status of reservation, press cancel button once, time and temperature of reservation menu will be shown with menu icon lighting constantly. Press again, screen returns to clock, or press start button to return to reservation status. 3> Reminder function is invalid during reservation status. 10. Pyrolytic Function This function allows you to clean thoroughly the oven cavity. 1> Rotate " K1 " to select the pyrolytic function.
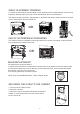
ACCESSORIES Wire shelf : For grill, dishes, cake pan with items for roasting and grilling. Slider bracket : For cooking larger size food, these shelf support rails on the right and left sides of the oven can be removed, dishes and tray can be put on the oven floor, using functions as Radiant grilling, Double grilling, Double grill with fan. NOTE: When placing dishes on the oven floor, please DO NOT use functions with bottom heater to prevent heat gathering at bottom.
SHELF PLACEMENT WARNING: To ensure the oven shelves operate safely, correct placement of the shelves between the side rail is imperative. Shelves and the pan only can be used between the first and fifth layers. The shelves should use with the right direction, it will ensure that during careful removal of the shelf or tray, hot food items should not slide out. OR USE OF ROTISSERIE ACCESSORIES The rotisserie works in combination with the grill element to heat the food equally.
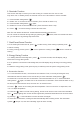
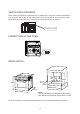
VENTILATING OPENINGS When cooking is finished or in pause state or in waiting state, if the oven's center temperature is over 75 degree, the cooling fan will continue working for 15 minutes. Or when the oven's center temperature becomes lower than 75 degree, the cooling fan will stop in advance. Ventilating openings CONNECTION OF THE OVEN N L INSTALLATION G560 80 250 100 F570 min. A595 E600 H560 D606 C575 B595 Remark: 1.Only plus deviations are admissible for all dimension. 2.
CLEANING AND MAINTENANCE For the sake of a good appearance and reliability, keep the unit clean. The modern design of the unit facilitates maintenance to a minimum. The parts of the unit which come into contact with food have to be cleaned regularly. Before any maintenance and cleaning, disconnect the power. Set all controls in the OFF position. Wait until the inside of the unit is not hot but only slightly warm- cleaning is easier than when warm.
Pronto Service + Support: 1800 440 335 Email: service@eurostylegroup.com.au HEAD OFFICE 65 Glynburn Road, Glynde SA 5070 Ph: 08 8165 1012 www.euroappliances.com.