
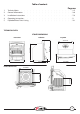
Operating instructions


7
INSTALLATION INSTRUCTIONS:
Step 1
Open the stove door and remove all loose packed parts, ashpan, tools and accessories.
Step 2
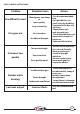
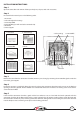
Disassemble the internal parts in the following order.
1. Fire Fence
2. Left and Right Side Castings
3. Loose Top Bae
4. Grate (Riddling bar will need to be removed also)
5. Back Wall
6. Grate Support
Step 3
Remove the stove from the convection chamber (Part18 in parts listing) by removing the 2no M6 xing bolts under the
rear of the grate support.
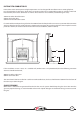
Step 4
Ensure the opening is suitable for tting the stove by placing the convection chamber into the recess in the replace
opening to ensure a good t. Ensure the oor area is level with the hearth and there is no rocking as the insert Stove is
screw xed to the oor.
Step 5
If the t of the convection chamber is good and the base where it is to sit is level with the hearth proceed to x the
convection chamber to the oor with the xing screw supplied. This will require marking where to drill the hole with
the convection chamber in place, removing convection chamber, drilling hole and re inserting the convection chamber
into the replace recess and xing it into place with the xing provided.
1. Fire Fence
2. Side Castings
4. Grate
3. Loose Bae
5. Back wall
6. Grate Support
5. Back Wall
6. Grate support
4. Grate
3. Loose Bae
2. Side castings
1. Fire Fence