
Operating instructions


8
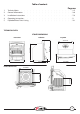
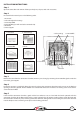
Step 6
Lift the still disassembled stove into the convection chamber approximately 50mm, lift the front edge to prevent
damage to the hearth then slide it gently home to its nal position
.
Step 7
The ue liner can now be xed to the spigot (part 13 in parts listing) with the xings provided and sealed according to
the manufactures instructions.
Step 8
Secure the stove to the convection chamber with the 2no M6 bolts removed in step 3. Before fully tightening push the
stove against the replace.
Step 9
Re assemble the parts removed in step 2 in reverse order.
Step 10
Re insert the ashpan under the grate.
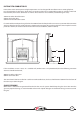
Allow enough time for any re cement and or mortar used in the installation to dry out according to the manufactures
instructions. Before lighting the stove check;
1. That all the internal parts are reassembled correctly.
2. That the riddling grate, primary air slider and air wash slider are working correctly.
3. That the connection between the stove and the ue liner/Chimney are fully sealed and airtight.
A small re may then be lit to check the installation of the stove.
Wait at least 24 hours before running the stove at full output.
Please note;
When this stove is properly installed it will not emit any fumes into the room. On occasion when using the riddling
grate or refueling the stove a small amount of fumes might escape into the room. Constant fume emission is
dangerous. If there is persistent fume emission into the room open the windows and doors and let the re go
out. Check the chimney/ue for any blockages and have them cleaned if necessary. Do not relight the stove until
the cause of the fume emission has been ascertained and corrected, get expert advice if necessary.
OPERATING INSTRUCTIONS: