
Owner`s manual


Operating Instructions
3. To ease the inserting of the beaters,
a slight twisting motion will aid in
engaging the beater drive tabs.
Install the second beater or dough
hook in the same manner as above.
When they are fully fitted and in
place you will hear a click.
If using the whisk, hold whisk at
stem end and insert into one of the
holes until it clicks into place. DO
NOT PUSH WHISK IN FROM THE
WIRE END AS WIRES MAY BE
DAMAGED.
Warning: Never operate the
appliance without all the parts in
place. Make sure that all parts are
properly assembled.
• Once you have inserted the desired
attachment, hold the mixer by the
handle with one hand and with the
other hand gently pull the power
cord from the main unit and plug it
in.
Caution: DO NOT pull with
excessive force on the power cord
or you will damage the rewinding
feature and void the warranty. When
rewinding, always hold the plug to
avoid cord whiplash. DO NOT pull
power cord out past the red marking
on the cord.
Selecting the Attachment
There are three (3) different attachments
for the hand mixer:
1. Beaters: Use for liquid mixes such as
creams, combining dry ingredients,
confectionery dough, etc.
2. Dough hooks: Use for light doughs.
Do not attempt to mix heavy bread
doughs.
3. Whisk: Used to beat air into mixtures
such as egg whites, yolks, or cream.
How to Operate the Hand Mixer
• Before plugging in the hand mixer, fit
the desired attachment required for the
mixing operation to be carried out.
• To attach accessories, perform the
following steps:
1. Select the attachment according to
the type of mixing required. Make
sure that the mixer is turned off and
unplugged from power source
before inserting or removing
beaters, whisk, or dough hooks.
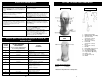
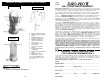
2. If using beaters or dough hooks,
insert stem end of beaters (one at
a time) into the small and large
beater openings in the mixer. (Fig.
1) Insert the beater with the
locator ring (Fig. 2) in the large
beater opening. The ring on the
beater or dough hook must sit
below the surface of the mixer
housing.
Fig. 2
Locator Ring
WARNING: ALWAYS avoid contact with moving parts while
unit is in operation. Keep hands, hair, clothing, as
other utensils away from beater/dough hooks/whisk
during operation. Failure to do so could result in
serious injury.
Fig. 1
Large
Beater
Opening
Small
Beater
Opening
4
Consignes d’utilisation
• Pour rembobiner le cordon
d’alimentation, appuyez sur le
bouton rembobiner.
Attention
• Pour retirer les accessoires,
procédez aux étapes suivantes :
1. Éteignez le batteur et
débranchez de la source
d’alimentation.
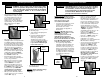
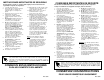
2. À l’aide du pouce et de l’index,
appuyez simultanément sur les
boutons d’éjection des
accessoires. (Figure 5). Ceci ne
fonctionnera que si le batteur à
main est éteint. NE PAS tenter
d'éjecter les fouets
mélangeurs/fouet/crochets
pétrisseurs si l’appareil est en
marche.
: En rembobinant, toujours
tenir la fiche afin d’éviter un coup de
fouet du cordon.
Fig. 5
23
Boutons
d’éjection
des
accessoires
ATTENTION: TOUJOURS éviter le contact avec les pièces mobiles
quand l’appareil est en marche. Gardez les cheveux,
les vêtements, et autres ustensiles éloignés des
fouets mélangeurs/crochets pétrisseurs lors du
fonctionnement. Omettre de le faire pourrait
provoquer des blessures sérieuses.