
User's Manual


Operating Instructions
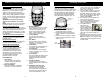
Getting To Know Your Programmable Pressure Cooker
Parts of Your Pressure Cooker
Sealing Gasket
The sealing gasket fits inside the cover of
the pressure cooker to form a very tight seal
between the cover and pressure cooker
when the cover is locked. The sealing
gasket can be easily removed for cleaning.
Over time, the sealing gasket may shrink,
harden, crack or become distorted with use.
If this occurs, the sealing gasket should be
replaced.
WARNING: Do not wash the sealing
gasket in the dishwasher, hand wash
only.
NOTE: If there are any concerns regarding
the sealing gasket call customer service.
Stainless Steel Steamer Ring
The steamer ring sits on the bottom of the
removable cooking pot to support roasts and
other meats and prevents the meat from
sticking to the bottom of the pot. It can also
be used to support a metal steamer basket
for vegetables.
Preset Programmed Cooking Buttons
The preset buttons are programmed to take
the guess work out of cooking with your
pressure cooker.
Removable Cooking Pot
The removable cooking pot is coated with a
non-stick surface for easier clean-up.
Using the “Keep Warm” Feature
This function can keep cooked foods
warm for up to 24 hours. The pressure
cooker will go into “Standby” mode for one
minute and then the “Keep Warm” mode
will automatically be engaged after the
cooking process has been completed.
The “Keep Warm” light will illuminate
when this feature is engaged. (Fig. 10)
4. Wipe the outer housing of the pressure
cooker with a damp cloth. Do NOT use
any abrasive cleaners or immerse in
water or any other liquid.
5. The removable cooking pot, pressure
cooker cover and sealing gasket are
washable. Wash them in warm, soapy
water. The removable cooking pot and
the cover are dishwasher safe. The
sealing gasket is NOT.
6. Use a sponge or a non-metallic soft
brush to clean the diffuser.
7. The pressure release valve does not
have to be cleaned after each use
unless it has become clogged.
8. The sealant washer
may need to be
cleaned. Remove it
from the safety floating
valve and clean with
warm, soapy water. To
replace, hold the safety float
valve with your finger and push it in.
(Fig. 12)
9. Store the pressure cooker with the cover
upside down over the main housing. Do
NOT store with the cover closed to avoid
compressing the sealing gasket for long
periods of time.
Fig. 12
Fig. 10
Keep Warm
Light
3. Beef/Pork Button
The beef/pork button is for cooking
roasts, briskets or pork ribs. You
can also use this setting for dry
beans or other legumes, whole
beets, chili and other foods that
require longer cooking time.
4. Chicken Button
The chicken button is set to
prepare roasts or poultry of any
kind.
5. Fish Button
The fish button is set to cook fish
perfectly. You can also cook fresh
vegetables on this setting.
6. Soup Button
The soup button is programmed to
cook soups, stews, or sauces.
7. Cancel Button
The cancel button can be used to
cancel a cooking cycle or to cancel
a wrong selection.
8. Timer Display
The timer display will show the time
the pressure cooker is operating
when a preset button has been
selected.
9. Keep Warm Button
The keep warm can be used to
keep cooked food warm until ready
for use.
10. Keep Warm Indicator Light
This indicator light (yellow) will
illuminate when the cooking
process has been completed and
the pressure cooker has switched
over to the “Keep Warm” cycle.
Cleaning & Storage
1. Always leave the pressure to cool
completely before you take the
components apart for cleaning.
2. Unplug and remove the power cord
from the appliance and the electrical
outlet.
3. Remove the vapor collector by pulling
it down and rinse under warm, soapy
water. (Fig. 11)
Vapor
Collector
Parts of the Control Panel
Cooking with your new Electronic
Pressure Cooker is simple and easy
to use. The intelligent electronic
controls take the guesswork out of
heat adjustment and cooking times.
Simply add your food to the cooking
pot, close the cover and push one of
the preset buttons and let the
pressure cooker do the rest.
Preset Buttons
1. Cook Button
The cook button is excellent for
cooking unprocessed white rice
and fresh vegetables.
2. Slow Cook Button
The slow cook button is excellent
for sticky rice, brown or wild rice.
Fig. 11
6 11