
User Guide


OPERATING INSTRUCTIONS
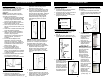
4. Once the telescopic tube is inserted,
you can adjust the height of the handle
by moving the locking latch past 90
degrees to the open position. Holding
the handle, extend the tube to the
height that is right for you and then
close the latch to the locked position.
(Fig. 3)
Fig. 3Fig. 2
3
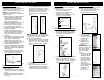
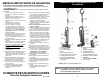
Charging the Battery
NOTE: The battery is packaged
separately from the charging base but it
is not charged. Before using the
vacuum, charge the battery for 24 hours.
NOTE: The charging base can be
mounted on a table top or a wall near an
electrical outlet.
1. When mounting on a wall, make sure
that the intended wall area for the
charging base to be drilled is free
from any hidden electrical wires,
water pipes and gas lines.
2. Select an appropriate place close to a
wall power outlet (120V., 60 Hz).
3. Do not place near direct sunlight,
near a heat source or outdoors.
4. Select an appropriate drill type for the
material to be drilled.
5. Carefully measure and mark the
location of all bracket holes and then
drill holes and screw the charging
base onto the wall. (Screws not
included.)
6. The charge adapter plug is keyed and
will fit into the charging base only one
way. Align the channel on the
adaptor plug with the tab on the
bottom of the charging base. (Fig. 1)
7. Plug the charging adapter into the
closest electrical wall outlet.
8. Place the charging base onto the wall.
Be careful not to pinch the charging
adaptor wire between the wall and the
charging base.
9. Insert the battery into the charging
base to charge. The charging light on
the charging base will light up.
NOTE: The battery must be charged for
24 hours prior to first use. Ensure that the
On/Off switch is in the “Off” position
before inserting the battery.
5. Hold the battery and insert the bottom
part first into the opening found at the
back of the unit. Then rotate in place
making sure that it clicks into place.
(Fig. 4)
Fig. 4
6. Turn the unit “On” to begin
vacuuming.
7. Place your foot lightly on the top of
the motorized brush and rotate the
handle back toward you to release the
unit from the locked upright position.
Fig. 1
Charger base
Charging
adapter
Battery
Charging light
Assembling the Stick Vac
1. Remove all the parts of the stick vac
from the box.
2. Hold the motorized brush and push it
in the base of the stick vac completely.
(Fig. 2)
3. Hold the telescopic tube and push it in
to the top of the handle of the stick
vac. (Fig. 3)
OPERATING INSTRUCTIONS
On/Off Switch
The On/Off switch has three different
positions. (Fig. 5)
1. Push on the "I" side to turn the
vacuum to “LOW” speed.
2. Push on the “II" side to turn the
vacuum to “HIGH” speed.
3. Push on the “O” (middle) to turn the
vacuum to the “Off” position.
Fig. 5
= ON (Low speed)
= OFF
= ON (High speed)
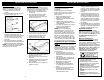
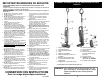
Converting Stick Vac to Hand Vac
1. Press the telescopic release button to
remove the telescopic tube. (Fig. 6)
2. Press the floor brush release button
and remove the motorized floor
brush. (Fig. 6)
Telescopic
tube release
Release
button
Lift
Pull
Fig. 6
3. Insert the crevice tool into the bottom
of the vacuum making sure that it
snaps into place. (Fig. 7) To remove
the crevice tool, press the motorized
brush/crevice tool release button.
Fig. 7
4
Emptying the Dust Cup
IMPORTANT: Always turn the vacuum
off before removing the dust cup.
1. To remove the dust cup, press the
dust cup release that is on the
bottom of the dust cup. (Fig. 8)
Fig. 8
Dust cup
release
2. Hold the dust cup
cover and twist it
to the left to remove
it from the dust
cup. (Fig. 9)
3. Hold it over a
garbage can and
empty the dust.
(Fig. 10)
IMPORTANT: Empty
the dust cup after every
use. Never use the
vacuum without the
dust cup and filter
in place.
4. To reattach the dust
cup cover, align the
indicators that are
the cover and the
dust cup and turn to
the right to lock in
place. Make sure
that the “▼”
symbol on the top
cover is aligned with
the “▲”symbol
on the dust cup
to lock into
place. (Fig. 11)
Fig. 9
Fig. 10
Fig. 11