3” Cordless Sweeper With Headlight Barredora Inalámbrica de 13” Con Luz Balayeuse Sans Fil de 13 po. Avec Phare OWNER’S MANUAL MANUAL DEL USUARIO GUIDE D’UTILISATION Model/Modelo/Modèle : V1730CR 7.2 Volt DC - 7.2 Voltios CC – 7.2 Volts CC EURO-PRO Operating LLC U.S.: 94 Main Mill Street, Door 16 Canada: 4400 Bois-Franc Plattsburgh, NY 12901 St-Laurent, QC H4S 1A7 Tel. : 1 (800) 798-7398 www.sharkvac.
IMPORTANT SAFEGUARDS When using an electrical appliance, basic safety precautions should always be observed, including the following READ ALL INSTRUCTIONS BEFORE USING YOUR CORDLESS SWEEPER. WARNING: To reduce the risk of fire, electrical shock, or injury: 1. 2. 3. 4. 5. 6. 7. 8. 9. 10. 11. 12. 13. Do not charge this unit outdoors. 14. Do not use outdoors or on wet surfaces. 15. Do not allow to be used as a toy. Close attention is necessary when used by or near children.
Soins et entretien Afin d’augmenter le rendement et la durée de vie de votre appareil, nous vous recommandons de respecter les consignes suivantes: 1. Une fois par mois, nettoyez l’appareil à l’aide d’un linge sec, incluant le réceptacle du réservoir à poussière. Retirez tout cheveu, fibre ou autre produit ayant pu s’accumuler dans le réceptacle, sur la broche rotative ou sur l’outil à angle. 2. N’utilisez pas de produit abrasif pour nettoyer la balayeuse. N’immergez pas cet appareil. 3.
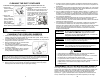
ASSEMBLING YOUR CORDLESS SWEEPER Retrait et élimination de la pile Before you start: Your Cordless Sweeper will require very little assembly. You should remove it from the carton and familiarize yourself with all the components listed as per the exploded view drawing (pg.2) This will help you in the assembly and operation of your cordless sweeper. Note: The charging adapter and the lower handle are shipped inside the dust cup. Lower Handle Fig. 1 1. 2. 3. 4. 5.
Changement de la brosse rotative, du boîtier de vitesse et de la raclette MISE EN GARDE: Lorsque vous changez la brosse rotative et le boîtier de vitesse, prenez garde à ne pas mettre l’appareil en marche en enfonçant l’électrobrosse balayeuse. 1. Retirez la poignée du tube de rallonge de l’électrobrosse balayeuse. 2. Tournez l’électrobrosse balayeuse à l’envers en prenant garde à ne pas mettre l’appareil en marche accidentellement. 3. Retirez le couvercle de la brosse (Fig.
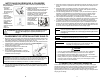
CLEANING THE DUST CONTAINER To achieve the best performance, empty the dust container after each use. 3. Replace dust container on cordless sweeper. 4. Periodically remove the brush cover on the front of the cordless sweeper and remove any build up of lint, hair or fiber on the rotating brush. To remove the cover - grip the cover from the bottom, pull out and upward until the cover unlocks from the side slots and tabs located on the top of the sweeper. (Fig. 9) Fig. 9 1.
NETTOYAGE DU RÉSERVOIR À POUSSIÈRE Afin d’obtenir un rendement supérieur, videz le réservoir à poussière après chaque utilisation. 3. Replacez le réservoir à poussière sur la 1. Tirez sur la balayeuse sans fil. coupelle à 4. Retirez périodiquement le couvercle de poussière en la la brosse du devant de la balayeuse tirant directement sans fil et éliminez toute accumulation du côté. (Fig. 7) de peluche, cheveux ou fibres de la Fig. 7 2. Videz la brosse rotative.
Changing the Rotating Brush, Gear Box & Squeegee WARNING: Use caution when changing the rotating brush and gear box so that the unit does not turn ON when pressing down on the sweeper power head. 1. Remove the extension tube handle from the sweeper power head. 2. Turn sweeper power head upside down being careful Not to accidentally turn the unit ON. 3. Remove the brush cover. (Fig. 11) (Refer to page 5 for detailed instructions.) 4. Push in on the locking tab of the gear box and lift gear box to remove.
ASSEMBLAGE DE VOTRE BALAYEUSE SANS FIL Battery Removal & Disposal Avant de commencer: Votre balayeuse sans fil ne nécessite qu’un léger assemblage. Retirez l’appareil de son emballage et familiarisez-vous avec ses composants, énumérés sous la figure éclatée (p. 22) Ceci vous aidera à assembler et à faire fonctionner votre balayeuse sans fil. Remarque : L’adaptateur de chargement est à l’intérieur de la coupelle à poussière. Poignée inférieure Fig. 1 1. 2. 3. 4. 5.
Care and Maintenance To improve the performance and life of your unit, we recommend you do the following: 1. Once a month clean the unit with a dry cloth, including the chamber which the dust container fits into. Remove any hair, fiber or other materials that may have built up in the chamber, on the rotating brush or edging tool. 2. Don’t use abrasive materials to clean the sweeper. Do not immerse the unit in water. 3. Do not pick up liquids or use on wet floors. 4.
MESURES DE PRÉCAUTION IMPORTANTES Certaines consignes de sécurité de base doivent toujours être respectées lors de l’utilisation d’un appareil électrique, incluant : LISEZ TOUTES LES CONSIGNES AVANT D’UTILISER VOTRE BALAYEUSE SANS FIL. MISE EN GARDE : Afin de réduire les risques d’incendie, d’électrocution et de blessure : 1. Ne chargez pas cet appareil à l’extérieur. 13. Ne tentez pas de changer d’accessoire pendant que l’appareil est en marche. 2.
MEDIDAS IMPORTANTES DE SEGURIDAD Al usar aparatos eléctricos, siempre debe seguir precauciones básicas de seguridad, incluyendo las siguientes: LEA TODAS LAS INSTRUCCIONES ANTES DE USAR SU BARREDORA INALÁMBRICA ADVERTENCIA: Para reducir el riesgo de incendio, descarga eléctrica o daños personales: 1. No recargue esta unidad en el exterior. 14. Tenga especial cuidado al limpiar 2. No la utilice en el exterior o en superficies escaleras. húmedas. 15. No la use para recoger líquidos 3.
Cuidado y Mantenimiento Para mantener el rendimiento y la vida útil de su unidad, le recomendamos lo siguiente: 1. Limpie la unidad con un trapo seco una vez por mes, incluyendo el compartimiento donde se coloca el recipiente para la tierra. Quite los pelos, fibras y cualquier otro material que se haya acumulado en el compartimiento, en el cepillo giratorio o el accesorio para bordes. 2. No utilice materiales abrasivos para limpiar la barredora. No sumerja la unidad en agua. 3.
ARMADO DE SU BARREDORA INALÁMBRICA Antes de comenzar: Su barredora inalámbrica requiere muy poco armado. Deberá sacarla de la caja y familiarizarse con todos los componentes listados en el diagrama descriptivo (Pág. 12). Esto le ayudará en el armado y operación de su barredora inalámbrica. Nota: El cargador y el mango inferior vienen guardados dentro del recipiente para la tierra. Mango Inferior Fig. 1 Fig. 2 1.
Cambio del Cepillo Giratorio, Engranajes y Escobilla de Goma ADVERTENCIA: Tenga cuidado al cambiar el cepillo giratorio y los engranajes para que la unidad no se encienda al presionar en el cabezal eléctrico de la barredora. 1. 2. 3. 4. Quite el tubo de extensión del cabezal eléctrico de la barredora. De vuelta el cabezal eléctrico teniendo cuidado para no encenderlo accidentalmente. Quite la cubierta del cepillo. (Fig. 11) (Vea la página 15 por instrucciones detalladas.
LIMPIEZA DEL RECIPIENTE PARA LA TIERRA Para obtener el mejor rendimiento, limpie el recipiente para la tierra luego de cada uso. 3. Vuelva a colocar el recipiente para la 1. Tire del recipiente tierra en la barredora. para la tierra hacia 4. De vez en cuando, quite la cubierta del fuera desde el cepillo del frente de la barredora y costado. (Fig. 7) saque la acumulación de pelusa, pelos o fibras del cepillo giratorio. Para quitar Fig. 7 la cubierta, agárrela por debajo, tire hacia fuera y 2.