N Inoa-CV-0614_1 17/06/14 12:06 Page1 Mode d’emploi - Climatiseurs de cave INOA Operating instructions - INOA cellar conditioners Bedienungsanleitung - Weinkeller-Klimagerät INOA Instrucciones - Climatizadores de bodega INOA
N Inoa-CV-0614_1 17/06/14 12:06 Page2
BIENVENUE DANS L’UNIVERS EUROC AVE Notre unique volonté est d’accompagner au mieux votre passion du vin tout au long des années… Pour cela, EuroCave déploie tout son savoir-faire pour réunir les critères essentiels à un vieillissement optimal des vins : La température : Les deux ennemis du vin sont les températures extrêmes et les fluctuations brutales de températures. Une température constante comprise entre 10° et 14°C (50 et 57°F) est considérée comme idéale pour le plein épanouissement du vin.
SOMMAIRE 1 • DESCRIPTIF DE VOTRE CLIMATISEUR p. 5 2 • CONSIGNES DE SÉCURITÉ IMPORTANTES p. 6 3 • ALIMENTATION 4 • PROTECTION ÉLECTRIQUE DE L’ENVIRONNEMENT ET ÉCONOMIES D’ÉNERGIE 5 • INSTALLATION DE VOTRE CLIMATISEUR 6 • FONCTIONNEMENT DE VOTRE CLIMATISEUR p. 6 p. 7 p.
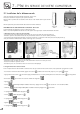
1 - DESCRIPTIF DE VOTRE CLIMATISEUR 17 18 12345678910 - Espace plafond/climatiseur : 200 mm mini Plafond Mur de la cave Cadre métallique de montage Gaine flexible 11 12 13 14 - Joint étanchéité climatiseur/cadre de montage Évaporateur à nettoyer régulièrement Télécommande Vis de fixations de la grille (qté : 24) Vis de fixation de la façade esthétique (qté : 4) (non fournies) 15 - Vis de fixation du cadre sur le mur (qté : 4) (non fournies) 16 17 18 - Vis de fixation du climatiseur sur le cadre
2 - CONSIGNES Avertissement DE SÉCURITÉ IMPORTANTES Lorsque vous utilisez votre climatiseur, observez toujours certaines précautions de base, notamment : N’utilisez le climatiseur que pour l’usage prévu, comme décrit dans le présent guide. Ne débranchez jamais l'appareil en tirant sur le cordon d’alimentation. Saisissez fermement la fiche du cordon et tirez droit pour la retirer de la prise murale. Si le cordon d’alimentation est endommagé, il doit être remplacé par un électricien qualifié.
5 - INSTALLATION DE VOTRE CLIMATISEUR - Lors de la livraison de votre appareil, assurez-vous, après déballage, que votre climatiseur ne présente aucun défaut d’aspect extérieur (choc, déformation,...). - En cas de problème, contactez votre revendeur. - Important : l’isolation de votre cave est déterminante pour le bon fonctionnement de votre climatiseur. La qualité de votre isolation déterminera la stabilité de la température programmée.
5 - INSTALLATION DE VOTRE CLIMATISEUR • Pose : (voir schémas C) Votre climatiseur est fourni avec un cadre métallique de montage pour simplifier le perçage des trous d’entrée et de sortie d’air. Il est également équipé de 2 gaines extensibles à découper (de 75 cm chacune) afin d’installer le climatiseur quelle que soit l’épaisseur du mur. Enfin, votre climatiseur est livré avec une façade esthétique et 4 grilles pour un rendu parfait.
7 - MISE EN SERVICE DE VOTRE CLIMATISEUR I- Branchement Faites vérifier que votre prise est bien alimentée (présence des fusibles et leurs ampérages, disjoncteur différentiel 30 mA en état (non valable dans certains pays)). Après avoir attendu 48 heures, raccordez votre climatiseur sur le secteur. II- Mise en fonction - Mettez l’interrupteur qui se trouve sous le climatiseur sur position 1.
7 - MISE EN SERVICE DE VOTRE CLIMATISEUR IV- Installation de la télécommande Vous pouvez installer votre télécommande à l’intérieur de votre cave. Nous vous conseillons de la placer au plus près des bouteilles. Fixez le boîtier à proximité de vos bouteilles à l’aide des vis et des chevilles fournies (voir schéma cidessous) NB : Ne positionnez pas la télécommande dans le flux d’air froid du climatiseur.
7 - MISE EN SERVICE DE VOTRE CLIMATISEUR - L’écran apparaît, puis . Si vous souhaitez reprogrammer la télécommande pour une version sonde interne, débranchez la sonde filaire et reprogrammez la télécommande en mode intérieure (IN) en refaisant les deux premières étapes décrites dans le paragraphe ci-dessus (cf.5-III-b p.11) : Le 2e écran indique sur indiquant OUT (OUT= installation extérieure). Appuyez sur la touche pour basculer sur en mode intérieur IN. Appuyez pour valider.
7 - MISE EN SERVICE DE VOTRE CLIMATISEUR Le compresseur reste alors en fonctionnement et les ventilateurs passent en petite vitesse pendant 15 minutes. Au-delà, le climatiseur revient aux vitesses de fonctionnement initial. VII- Fonction réchauffeur Le climatiseur EuroCave INOA est muni d’une résistance (650 W) permettant de maintenir la température intérieure de votre cave. Dès que sa température est inférieure à la température programmée, la fonction réchauffage est automatiquement mise en action.
WELCOME TO THE WORLD OF EUROC AVE Our greatest wish is to accompany your enthusiasm for wine throughout the years… To do so, EuroCave puts all of its know-how into action to bring together the essential factors in optimal wine maturing: Temperature: The two worst enemies of your wine are extreme temperatures and sudden fluctuations in temperature. A constant temperature of 10° to 14°C (50 to 57°F) is considered to be ideal for your wine to reach its full potential.
CONTENTS 1 • CONDITIONER DESCRIPTION 2 • IMPORTANT SAFETY RECOMMENDATIONS p. 6 3 • ELECTRICAL POWER SUPPLY p. 6 4 • CARE FOR THE ENVIRONMENT AND ENERGY SAVING 5 • INSTALLING YOUR 6 • CONDITIONER CONDITIONER OPERATION p. 6 p. 7 p.
1 - CONDITIONER DESCRIPTION 17 COLD AIR HOT AIR 18 1- Distance between ceiling / conditioner: 200 mm min. 2 3 4 5 6 7 8 Ceiling - 9- Cellar wall Metal mounting frame 10 11 12 13 14 - Flexible ducting Aesthetic front panel Grid, to be cleaned regularly (see p.
2 - IMPORTANT Warning SAFETY RECOMMENDATIONS When using your conditioner, you should always observe certain basic precautions, especially: Never use your conditioner for anything other than its specific purpose as described in this guide. Never unplug the conditioner by pulling on the supply lead. Take a firm hold on the plug and pull out smoothly in a straight line from the wall socket. If the power lead is damaged, it must be replaced by a qualified electrician.
5 - INSTALLING YOUR CONDITIONER - When your appliance is delivered, ensure, after unpacking, that your conditioner shows no apparent damage to exterior appearance (impacts, buckling, etc.). - In the event of a problem, contact your EuroCave dealer. - Important: insulation of your cellar is crucial for your conditioner to perform at its best. The quality of your insulation will determine the stability of the programmed temperature. Do not use fibrous insulation, such as glass wool or rock wool.
5 - INSTALLING YOUR • Fitting: (see C diagrams) Your conditioner comes supplied with a metal mounting frame which simplifies the process of drilling air entry and exit holes. It also has 2 extendable ducts to be cut to length (75 cm each) in order to install the conditioner whatever the thickness of the wall. Finally, your conditioner is supplied with an aesthetic front panel and 4 grids for an aesthetic appearance.
7 - COMMISSIONING YOUR CONDITIONER I- Connection Check that the plug is connected to a power supply (presence of correct amp fuses, functioning 30 mA* differential circuit breaker - not applicable to certain countries). Wait 48 hours before plugging in your conditioner. II- Switching on - Place the switch, located under the conditioner, in position 1. - Press and hold down the key on your remote control for about 8 seconds, until the To put your conditioner on standby, press and hold down the goes off.
7 - COMMISSIONING YOUR CONDITIONER IV- Installing the remote control You can install the remote control inside your cellar. We recommend that you place it as close as possible to the bottles. Fix the unit close to your bottles using the supplied pegs and screws (see diagram below) N.B.: Do not place the remote control in the path of the conditioner’s cold air flow. Installing the remote control outside the cellar It is also possible to place the remote control outside the cellar.
7 - COMMISSIONING YOUR CONDITIONER If you wish to reprogramme the remote control for an internal sensor, disconnect the wired sensor and reprogramme the remote control in internal mode (IN) by repeating the first two steps described in the paragraph above (see 5-III-b p.11): The 2nd screen displays indicating OUT (OUT= external installation). Press the key to change to IN internal mode. Press to confirm.
7 - COMMISSIONING YOUR CONDITIONER VII- Heating function The EuroCave INOA conditioner has a heater (650 W) allowing the internal temperature in your cellar to be maintained at an optimal level. As soon as the temperature drops below the programmed temperature, the heating function is automatically activated. VIII- Changing the remote control batteries Remote control power supply: 1 x 3 V (CR 2430 battery) (2 batteries supplied) Battery life: 2 years approx The remote control is supplied with 2 batteries.
WILLKOMMEN IN DER WELT VON EUROCAVE Wir möchten jahraus, jahrein der Begleiter für Ihre Weinleidenschaft sein... Hierzu hat EuroCave all sein Know-how eingesetzt, um die wichtigsten Kriterien für ein optimales Reifen der Weine zu gewährleisten: Die Temperatur: Die beiden schlimmsten Feinde des Weins sind extreme Temperaturen und starke Temperaturschwankungen. Eine konstante Temperatur zwischen 10° und 14°C (50 und 57 °F) lässt den Wein ideal altern und seine Eigenschaften optimal entfalten.
INHALTSVERZEICHNIS 1 • BESCHREIBUNG 4 IHRES KLIMAGERÄTS S. 5 2 • WICHTIGE SICHERHEITSHINWEISE S. 6 3 • STROMVERSORGUNG S. 6 4 • UMWELTSCHUTZ UND ENERGIESPARMASSNAHMEN S. 6 5 • INSTALLATION IHRES KLIMAGERÄTS S. 7 6 • FUNKTIONSWEISE IHRES KLIMAGERÄTS S.
1 - BESCHREIBUNG IHRES KLIMAGERÄTS 17 KALTLUFT HEISSLUFT 18 1 2 3 4 5 6 7 8 9 - Abstand Decke/Klimagerät: Min. 200 mm 10 - Regelmäßig zu reinigender Kondensator Decke Mauer des Kellers Metall-Montagerahmen Flexibles Rohr Verkleidung Regelmäßig zu reinigendes Gitter (siehe S.
2 - WICHTIGE SICHERHEITSHINWEISE Warnung Beachten Sie bei der Nutzung Ihres Klimageräts stets gewisse grundlegende Sicherheitsmaßnahmen, vor allem: Verwenden Sie das Klimagerät nur für den in dieser Bedienungsanleitung vorgesehenen Verwendungszweck. Ziehen Sie niemals am Stromkabel, um den Gerätestecker aus der Steckdose zu ziehen. Nehmen Sie den Kabelstecker fest in die Hand und ziehen Sie gerade, um ihn aus der Steckdose zu bekommen.
5 - INSTALLATION IHRES KLIMAGERÄTS - Versichern Sie sich bei der Lieferung Ihres Geräts nach dem Auspacken, dass Ihr Klimagerät keine äußeren Mängel aufweist (Schlag, Deformation,...). - Setzen Sie sich bei Problemen mit Ihrem Händler in Verbindung. - Wichtig: Die Isolierung ihres Kellers ist für das richtige Funktionieren Ihres Klimageräts entscheidend. Die Stabilität der programmierten Temperatur hängt von der Qualität Ihrer Isolierung ab.
5 - INSTALLATION • Aufstellen: (siehe Abbildungen C) Ihr Klimagerät wird mit einem Metall-Montagerahmen geliefert, der das Bohren der Einlass- und Auslasslöcher erleichtert. Ihr Klimagerät besitzt auch 2 zuschneidbare, dehnbare Schläuche (jeder 75 cm), damit es unabhängig von der Wanddicke installiert werden kann. Letztendlich wird Ihr Klimagerät für eine perfekte Optik mit einer Verkleidung und 4 Gittern geliefert.
7 - INBETRIEBNAHME IHRES KLIMAGERÄTS I- Stromanschluss Lassen Sie überprüfen, ob Ihre Steckdose richtig angeschlossen ist (Schmelzeinsätze und ihre Stromstärke, 30mA-Fehlerstromschutzschalter in gutem Zustand) (in einigen Ländern nicht gültig)). Stecken Sie Ihr Klimagerät erst nach einer Wartezeit von 48 Stunden an das Stromnetz an. II- Inbetriebnahme - Stellen Sie den Schalter unter dem Klimagerät auf die Position 1.
7 - INBETRIEBNAHME IHRES KLIMAGERÄTS IV- Installation der Fernbedienung Sie können Ihre Fernbedienung in Ihrem Weinkeller installieren. Wir empfehlen Ihnen, sie möglichst nah an den Flaschen zu platzieren. Befestigen Sie das Gehäuse mit Hilfe der mitgelieferten Schrauben und Dübel in der Nähe Ihrer Flaschen (siehe untenstehende Abbildung). HINWEIS: Bringen Sie die Fernbedienung nicht im Kaltluftstrom des Klimageräts an.
7 - INBETRIEBNAHME IHRES KLIMAGERÄTS Wenn Sie die Fernbedienung für eine Innensonde neu programmieren wollen, stecken Sie die Kabelsonde ab und programmieren Sie die Fernbedienung im Innenmodus (IN) neu. Führen Sie hierzu die beiden ersten, im vorstehenden Paragraphen beschriebenen Schritte durch (siehe 5-III-b, S. 11): Die 2. Anzeige Drücken Sie auf erscheint und zeigt OUT (OUT = Installation außerhalb) an. Drücken Sie auf die Taste , um in den Innenmodus IN zu wechseln. ,um zu bestätigen.
7 - INBETRIEBNAHME IHRES KLIMAGERÄTS VII- Heizfunktion Das INOA-Klimagerät von EuroCave besitzt einen Widerstand (650W), der es erlaubt, die Innentemperatur Ihres Weinkellers zu halten. Sobald seine Temperatur unter die programmierte Temperatur fällt, läuft automatisch die Heizfunktion an. VIII- Wechseln der Batterien der Fernbedienung Stromversorgung der Fernbedienung: 1 x 3 V (Batterie CR 2430) (2 Batterien mitgeliefert) Lebensdauer: 2 Jahre Die Fernbedienung besitzt 2 Batterien.
BIENVENIDO AL UNIVERSO EUROC AVE Nuestra única voluntad es acompañar lo mejor posible su pasión por el vino en el transcurso de los años… Para ello, EuroCave despliega toda su competencia para reunir los criterios esenciales para un excelente envejecimiento de los vinos: La temparatura: Los dos enemigos del vino son las temperaturas extremas y las fluctuaciones bruscas de temperatura.
ÍNDICE 1 • ELEMENTOS DEL CLIMATIZADOR 2 • INDICACIONES 3 • ALIMENTACIÓN IMPORTANTES SOBRE LA SEGURIDAD ELÉCTRICA pág. 6 pág. 6 4 • PROTECCIÓN DEL MEDIO AMBIENTE Y AHORRO ENERGÉTICO pág. 6 5 • INSTALACIÓN DEL CLIMATIZADOR pág. 7 6 • FUNCIONAMIENTO DEL CLIMATIZADOR pág.
1 - ELEMENTOS DEL CLIMATIZADOR 17 AIRE FRÍO AIRE CALIENTE 18 1 2 3 4 5 6 7 - Espacio techo/climatizador: Mínimo 200 mm 8- Junta de estanquidad del climatizador/marco de montaje 9- Techo Muro de la bodega Marco metálico de montaje Tubo flexible Frontal estético Rejilla que debe limpiarse con regularidad (véase pág 12) Evaporador que debe limpiarse con regularidad 10 11 12 13 14 - Condensador que debe limpiarse con regularidad Interior de la bodega Mando a distancia Tornillos para fijar la rej
2 - INDICACIONES IMPORTANTES SOBRE LA SEGURIDAD Advertencia Al utilizar el climatizador, respete siempre algunas precauciones básicas, principalmente: Utilice el climatizador únicamente para el uso previsto, tal y como se describe en la presente guía. No desconecte nunca el aparato tirando del cable de alimentación. Agarre firmemente el enchufe y tire para retirarlo del enchufe de la pared. Si el cable de alimentación está dañado, debe ser sustituido por un electricista cualificado.
5 - INSTALACIÓN DEL CLIMATIZADOR Cuando reciba el equipo y tras desembalarlo, asegúrese de que el climatizador no presenta defectos en el exterior (golpes, deformaciones...). - Si hubiera algún problema, póngase en contacto con su distribuidor. - Importante: el aislamiento de la bodega es determinante para el buen funcionamiento del climatizador. La calidad del aislamiento determinará la estabilidad de la temperatura programada. No utilice un aislante fibroso tipo lana de vidrio o lana de roca.
5 - INSTALACIÓN • Instalación: (véase esquemas C) El climatizador se suministra con un marco metálico de montaje que simplifica la perforación de los agujeros de entrada y salida de aire. El climatizador también está equipado con 2 tubos flexibles extensibles que pueden recortarse (75 cm cada uno) para instalar el climatizador sea cual sea el espesor del muro. Por último, el climatizador se entrega con un frontal estético y 4 rejillas para un acabado perfecto.
7 - PUESTA EN MARCHA DEL CLIMATIZADOR I- Conexión a la red Compruebe que la alimentación del enchufe sea correcta (fusibles y amperajes, disyuntor diferencial 30 mA* en buen estado) (*no aplicable en algunos países). Espere 48 horas y conecte el climatizador a la red. II- Puesta en marcha - Ponga el interruptor que está debajo del climatizador en la posición 1.
7 - PUESTA EN MARCHA DEL CLIMATIZADOR IV- Instalación del mando a distancia Se puede instalar el mando a distancia dentro de la bodega. Le aconsejamos que lo ponga lo más cerca posible de las botellas. Fije la caja cerca de las botellas con la ayuda de los tornillos y las clavijas suministrados (véase esquema más abajo). Nota: No deje nunca el mando a distancia en el flujo de aire frío del climatizador.
7 - PUESTA EN MARCHA DEL CLIMATIZADOR - Se visualiza el pictograma y después . Si desea volver a programar el mando a distancia para la opción sonda interna, desconecte la sonda cableada y vuelva a programar el mando a distancia en modo interior (IN) siguiendo de nuevo los dos primeros pasos descritos en el párrafo de arriba (cf.5-III-b p.11): La 2ª pantalla indica que indica OUT (OUT = instalación exterior). Pulse la tecla para bascular al modo interior IN. Pulse para aceptar.
7 - PUESTA EN MARCHA DEL CLIMATIZADOR A partir de entonces, el climatizador recupera la velocidad de funcionamiento inicial. VII- Función calentador El climatizador EuroCave INOA está dotado de una resistencia (650 W) que permite mantener la temperatura interior de la bodega. Cuando la temperatura sea inferior a la temperatura programada, se activará automáticamente la función calentador.
N Inoa-CV-0614_1 17/06/14 12:06 Page3 AVERTISSEMENT Les informations contenues dans ce document sont sujettes à modifications sans préavis. Photos non contractuelles. EuroCave n’offre aucune garantie sur cet appareil lorsqu’il est utilisé pour un usage particulier autre que celui pour lequel il a été prévu. EuroCave ne pourra pas être tenu pour responsable des erreurs contenues dans le présent manuel, ni de tout dommage lié ou consécutif à la fourniture, la performance ou l’utilsation de cet appareil.
Leader dans le domaine de la conservation, la présentation et le service des vins depuis plus de 35 ans, EuroCave vous propose des solutions adaptées à chacun de vos besoins. Armoires à vins, rangements, climatiseurs de cave, système de Vin au verre….n’hésitez pas à contacter votre revendeur EuroCave pour toute information complémentaire ! Leader in the wine preservation, presentation and service sector for over 35 years, EuroCave offers you solutions adapted to every one of your requirements.