
Specifications


2-34
User’s Manual
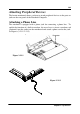
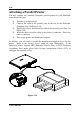
Attaching a Parallel Printer
You may connect any standard Centronics parallel printer to your Notebook
using the parallel port.
m Turn the system power off.
m Connect the cable to the parallel port on the rear of the Notebook
Computer (Step 1 in Figure 2-24).
m Tighten the screws that fasten the cable to the parallel port (Step 2 in
Figure 2-24).
m Insert the other end of the cable to the printer’s connector. Fasten the
cable’s connector.
m Turn on the printer and Notebook Computer.
In addition, you will need to install the manufacturer-supplied driver for the
printer. Refer to the device’s user’s guide for more information. If the
connected printer supports EPP (Enhanced Parallel Port) or ECP (Extended
Capabilities Port) mode, please enter System Configuration Utility (SCU) to
configure the required setting.
Figure 2-24