BEDIENUNGSANLEITUNG USER MANUAL LED SLS-18 TCL/BCL FLOOR Für weiteren Gebrauch aufbewahren! Keep this manual for future needs! © Copyright Nachdruck verboten! Reproduction prohibited!
Inhaltsverzeichnis / Table of contents EINFÜHRUNG .................................................................................................................................................................... 3 Lieferumfang ................................................................................................................................................................... 3 SICHERHEITSHINWEISE ...............................................................................................
BEDIENUNGSANLEITUNG LED SLS-18 TCL/BCL Floor ACHTUNG! Gerät vor Feuchtigkeit und Nässe schützen! Niemals das Gerät öffnen! Lesen Sie vor der ersten Inbetriebnahme zur eigenen Sicherheit diese Bedienungsanleitung sorgfältig durch! Alle Personen, die mit der Aufstellung, Inbetriebnahme, Bedienung, Wartung und Instandhaltung dieses Gerätes zu tun haben, müssen - entsprechend qualifiziert sein - diese Bedienungsanleitung genau beachten - die Bedienungsanleitung als Teil des Produkts betrachten - die Bedienun
Unbedingt lesen: Bei Schäden, die durch Nichtbeachtung der Anleitung verursacht werden, erlischt der Garantieanspruch. Für daraus resultierende Folgeschäden übernimmt der Hersteller keine Haftung. Das Gerät darf nicht in Betrieb genommen werden, nachdem es von einem kalten in einen warmen Raum gebracht wurde. Das dabei entstehende Kondenswasser kann unter Umständen Ihr Gerät zerstören.
GESUNDHEITSRISIKO! Blicken Sie niemals direkt in die Lichtquelle, da bei empfindlichen Menschen u. U. epileptische Anfälle ausgelöst werden können (gilt besonders für Epileptiker)! Kinder und Laien vom Gerät fern halten! Das Gerät darf niemals unbeaufsichtigt betrieben werden! BESTIMMUNGSGEMÄßE VERWENDUNG Bei diesem Gerät handelt es sich um einen Effektstrahler, mit dem sich dekorative Lichteffekte erzeugen lassen.
Nehmen Sie das Gerät erst in Betrieb, nachdem Sie sich mit seinen Funktionen vertraut gemacht haben. Lassen Sie das Gerät nicht von Personen bedienen, die sich nicht mit dem Gerät auskennen. Wenn Geräte nicht mehr korrekt funktionieren, ist das meist das Ergebnis von unsachgemäßer Bedienung! Reinigen Sie das Gerät niemals mit Lösungsmitteln oder scharfen Reinigungsmitteln, sondern verwenden Sie ein weiches und angefeuchtetes Tuch.
INSTALLATION Das Gerät kann sowohl hängend als auch stehend installiert werden. Überkopfmontage LEBENSGEFAHR! Bei der Installation sind insbesondere die Bestimmungen der BGV C1 und EN 60598-2-17 zu beachten! Die Installation darf nur vom autorisierten Fachhandel ausgeführt werden! Die Aufhängevorrichtungen des Gerätes muss so gebaut und bemessen sein, dass sie 1 Stunde lang ohne dauernde schädliche Deformierung das 10-fache der Nutzlast aushalten kann.
Befestigen Sie das Gerät über einen geeigneten Haken an Ihrem Traversensystem. Sichern Sie das Gerät bei Überkopfmontage immer mit einem geeigneten Sicherungsseil. Es dürfen nur Sicherungsseile gemäß DIN 56927, Schnellverbindungsglieder gemäß DIN 56927, Schäkel gemäß DIN EN 1677-1 und BGV C1 Kettbiner eingesetzt werden. Die Fangseile, Schnellverbindungsglieder, Schäkel und Kettbiner müssen auf Grundlage der aktuellsten Arbeitsschutzbestimmungen (z. B.
Wenn Sie Controller mit dieser XLR-Belegung verwenden, können Sie den DMX-Ausgang des Controllers direkt mit dem DMX-Eingang des ersten Gerätes der DMX-Kette verbinden. Sollen DMX-Controller mit anderen XLR-Ausgängen angeschlossen werden, müssen Adapterkabel verwendet werden. Aufbau einer seriellen DMX-Kette: Schließen Sie den DMX-Ausgang des ersten Gerätes der Kette an den DMX-Eingang des nächsten Gerätes an.
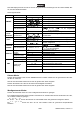
Das LED Display leuchtet auf und Sie können die gewünschten Einstellungen mit den Tasten MODE, SET UP, UP oder DOWN auswählen. Siehe folgende Grafik.
Auto Modus Drücken Sie die MODE Taste um in den Auto Modus zu gelangen. Im Auto Modus stehen jeweils 3 Untermenüs zur Auswahl. Bitte drücken Sie jeweils die SET UP Taste, um zu dieser Auswahl zu gelangen. ~ können Sie Bei Farbüberblendungsprogramm wählen. Bei wählen.
DMX Channel Auswahl: Auswählen eines DMX Kanal Modus Nachdem Sie die gewünschte Adresse ausgewählt haben, können Sie nun einen DMX Kanal Modus auswählen (5 CH, 6 CH, 7 CH, 9 CH). Drücken Sie die SET UP Taste damit das Display / / / anzeigt. Wählen Sie den gewünschten Modus über die UP oder DOWN Tasten aus. Die Werte der jeweiligen Kanal Belegungen entnehmen Sie bitte folgenden Tabellen des DMX Protokolls: DMX-Protokoll 5-Kanal Modus: In diesem Modus ist die letztmögliche Startadresse 508.
9-Kanal Modus: In diesem Modus ist die letztmögliche Startadresse 504.
120-127 128-135 136-143 144-151 152-159 160-167 168-175 176-183 184-191 192-199 200-207 208-215 216-223 224-231 232-239 240-247 248-255 Program 16 Program 17 Program 18 Program 19 Program 20 Program 21 Program 22 Program 23 Program 24 Program 25 Program 26 Program 27 Program 28 Program 29 Program 30 Program 31 Program 32 Kanal 8 Kanal 7 Kanal 6 Kanal 5 Kanal 4 Kanal 3 Kanal 2 Kanal 1 DMX FUNKTION WERT 0-7 Program 1 8-15 Program 2 16-23 Program 3 24-31 Program 4 32-39 Program 5 40-47 Program 6 48-55 Progra
Kanal 8 Kanal 7 Kanal 6 Kanal 5 Kanal 4 Kanal 3 Kanal 2 Kanal 1 DMX FUNKTION WERT 0-7 Program 1 8-15 Program 2 Program 3 16-23 24-31 Program 4 32-39 Program 5 40-47 Program 6 Program 7 48-55 56-63 Program 8 64-71 Program 9 72-79 Program 10 80-87 Program 11 88-95 Program 12 96-103 Program 13 104-111 Program 14 112-119 Program 15 Keine Keine Keine Keine Keine Musikgesteuerter 120-127 Program 16 Empfindlichkeit Dimming Modus 0-255 Funktion Funktion Funktion Funktion Funktion 128-135 Program 17 (zunehmend) 16-2
Das Gerät sollte regelmäßig von Verunreinigungen wie Staub usw. gereinigt werden. Verwenden Sie zur Reinigung ein fusselfreies, angefeuchtetes Tuch. Auf keinen Fall Alkohol oder irgendwelche Lösungsmittel zur Reinigung verwenden! Im Geräteinneren befinden sich außer der Sicherung keine zu wartenden Teile.
USER MANUAL LED SLS-18 TCL/BCL FLOOR CAUTION! Keep this device away from rain and moisture! Never open the housing! For your own safety, please read this user manual carefully before you initially start-up.
Important: Damages caused by the disregard of this user manual are not subject to warranty. The dealer will not accept liability for any resulting defects or problems. If the device has been exposed to drastic temperature fluctuation (e.g. after transportation), do not switch it on immediately. The arising condensation water might damage your device. Leave the device switched off until it has reached room temperature. Please make sure that there are no obvious transport damages.
Never leave this device running unattended. OPERATING DETERMINATIONS This device is a lighting effect for creating decorative effects. This product is only allowed to be operated with an alternating voltage of 230 V, 50 Hz and was designed for indoor use only. This device is designed for professional use, e.g. on stages, in discotheques, theatres etc. Lighting effects are not designed for permanent operation.
If this device will be operated in any way different to the one described in this manual, the product may suffer damages and the guarantee becomes void. Furthermore, any other operation may lead to dangers like shortcircuit, burns, electric shock, crash etc. DESCRIPTION OF THE DEVICE Features Slimline LED-Spot with 3 W TCL/3 W BCL DMX512 control possible via any commercial DMX controller (occupies max.
The installation of the device has to be built and constructed in a way that it can hold 10 times the weight for 1 hour without any harming deformation. The installation must always be secured with a secondary safety attachment, e.g. an appropriate catch net. This secondary safety attachment must be constructed in a way that no part of the installation can fall down if the main attachment fails.
Pull the safety bond through the attachment eyelet and over the trussing system or a safe fixation spot. Insert the end in the quick link and tighten the safety screw. The maximum drop distance must never exceed 20 cm. A safety bond which already held the strain of a crash or which is defective must not be used again. Adjust the desired inclination-angle via the mounting-bracket and tighten the fixation screws.
Choose the device which is to control the effects. This device then works as master device and controls all other slave devices, which are to be connected to the master device via a DMX-cable. Connect the OUT jack with the IN plug of the next device. Connection with the mains Connect the device to the mains with the enclosed power supply cable.
MODE SET UP Red Green DIMMER Blue White dimmer Amber dimmer Flash speed, increasing Program selection Sensitivity SOUND selection, increasing Fading colors Switching colors AUTO Speed set Color select STATIC Flash speed, COLOR increasing SELECT OTHER FUNCTION Adjust the intensity of the red color Adjust the intensity of the green color Adjust the intensity of the blue color Adjust the intensity of the white color Adjust the intensity of the amber color is off, is slowest, is fastest Select the interna
Auto mode Press the MODE button to select the auto mode. In auto mode there are 3 sub-menus to choose from. Please press the SET UP button to reach the selection. At ~ you can select the desired fading color program via the UP or DOWN buttons. At ~ you can select the desired switching color program via the UP or DOWN buttons. At ~ DOWN buttons. you can select the desired speed of the color programs AF or AJ via the UP or Static color mode Press the MODE button to select the static color mode.
DMX-protocol 5-channel mode: In this mode, the last possible starting address is 508. Channel 1 2 3 4 5 Value 000~255 000~255 000~255 000~255 000~255 Function Red (0 – 100%) Gree (0 – 100%) Blue (0 – 100%) White (0 – 100%) Amber (0 – 100%) 6-channel mode (default): In this mode, the last possible starting address is 507.
80-87 88-95 96-103 104-111 112-119 120-127 128-135 136-143 144-151 152-159 160-167 168-175 176-183 184-191 192-199 200-207 208-215 216-223 224-231 232-239 240-247 248-255 G+B G+W G+A B+W B+A W+A R+G+B R+G+W R+G+A R+B+W R+B+A R+W+A G+B+W G+B+A G+W+A B+W+A R+G+B+W R+G+B+A R+G+W+A R+B+W+A G+B+W+A R+G+B+W+A CH8 CH9 DMX VALUE 0-7 8-15 16-23 24-31 32-39 40-47 48-55 56-63 64-71 72-79 80-87 88-95 96-103 104-111 112-119 Fading color 120-127 mode 128-135 64 - 127 136-143 144-151 152-159 160-167 168-175 176-183 184
CH8 CH9 Switching color mode 128-191 DMX VALUE 0-7 8-15 16-23 24-31 32-39 40-47 48-55 56-63 64-71 72-79 80-87 88-95 96-103 104-111 112-119 120-127 128-135 136-143 144-151 152-159 160-167 168-175 176-183 184-191 192-199 200-207 208-215 216-223 224-231 232-239 240-247 248-255 FUNCTION Program 1 Program 2 Program 3 Program 4 Program 5 Program 6 Program 7 Program 8 Program 9 Program 10 Program 11 Program 12 Program 13 Program 14 Program 15 Program 16 Program 17 Program 18 Program 19 Program 20 Program 21 Pro
144-151 152-159 160-167 168-175 176-183 184-191 192-199 200-207 208-215 216-223 224-231 232-239 240-247 248-255 Program 19 Program 20 Program 21 Program 22 Program 23 Program 24 Program 25 Program 26 Program 27 Program 28 Program 29 Program 30 Program 31 Program 32 CLEANING AND MAINTENANCE The operator has to make sure that safety-relating and machine-technical installations are inspected by an expert after every four years in the course of an acceptance test.
If the power supply cable of this device becomes damaged, it has to be replaced by a special power supply cable available at your dealer. Should you have further questions, please contact your dealer. TECHNICAL SPECIFICATIONS Power supply: Power consumption: Number of DMX channels: DMX512 connection: Sound-control: Maximum ambient temperature Ta: Maximum housing temperature TC (steady state): Min. distance from flammable surfaces: Min.