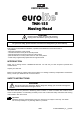
BEDIENUNGSANLEITUNG USER MANUAL MODE D'EMPLOI MANUAL DEL USUARIO TMH-155 Moving-Head Für weiteren Gebrauch aufbewahren! Keep this manual for future needs! Gardez ce mode d’emploi pour des utilisations ultérieures! Guarde este manual para posteriores usos. © Copyright Nachdruck verboten! Reproduction prohibited! Réproduction interdit! Prohibida toda reproducción.
MULTI-LANGUAGE-INSTRUCTIONS Inhaltsverzeichnis Table of contents Sommaire Contenido EINFÜHRUNG................................................................................................................................................... 4 SICHERHEITSHINWEISE................................................................................................................................. 4 BESTIMMUNGSGEMÄßE VERWENDUNG........................................................................................
INTRODUCTION ............................................................................................................................................. 31 INSTRUCTIONS DE SÉCURITÉ .................................................................................................................... 31 EMPLOI SELON LES PRESCRIPTIONS ....................................................................................................... 32 DESCRIPTION DE L'APPAREIL..............................................
USER MANUAL TMH-155 Moving-Head CAUTION! Keep this device away from rain and moisture! Unplug mains lead before opening the housing! For your own safety, please read this user manual carefully before you initial start-up.
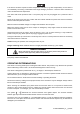
If the device has been exposed to drastic temperature fluctuation (e.g. after transportation), do not switch it on immediately. The arising condensation water might damage your device. Leave the device switched off until it has reached room temperature. This device falls under protection-class I. The power plug must only be plugged into a protection class I outlet.
Make sure that the area below the installation place is blocked when rigging, derigging or servicing the fixture. For overhead use (mounting height >100 cm), always fix the fixture with an appropriate safety-rope. Fix the safety-rope at the correct fixation points only. The safety-rope must never be fixed at the transport handles! Only operate the fixture after having checked that the housing is firmly closed and all screws are tightly fastened.
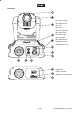
Overview (1) Projector head (2) Objective-lens (3) Yoke (4) Base (5) Carrying handle (6) Power switch (7) Power supply (8) Fuseholder (9) Ventilation fan (10) DMX-In socket (11) DMX-Out socket (12) Display (13) DIP-switches (14) Function-DIP-switches 21/58 51786410X84NXS_V_1_2.
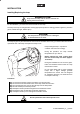
INSTALLATION Installing/Replacing the lamp DANGER TO LIFE! Only install the lamp with the device switched off! Unplug from mains before! For the installation, you need one HTI 90 V/150 W GY-9.5 lamp. The lamp must only be changed when wearing appropriate protective clothing (protection glasses, protection gloves, helmet with sight, leather apron). CAUTION! The lamp has to be replaced when it is damaged or deformed due to the heat! The lamp life given by the manufacturer must never be exceeded.
Lamp adjustment The lampholder is aligned at the factory. Due to differences between lamps, fine adjustment may improve light performance. Strike the lamp, open the shutter and the iris, set the dimmer intensity onto 100 % and focus the light on a flat surface (wall). Center the hot-spot (the brightest part of the beam) using the 3 adjustment screws "A, B, C”. Turn one screw at a time to drag the hot-spot diagonally across the projected image.
If the projector shall be lowered from the ceiling or high joists, professional trussing systems have to be used. The projector must never be fixed swinging freely in the room. Caution: Projectors may cause severe injuries when crashing down! If you have doubts concerning the safety of a possible installation, do NOT install the projector! Before rigging make sure that the installation area can hold a minimum point load of 10 times the projector's weight.
25/58 51786410X84NXS_V_1_2.
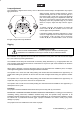
(1) Omega-holders (2) Clamp (3) Quick-lock fastener Screw one clamp each via a M12 screw and nut onto the Omega-holders. Insert the quick-lock fasteners of the first Omega-holder into the respective holes on the bottom of the device. Tighten the quick-lock fasteners fully clockwise. Install the second Omega-holder. DMX-512 connection / connection between fixtures The wires must not come into contact with each other, otherwise the fixtures will not work at all, or will not work properly.
Connection with the mains Connect the device to the mains with the enclosed power supply cable. The occupation of the connection-cables is as follows: Cable Brown Blue Yellow/Green Pin Live Neutral Earth International L N The earth has to be connected! If the device will be directly connected with the local power supply network, a disconnection switch with a minimum opening of 3 mm at every pole has to be included in the permanent electrical installation.
Controlling: After having addressed all TMH-155, you may now start operating these via your lighting controller. Note: After switching on, the TMH-155 will automatically detect whether DMX 512 data is received or not. If the data is received, the the display will show "A001" with actually set address and the DMX-LED is lit. If there is no data received at the DMX-input, the DMX-LED is off.
Control channel 6 - Shutter, Dimmer DMX-value 0-39 40-128 129-139 140-243 244-255 Feature Shutter closed Dimmer control (shutter open) No function (shutter open) Strobo effect with increasing speed (max.
The objective lens will require weekly cleaning as smoke-fluid tends to building up residues, reducing the light-output very quickly. The cooling-fans should be cleaned monthly. The gobos may be cleaned with a soft brush. The interior of the fixture should be cleaned at least annually using a vacuum-cleaner or an air-jet. The dichroic colour-filters, the gobo-wheel and the internal lenses should be cleaned monthly. There are no serviceable parts inside the device except for the lamp and the fuse.