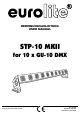
BEDIENUNGSANLEITUNG USER MANUAL STP-10 MKII for 10 x GU-10 DMX Für weiteren Gebrauch aufbewahren! Keep this manual for future needs! © Copyright Nachdruck verboten! Reproduction prohibited!
MULTI-LANGUAGE-INSTRUCTIONS Inhaltsverzeichnis / Table of contents EINFÜHRUNG .................................................................................................................................................................... 3 LIEFERUMFANG .................................................................................................................................................................. 3 SICHERHEITSHINWEISE ....................................................................
BEDIENUNGSANLEITUNG STP-10 MKII für 10 x GU-10 DMX Lesen Sie vor der ersten Inbetriebnahme zur eigenen Sicherheit diese Bedienungsanleitung sorgfältig durch! Alle Personen, die mit der Aufstellung, Inbetriebnahme, Bedienung, Wartung und Instandhaltung dieses Gerätes zu tun haben, müssen - entsprechend qualifiziert sein - diese Bedienungsanleitung genau beachten - die Bedienungsanleitung als Teil des Produkts betrachten - die Bedienungsanleitung während der Lebensdauer des Produkts behalten - die Bedienung
Das Gerät darf nicht in Betrieb genommen werden, nachdem es von einem kalten in einen warmen Raum gebracht wurde. Das dabei entstehende Kondenswasser kann unter Umständen Ihr Gerät zerstören. Lassen Sie das Gerät solange uneingeschaltet, bis es Zimmertemperatur erreicht hat! Bitte überprüfen Sie vor der ersten Inbetriebnahme, ob kein offensichtlicher Transportschaden vorliegt.
Vermeiden Sie es, das Gerät in kurzen Intervallen an- und auszuschalten (z. B. Sekundentakt), da ansonsten die Lebensdauer der Lampe erheblich reduziert werden würde. GESUNDHEITSRISIKO! Blicken Sie niemals direkt in die Lichtquelle, da bei empfindlichen Menschen u. U.
Die maximale Umgebungstemperatur Ta = 45° C darf niemals überschritten werden. Nehmen Sie das Gerät erst in Betrieb, nachdem Sie sich mit seinen Funktionen vertraut gemacht haben. Lassen Sie das Gerät nicht von Personen bedienen, die sich nicht mit dem Gerät auskennen.
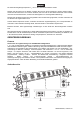
(1) Stand-/Hängebügel (2) Spannungsversorgungseingang (NEUTRIK-Buchse) (3) DMX-Eingangsbuchse (4) LED Display mit Bedientasten (Menu, Up, Down, Enter) (5) Netzschalter (6) Sicherungshalter (7) DMX-Ausgangsbuchse (8) Spannungsversorgungsausgang (NEUTRIK-Buchse) (9) Feststellschrauben (10) Fangsicherungen INSTALLATION Lampeninstallation/Lampenwechsel LEBENSGEFAHR! Lampen nur bei ausgeschaltetem Gerät einsetzen! Netzstecker ziehen! ACHTUNG! Die Lampe muss gewechselt werden, wenn diese beschädigt ist oder s
Montage Das Gerät kann direkt auf den Boden gestellt oder in jeder möglichen Position installiert werden, ohne seine funktionellen Eigenschaften zu verändern. Festinstallation oder Montage auf einem Traversensystem sind möglich.
Befestigen Sie das Gerät über geeignete Haken an Ihrem Traversensystem. Sichern Sie das Gerät bei Überkopfmontage immer mit einem geeigneten Sicherungsseil. Es dürfen nur Sicherungsseile gemäß DIN 56927, Schnellverbindungsglieder gemäß DIN 56927, Schäkel gemäß DIN EN 1677-1 und BGV C1 Kettbiner eingesetzt werden. Die Fangseile, Schnellverbindungsglieder, Schäkel und Kettbiner müssen auf Grundlage der aktuellsten Arbeitsschutzbestimmungen (z. B.
LEBENSGEFAHR! Vor der ersten Inbetriebnahme muss die Einrichtung durch einen Sachverständigen geprüft werden! DMX512-Ansteuerung Achten Sie darauf, dass die Adern der Datenleitung an keiner Stelle miteinander in Kontakt treten. Die Geräte werden ansonsten nicht bzw. nicht korrekt funktionieren. Beachten Sie, dass die Startadresse abhängig vom verwendeten Controller ist. Unbedingt Bedienungsanleitung des verwendeten Controllers beachten.
Die Belegung der Anschlussleitungen ist wie folgt: Leitung Braun Blau Gelb/Grün Pin Außenleiter Neutralleiter Schutzleiter International L N Der Schutzleiter muss unbedingt angeschlossen werden! Wenn das Gerät direkt an das örtliche Stromnetz angeschlossen wird, muss eine Trennvorrichtung mit mindestens 3 mm Kontaktöffnung an jedem Pol in die festverlegte elektrische Installation eingebaut werden.
Über die UP oder DOWN Tasten können Sie die gewünschten Werte eingeben. Bitte drücken Sie nochmal die ENTER Taste zur Bestätigung. Ihre Einstellungen werden gespeichert. Lampenvorheizung Zur Lampenschonung empfehlen wir, die Lampen unbedingt vorzuheizen. Sie können den gewünschten Prozent selbst einstellen. Drücken Sie die MENU Taste bis die Anzeige (PSXX) anzeigt um den Vorheizungs-Modus zu wählen. Über die UP oder DOWN Tasten können Sie den gewünschten Prozentwert eingeben.
5-Kanal-Modus Kanal 1 2 3 4 5 Wert 000~255 000~255 000~255 000~255 000~255 Funktion Dimmer: Lampen 1, 2 (0 – 100%) Dimmer: Lampen 3, 4 (0 – 100%) Dimmer: Lampen 5, 6 (0 – 100%) Dimmer: Lampen 7, 8 (0 – 100%) Dimmer: Lampen 9, 10 (0 – 100%) 10-Kanal-Modus (Vorgabewert) Kanal 1 2 3 4 5 6 7 8 9 10 Wert 000~255 000~255 000~255 000~255 000~255 000~255 000~255 000~255 000~255 000~255 Funktion Dimmer: Lampe 1 (0 – 100%) Dimmer: Lampe 2 (0 – 100%) Dimmer: Lampe 3 (0 – 100%) Dimmer: Lampe 4 (0 – 100%) Dimmer: L
Bitte beachten Sie auch die Hinweise unter "Lampeninstallation/Lampenwechsel". Sicherungswechsel Beim Ausfall der Lampe kann die Feinsicherung des Gerätes durchbrennen. Wenn die Feinsicherung des Gerätes defekt ist, darf diese nur durch eine Sicherung gleichen Typs ersetzt werden. Vor dem Sicherungswechsel ist das Gerät allpolig von der Netzspannung zu trennen (Netzstecker ziehen).
OPERATING INSTRUCTIONS STP-10 MKII for 10 x GU-10 DMX For your own safety, please read this user manual carefully before you initially start-up.
If the device has been exposed to drastic temperature fluctuation (e.g. after transportation), do not switch it on immediately. The arising condensation water might damage your device. Leave the device switched off until it has reached room temperature. Please make sure that there are no obvious transport damages. Should you notice any damages on the A/C connection cable or on the casing, do not take the device into operation and immediately consult your local dealer.
Keep away children and amateurs! Never leave this device running unattended. OPERATING DETERMINATIONS This device is a lighting effect for creating decorative effects. This product is only allowed to be operated with an alternating voltage of 230 V, 50 Hz and was designed for indoor use only. This device is designed for professional use, e.g. on stages, in discotheques, theatres etc. Lighting effects are not designed for permanent operation.
If this device will be operated in any way different to the one described in this manual, the product may suffer damages and the guarantee becomes void. Furthermore, any other operation may lead to dangers like shortcircuit, burns, electric shock, lamp explosion, crash etc.
INSTALLATION Installing/Replacing the lamps DANGER TO LIFE! Only install the lamps with the device switched off! Unplug from mains before! CAUTION! The lamp has to be replaced when it is damaged or deformed due to the heat! Before replacing the lamp, unplug mains lead and let the lamp cool down (approx. 5 minutes).
The installation must always be secured with a secondary safety attachment, e.g. an appropriate catch net. This secondary safety attachment must be constructed in a way that no part of the installation can fall down if the main attachment fails. When rigging, derigging or servicing the device staying in the area below the installation place, on bridges, under high working places and other endangered areas is forbidden.
A safety bond which already held the strain of a crash or which is defective must not be used again. Adjust the desired inclination-angle via the mounting-bracket and tighten the fixation screws. DANGER TO LIFE! Before taking into operation for the first time, the installation has to be approved by an expert! Fixed Installation Before attaching the device, make sure that the installation area can hold a minimum point load of 10 times the device's weight.
Occupation of the XLR connection: If you are using controllers with this occupation, you can connect the DMX output of the controller directly with the DMX input of the first device in the DMX chain. If you wish to connect DMX controllers with other XLR outputs, you need to use adapter cables. Building a serial DMX chain: Connect the DMX output of the first device in the DMX chain with the DMX input of the next device.
The device has two operating modes. It can be operated in Stand-Alone or in DMX-controlled mode. - STAND-ALONE (PXX) - LAMP PREHEAT (PSXX) - DMX (AXXX) LED Screen The LED screen offers several features: you can run the internal programs or set the starting address. Browse through the main menu by pressing the MENU button. By pressing the ENTER button you can choose the desired setting in the submenus. You can change the values of your selection by pressing the UP or DOWN buttons.
Addressing the Device Press the MENU button until the screen shows (AXXX) in order to set the starting address. Via the UP or DOWN buttons you can select the desired address. Choosing a DMX Channel Mode with 1, 2, 5, or 10 Channal Occupation The device has 4 DMX-modes. The LED screen allows you to assign the DMX-Mode. Setting DMX Mode After setting the desired address via the UP or DOWN buttons, press the ENTER button.
CLEANING AND MAINTENANCE The operator has to make sure that safety-relating and machine-technical installations are inspected by an expert after every four years in the course of an acceptance test. The operator has to make sure that safety-relating and machine-technical installations are inspected by a skilled person once a year.
TECHNICAL SPECIFICATIONS Power supply: Power consumption: Number of DMX channels: DMX-512 connection: Maximum ambient temperature Ta: Maximum housing temperature TC (steady state): Min. distance from flammable surfaces: Min. distance to lighted object: Fuse: Dimensions (LxWxH): Weight: 230 V AC, 50 Hz ~ 750 W 1/2/5/10 3-pin XLR 45° C 200° C 0.