900mm Dual Fuel Upright Manual MODEL GGF90S - Stainless Steel Installation and Operation
WHEN YOU CALL FOR SERVICE When you call for service or order parts for your unit, be sure to give: 1. MODEL 2. SERIAL NUMBER 3. COLOUR 4. PART NAME and/or description of problem 5. YOUR FULL NAME, ADDRESS, and HOME TELEPHONE NUMBER and BUSINESS TELEPHONE NUMBER IF APPROPRIATE. RECORD HERE FOR EASY REFERENCE Model Serial Number Colour Installation Date Dealer's Name and Address Servicing shall be carried out only by authorised personnel.
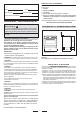
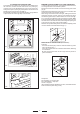
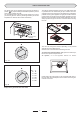
Note: The cooker is fitted with 4 legs for an eventual alignment in height with the furniture ( fig. 1 A ). POSITIONING Important: Fix the chain located next to the gas connection on both sides of the cooker to the wall to prevent the cooker from tilting. Both chains must be securely fixed. Make sure that the wall surface behind the Cooker is noncombustable (will not catch fire). Where a painted surface is adjacent, a fire retardent paint surface is recommended.
ELECTRICAL CONNECTION The appliance must be installed by a suitably qualified person in accordance with these instructions and with the requirements of the Australian Wiring Rules AS/NZS 3000. Fixed wired installations are to be provided with suitable isolation means in accordance with the said rules. Any plug socket installed for the purpose of connecting the appliance to supply must be readily accessible when the appliance is installed.
GAS CONVERSION AND ADJUSTMENT When used with natural gas all burners have been preset at our factory and further adjustment should not be necessary. Conversion kits to other gases are available from the place of purchase. Do not attempt to fit the conversion kit yourself. Conversion to U-LPG gas should only be carried out by an authorized technician. SPECIAL NOTE After installation or any servicing operation, always ensure that the appliance is gas sound and that the components are now operating correctly.
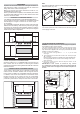
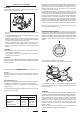
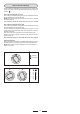
MINIMUM FLOW ADJUSTMENT FOR OVEN THERMOSTAT In order to adjust the minimum, act as follows: switch the burner on turning the knob to the maximum position. Remove the knob and unscrew of some turns the by-pass screw (fig. H). Assemble the knob and let the oven warm up for 15 minutes; after that turn the knob to the minimum position.
Always use pans with a flat base diameter, which are well balanced and stable in use, a pan which overhangs the hotplate should not be used. Avoid using old, misshapen pans, or pans which are unstable when placed on a flat surface. Do not use split pans as they are inherently unstable. To save gas, always position pans centrally over the burners and adjust the flames so that they do not lick up the sides of the pan and only the base is heated.
USE OF THE GAS OVEN The first time the oven is used, it may give off acrid smells, caused by the first heating of isolating panels glue surrounding the oven (it is necessary to heat up the oven at the maximum temperature for about 30-40 minutes with closed door). It is something normal, and in case it will occur, wait for the smoke to stop before introducing the food into the oven.
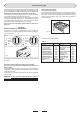
USE OF THE ELECTRIC GRILL The electric grill can be operated turning the knob clockwise on position (fig. 5A) and setting the desired temperaure by means of the energy regulator (fig. 5B). The red warning light on the control panel will light up to inform you that the grill is on and the yellow light will stay lit until the temperature is reached, after it will lit intermittently.
USE OF THE FAN FUNCTION Some models are fitted with oven fan placed in the central part of the oven cavity. It can be operated turning the knob (fig. 6) on position . Use of the fan assisted gas oven The air which is heated by the gas burner is circulated by the fan which distributes the heat on the food. NOTE: this function must be used with the oven burner and the fan switch both on. This function must be used with the oven door closed.
INSTRUCTIONS FOR USE OF CONTROL DEVICES (ACCORDING TO THE MODELS) ELECTRONIC TIMER FOR COOKER (Fig. 9) Functions On The display flashes. MINUTES COUNTERS (Fig. 8) Turn the knob clockwise to set the desired cooking time. The minutes minder can be adjusted from 1 to 60 minutes. A sound signal will inform you that the chosen time is up. Time setting Press the left button. Set the time with buttons + and -. This function remains activated 7 seconds after the last +/operation.
Daily Regular wiping down directly after use prevents dirt from burning on. Clean the appliance with water and a detergent or all purpose cleaner. Avoid using too much water to prevent it entering the burner or ventilation openings. CLEANING Before cleaning the appliance, close the gas stopcock and unplug appliance or disconnect power at the main circuit breaker of the electrical system. Do not clean the appliance surfaces when still hot.
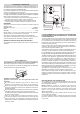
Disassembly of the worktop must only be done by a qualified service technician DISASSEMBLE OF WORK-TOP In case it is necessary to repair or replace the inside components, act as follows: Remove the grids, remove burners and flame-spreaders (see fig. 13), unscrew the visible screws V placed on the work-top (see fig. 14). Disassemble the work-top by unscrewing the rear screws A (see fig. 15A or 15 B according to the models).
GREASING OF TAPS If a tap becomes hard to be turned, grease it using a specific grease withstanding high temperatures. Act as follows: open the work-top and disassemble also the control panel as described on the previous paragraph. Unscrew the two fixing screws from the burner body (see picture) and remove the cone. SOME SAFETY POINT Do not use the appliance as a space heater. If you smell gas Open a window. Do not use any electrical switches. Immediately extinguish naked flames.
OVEN DOES NOT WORK AT ALL First, when the oven is equipped with timer, check appliance is not programmed to turn on later. If it is, turn to manual setting (i.e. hand symbol). If the button or scale on the timer remains in the automatic position after use, the power supply to the oven will be interrupted. Also, check your appliance is switched on at the mains. Next check for an unexpected power strike by switching on adjacent lights etc. Finally, check fuses and plug wiring.
538621 - 29 - 07 - 10