HC10TVTM OWNER’S MANUAL
Table of Content Page Content -----------------------------------------------------------------------------------------------------02 1. Components Check -------------------------------------------------------------------------------------03 2.
1. Components Checking Check the following fittings after opening the box. If there is anything missing, please contact with the local dealer. Right Upright x1 Left Upright x1 Computer Console x1 Parts kit x1 Frame x1 3 2010/4/7 Ver1.1+V1.
2. Overview Drawing Fan Vent Touch Sensor Console Hand Grip Pulse Bottle Holder Emergency Button Handrail Running Belt Anti-Slip Pad Frame Assembly Adjustment Foot Pad 4 2010/4/7 Ver1.1+V1.
2-1 Computer Console Fan Adjust to change the wind direction. Touch-Sensitive Computer Please refer to 5-1 Computer Struction about the details. MP3 Input/Earphone Output Bottle Holder Please refer to 5-3 Cup Holder and Stuff Holder about the details Utility Tray Please refer to 5-3 Bottle Holder and Utility Tray about the details. 5 Emergency Button Please refer to 3-6 Emergency Stop 2010/4/7 Ver1.1+V1.
2-2 Software Update Slot TV Software Update Slot Open the cover back of the computer and insert the wire to update software. (If need, please contact with the dealer) C-SAFE Slot Update the software by RJ45 port at the back of the computer. 6 2010/4/7 Ver1.1+V1.
2-3 Wire Rod and Power Switch Wire Rod System Coil the extra power cord on this to tidy it up. CAUTION ! Don’t carry the treadmill by this as it will bend. Power Socket Power Switch Circuit Breaker Power Switch Circuit Breaker If the current goes over the rated value, it will reset automatically. After 10 minutes, the pressure will go back to the preset value. Bounce Automatically Power Socket Pay attention to the voltage of the socket (110V or 220V). 7 2010/4/7 Ver1.1+V1.
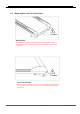
2-4 Running Belt and Side Incline Base Caution Running Belt Keep hands away from the running belt while the treadmill is running. If service needs to be done near this area, turn the treadmill off and unplug the unit first. Caution Lateral Incline Base Keep hands away from the front end of the treadmill and elevation arm. If service needs to be done near this area, turn the treadmill off and unplug the unit first. 8 2010/4/7 Ver1.1+V1.
3. Caution 3-1 Important Safety Instructions Warning: To reduce the risk of burn, fire, electric shock, or physical injury, please read the important safety instructions and product information carefully before starting to use this product. The owner of the treadmill should take on the responsibility to make sure that all the users can fully understand the cautions and important safety instructions • Before starting any exercise/fitness program you should consult with your healthcare professional.
spikes on shoes. • Connect the product to a properly grounded dedicated outlet only. Do not connect other appliances to the same outlet or circuit. • Before stepping on the treadmill, please stand on the anti-slip pads on either side of the treadmill frame. Step on the treadmill after it begins to run. this will avoid unnecessary initial loads. • Before using the treadmill, please examine every part first. • Never drop or insert any objects into any vent of the treadmill.
3-2 Power Requirement This treadmill needs special power supply: Power Voltage(V)Frequency(HZ) Rated Current(A) 100 50/60 18 120 50/60 18 200 50/60 9 220 50/60 9 230 50/60 9 240+ 50/60 9 A dedicated outlet is REQUIRED for this treadmill. The hot, neutral and ground wires must each be routed independently (not looped or tied to other circuits. This product must be properly grounded to prevent damage from a lightning strike.
3-3 Leveling Adjustment An uneven floor may cause the treadmill to rock while it is running. Adjust the leveling feet as follows to make the unit stable. The method of adjustment is as follows: 1. Turn A counter-clockwise to loosen it. 2. Adjust B to a proper height. 3. Turn A clockwise to tighten it. 4. The same adjustment is used for each side. 3-4 Power Switch The Power Switch is on the bottom panel of the treadmill. 1 means on, 0 means off. 12 2010/4/7 Ver1.1+V1.
3-5 Centering The Belt After installing and leveling the treadmill, check the belt to ensure that it is tracking properly. First, plug the power cord into an appropriate dedicated outlet. Then, turn the treadmill ON. Have one person stand on the anti-slip pads on either side of the treadmill frame. Do not stand on the running belt at this time. Press the QUICK START key, and increase the speed to 4.0 mph (6.4kph).
3-6 Emergency Stop System This treadmill is equipped with the safety system. The emergency stop button is shown on the drawing.There are two ways to make the treadmill stop emergently: 1. Press the safety key Press safety key, the treadmill will stop running immediately 2. Pull out the rope Pull out the below rope to stop it. 14 2010/4/7 Ver1.1+V1.
Caution: When flapping on /press the safety key, the part tied by the below rope will protrude. If the treadmill returns to start/ready status, please press the protuberant part. Press the protruded part back The treadmill will return to the start/ready status. 15 2010/4/7 Ver1.1+V1.
4. Assembly Instructions Please read the instructions carefully before assembling the unit,then choose a flat position to start. 4-1 Pre-Assembly Check List ITEM A B C D Description Computer Console Frame Left Handrail Right Handrail 16 Qty 1 1 1 1 2010/4/7 Ver1.1+V1.
Parts kit ITEM a Hex Screw M10xP1.5x70 Qty 8 b Hex Screw M8XP1.25x15 4 c d e Description Hex Wrench 5mm x 80mm x 80mm Hex Wrench 6mm x 80mm x 80mm Hex Wrench 10mm x 65mm x120mm 1 1 1 f Bushing Wrench + Screwdriver 1 g h i Hex Screw M8XP1.25x20 Washer Ø8 xØ19 x 3.0 Spring Washer M8 2 2 2 17 2010/4/7 Ver1.1+V1.
4-2 Assembly Steps TV Cable(Lower) AV Extension Wire(Lower) Control Wire Port Upper Motor Cover Washer Spring Washer Philips Screw Philips Screw Hex Screw Running Belt Philips Screw Philips Screw Frame Assembly Two people should finish the assembly steps. (Caution!! Please follow exactly the assemly steps below to aviod injury.) 1. First, loosen the Philips Screws (altogether 10cpcs) which fix the upper motor cover on the Frame(B), remove the upper motor cover.
TV Cable(Upper) AV Extension Wire(Upper) Computer Grounding Wire Computer Control Wire AV Extension Wire(Lower) TV Cable(Lower) Upright Control Wire Frame Grounding Wire 1. Put the Computer Console (A) on the upper part of the Uprights(C,D) on the assembled Frame(B), and connect the uprights control wire with computer control wires. Last, tighten the computer console with Hex Screw(b) on the upper part of uprights. 2.
5. COMPUTER D J C E I I B I K I A I F/G/H The treadmill provides users with a simple and easy-to-use interface. User can enter settings and exercise targets through the computer. 5-1 Display Interface Description A -Program Main Window: (1) The curve shows the value of incline and speed throughout programs. At bottom left chart, the upper chart indicates incline and speed for a complete workout session and data be updated once every minute.
B - Display of time, incline and speed information: Workout time and incline/speed value will display on dashboard. A green grid will be lit every 60 seconds. If all grids are filled, it will start again from the 1st green grid. If speed increases 1KPH, a yellow grid will be lit. If incline increase 1level, a blue grid will be lit. C –Heart Rate Value The heart rate value will display (Range: 50-240BPM). It displays user’s heart rate by using either contact handpulse or chest belt.
5-2 Key Instructions F -QUICK START: 1 - Enter manual run After pressing this key, motor runs at the lowest speed 0.8KPH (0.5MPH). Incline will return 0% automatically. During workout, users can adjust the incline and speed. 2 -Restart motor Under pause status, if pressing this key again, the motor will gradually resume to previous setting speed. G -Stop and Emergency Stop 1 -Pause/stop during workout Press this key once can pause treadmill during workout.
I -Touch Keys Turn on or turn off vedio function which includes AV/TV/CATV/DTV/MP3. :After turning on the video, press this key to adjust the volume or channel. :After the motor starts, press this key to adjust speed or incline. :Start treadmill directly. : Stop treadmill immediately or leave the present menu and then revert to start/ready status. Pause motor. :Under DTV mode, this icon will appear. Press to show DTV menu :Press this key to start or stop the fan. :Increase setting. :Confirm setting.
◎Device Instruction J - Fan Vent Adjust vent up and down. K - Sound Output/Input Jack Built-in jack can insert MP3 player or earphone for playing and listening music. 24 2010/4/7 Ver1.1+V1.
5-3 Bottle Holder and Utility Tray Computer console has cup holder (A) and two utility trays (B) in which you can put a MP3 player, mobile phone etc. B Utility Tray A Bottle Holder Grasp the lower brim of bottle and turn left, then pull out the bottle holder to clean 25 2010/4/7 Ver1.1+V1.
5-4 Operation Instructions 1. Turn on the treadmill. 2. You will hear a sound after 5 seconds which means start/ready menu is loaded, then you hear a sound again after 5 seconds, press any key, than ”beep” can be heard, at this time, treadmill is ready to run. 3. You can press OFF or ON to switch screen between menu, bar chart and TV. 4. Press safety key, and the screen will display , at this time, motor will stop and user should press the protruded part back to return start/ready status. 5.
6. Workouts ( Programs ) z MANUAL Mode Under start/ready status, press QUICK START key to start the program. The default weight 70 kg will be used for calculating calorie consumption. Under this mode, you can press speed/incline key to adjust the incline and speed of the treadmill. Initial incline is 0 % and initial peed is 0.8 KPH. Default Time is 0 min. z Program Mode HRC(Chest belt must be used): The purpose of this program is self-training based on heart rate. The first 2 min is warm up period.
Press to confirm. Program will start immediatelly.
Heart Rate Monitoring A. Hand Sensor System During exercises, grasp the stainless steel sensors on the front handrail to check your heart rate. Two sensors are located on each of the handrails. Contact must be maintained with all four sensors to obtain a heart rate. The console displays a heart rate within 20 to 30 seconds of contact with the sensors. Do not attempt to grasp the sensors at speeds above 4.5 MPH, or 7.2 KPH. For these speeds, the use of a heart rate chest strap is recommended. B.
9 HOLE RUN: This program is based on 3500m, after you run for 3500m, the program is completed, and then the treadmill will stop. This program simulates the terrain of a golf course,the intensity will be decided by the change of incline. After user selects this program, screen will require the user to input the following setting. :Default : 70 kg,Range:23~180 kg,Step is 1 kg. After selection, into the next setting. press :Default : LV 1,Range:1~10 LV,Step is 1 LV.
◎ Please refer to the attached table for L1-L10 profile. AEROBIC: The aerobic is cardiovascular exercise and to improve blood circulation in your body. Large amount of oxygen will be consumed as metabolism during aerobic exercise, for example, walking, swimming, playing tennis, biking and dancing. Aerobic exercise will burn dextrose and fat, so it is good way to loose fat.
:Default: 70 kg,Range:23~180 kg,Step is 1 kg. After selection, into the next setting. press :Default Value: LV 1,Range:1~10 LV,Step is 1 LV. After selection, press into the next setting. : Default is 20 min;Time Range:20~99 min,Step is 1 min. After selection, press and the treadmill will start. ◎ Please refer to the attached table for L1-L10 profile.
※Error Code:( Please contact with local dealer to solve the problem) :Can’t read the speed feedback. :Incline motor can’t work within the ADC range. :Incline is higher or lower(out of range).Should be self-correction automatically after restart the treadmill. 33 2010/4/7 Ver1.1+V1.
7. Video Operation Instructions 1. Under start/ready status or treadmill is running, press / key to turn on/off. 2. After turning on video, it will automatically switch to TV screen (default); you can switch between TV, video and music. See below. / (optional) 3. Analogue TV: there are CATV (Coaxial cable), TV (Antenna) for selection. You can select only one TV mode each time. Set-up is also available for further setting. 4. AV:to watch video by connecting DVD player through RGB with treadmill.
STEP2. After entering set-up, screen below will pop up STEP3. Press key to enter screen below, then select your TV system. STEP4. After selecting TV system, press TV or CATV key (marked in red) 35 2010/4/7 Ver1.1+V1.
STEP5. Pressing key for auto scan that will take about (1) minute to complete. STEP6. After completion of auto scan, press key, then a beep sound comes up. 5 sec later, screen will automatically return to start/ready status. STEP7. Power on and then power off treadmill to save setting. STEP8. Under start/ready status, press key, then switch to 36 (photo below). 2010/4/7 Ver1.1+V1.
STEP10. Adjust VOLUME ▲▼; select CHANNEL ▲▼ STEP11. If TV signal is from cable, press key to watch cable TV (Photo below) ※ In analogue TV, if TV channels are lacking or screen is not responsive when touch, please check signal strength should be 60-75 dBuV up to turner board. If signal strength is correct, please rescan again (STEP1). If problems still persist, please contact with your dealer or local TV company.
STEP2.Press key again, or press +/-to switch unit. Control software version Touch panel software version Unit (0000:MPH;0001:KM/H) STEP3. Once unit is set, press key twice to leave set-up and return to start/ready status. Should any difficulty come up during set-up, please power off and power on machine first or alternatively, please contact with your dealer. 38 2010/4/7 Ver1.1+V1.
◎Digital TV Set-Up Procedure (DTV is optional) Screen below will pop up when DTV is set first time. STEP1. Select your country by touching CHANNEL▲▼ (below photo) STEP2. Move cursor down to language by touching VOLUME▲▼, then select language by touching CHANNEL▲▼ STEP3. Press key to start auto scan. (Below photo) 39 2010/4/7 Ver1.1+V1.
STEP4. Once auto scan is completed 100%, channels will be saved (Below photo) and turns automatically to DTV screen. STEP5. Adjust VOLUME ▲▼; select CHANNEL ▲▼. STEP6. Touch icon to show or close weekly DTV programs. (Below photo) STEP7. Touch CHANNEL▲▼ to show TV program from Monday to Sunday; touch VOLUME▲▼ to show daily TV programs; Touch key to show the channel organizer table(Below photo), then touch VOLUME▲▼ to choice channel ,Touch 40 key to confirm. 2010/4/7 Ver1.1+V1.
※Attention: When DTV setting is incorrect or no DTV signal, step4 screen will show the main menu because of the scanning defeat,Please restart or return to page of the STEP1 according to the STEP9 way, and re-set step1~step4 until setting is completed. STEP8. In the case to re-set main menu, hold up below screen will pop out,. (Touch key for 10~15sec (under DTV image screen),then key can cancel the step and return to the screen of weekly TV programs) STEP9.
(We strongly recommend not entering other setting screen, please touch key to finish setting) ※Attention: In DTV, if there are lacking channels, no signal or screen lag, please check signal strength should be 60~75dBuV up to turner board. If signal strength is correct, please enter the main menu (STEP 8) to reset again. If problems still persist, please contact with your dealer or local TV company. 42 2010/4/7 Ver1.1+V1.
8. Project Figure L1-L10 Speed/Incline Table 9 Holes 9 hole Run Program Level 1 9 hole Run Program Level 2 Time Incline Speed (kph) Speed (mph) Time Incline Speed (kph) Speed (mph) Time Incline Speed (kph) Speed (mph) 1 31 2 1.6 1 1 4 1.6 1 31 2 1.6 1 1.6 1 32 2 1.6 1 2 4 1.6 1 32 2 1.6 1 2 1.6 1 33 2 1.6 1 3 4 1.6 1 33 2 1.6 1 4 2 1.6 1 34 2 1.6 1 4 4 1.6 1 34 2 1.6 1 5 2 1.6 1 35 2 1.6 1 5 0 1.6 1 35 4 1.6 1 6 2 1.
30 2 1.6 1 60 4 1.6 1 30 2 44 1.6 1 60 0 1.6 1 2010/4/7 Ver1.1+V1.
9 hole Run Program Level 3 Time Incline Speed (kph) 9 hole Run Program Level 4 Speed (mph) Time Incline Speed (kph) Speed (mph) Time Incline Speed (kph) Speed (mph) Time Incline Speed (kph) Speed (mph) 1 4 1.6 1 31 6 1.6 1 1 4 1.6 1 31 6 1.6 1 2 4 1.6 1 32 6 1.6 1 2 4 1.6 1 32 6 1.6 1 3 4 1.6 1 33 8 1.6 1 3 4 1.6 1 33 4 1.6 1 4 4 1.6 1 34 6 1.6 1 4 4 1.6 1 34 2 1.6 1 5 4 1.6 1 35 6 1.6 1 5 2 1.6 1 35 2 1.
9 hole Run Program Level 5 Time Incline Speed (kph) 9 hole Run Program Level 6 Speed (mph) Time Incline Speed (kph) Speed (mph) Time Incline Speed (kph) Speed (mph) Time Incline Speed (kph) Speed (mph) 1 6 1.6 1 31 6 1.6 1 1 6 1.6 1 31 10 1.6 1 2 6 1.6 1 32 6 1.6 1 2 6 1.6 1 32 10 1.6 1 3 6 1.6 1 33 6 1.6 1 3 6 1.6 1 33 4 1.6 1 4 6 1.6 1 34 8 1.6 1 4 0 1.6 1 34 4 1.6 1 5 10 1.6 1 35 8 1.6 1 5 0 1.6 1 35 4 1.
9 hole Run Program Level 7 Time Incline Speed (kph) 9 hole Run Program Level 8 Speed (mph) Time Incline Speed (kph) Speed (mph) Time Incline Speed (kph) Speed (mph) Time Incline Speed (kph) Speed (mph) 1 8 1.6 1 31 2 1.6 1 1 8 1.6 1 31 10 1.6 1 2 8 1.6 1 32 2 1.6 1 2 8 1.6 1 32 10 1.6 1 3 6 1.6 1 33 2 1.6 1 3 10 1.6 1 33 10 1.6 1 4 6 1.6 1 34 6 1.6 1 4 10 1.6 1 34 10 1.6 1 5 0 1.6 1 35 6 1.6 1 5 10 1.6 1 35 10 1.
9 hole Run Program Level 9 Time Incline Speed (kph) 9 hole Run Program Level 10 Speed (mph) Time Incline Speed (kph) Speed (mph) Time Incline Speed (kph) Speed (mph) Time Incline Speed (kph) Speed (mph) 1 10 1.6 1 31 10 1.6 1 1 10 1.6 1 31 12 1.6 1 2 6 1.6 1 32 10 1.6 1 2 8 1.6 1 32 12 1.6 1 3 6 1.6 1 33 10 1.6 1 3 8 1.6 1 33 8 1.6 1 4 6 1.6 1 34 10 1.6 1 4 8 1.6 1 34 8 1.6 1 5 6 1.6 1 35 10 1.6 1 5 8 1.6 1 35 8 1.
5K Run 5K Run Program Level 1 Time Incline 5K Run Program Level 2 Speed (kph) Speed (mph) Time Incline Speed (kph) 5K Run Program Level 3 Speed (mph) Time Incline Speed (kph) Speed (mph) 5K Run Program Level 4 Time Incline Speed (kph) 5K Run Program Level 5 Speed (mph) Time Incline Speed (kph) Speed (mph) 1 0 8.8 5.5 1 0 9.6 6 1 0 10.4 6.5 1 0 11.2 7 1 0 12 7.5 2 0 8.8 5.5 2 0 9.6 6 2 0 10.4 6.5 2 0 11.2 7 2 0 12 7.5 3 0 8.8 5.5 3 0 9.
5K Run Program Level 6 Time Incline Speed (kph) 5K Run Program Level 7 Speed (mph) Time Incline Speed (kph) Speed (mph) 5K Run Program Level 8 Time Incline Speed (kph) 5K Run Program Level 9 Speed (mph) Time Incline Speed (kph) 5K Run Program Level 10 Speed (mph) Time Incline Speed (kph) Speed (mph) 1 0 12.8 8 1 0 13.6 8.5 1 0 14.4 9 1 0 15.2 9.5 1 2 16 10 2 0 12.8 8 2 0 13.6 8.5 2 0 14.4 9 2 2 15.2 9.5 2 2 16 10 3 0 12.8 8 3 0 13.6 8.
Calorie Goal Calorie Goal Program Level 1 Time Incline Speed (kph) Speed (mph) Calorie Goal Program Level 2 Time Incline Speed (kph) Speed (mph) Calorie Goal Program Level 3 Calorie Goal Program Level 4 Time Incline Speed (kph) Speed (mph) Time Incline Speed (kph) Speed (mph) Calorie Goal Program Level 5 Time Incline Speed (kph) Speed (mph) 1 2 5.4 3.3 1 0 5.6 3.5 1 4 5.9 3.6 1 0 6.1 3.8 1 0 6.1 3.8 2 0 5.4 3.3 2 3 5.4 3.3 2 0 5.9 3.6 2 0 5.9 3.6 2 0 6.
Aerobic Speed and incline change Aerobic RUN Incline Level 1 Level 2 Level 3 Level 4 Level 5 Level 6 Level 7 Level 8 Level 9 Level 10 (KPH) (MPH) Incline (KPH) (MPH) Incline (KPH) (MPH) Incline (KPH) (MPH) Incline (KPH) (MPH) Incline (KPH) (MPH) Incline (KPH) (MPH) Incline (KPH) (MPH) Incline (KPH) (MPH) Incline (KPH) (MPH) 1 0 2.4 1.5 0 2.4 1.5 0 2.4 1.5 0 3.2 2 0 3.2 2 0 3.2 2 1 3.2 2 1 4 2.5 1 4 2.5 1 4 2.5 2 0 3.2 2 0 3.2 2 0 3.2 2 0 4 2.5 0 4 2.5 0 4 2.5 1 4 2.5 1 4.8 3 1 4.8 3 1 4.
HIGHLAND RUN HIGHLAND RUN Program HIGHLAND RUN Level 1 Program HIGHLAND RUN Program HIGHLAND RUN Level 2 Time Incline Speed (kph) Speed (mph) Level 3 Time Incline Speed (kph) Speed (mph) Program HIGHLAND RUN Level 4 Time Incline Speed (kph) Speed (mph) Program Level 5 Time Incline Speed (kph) Speed (mph) Time Incline Speed (kph) Speed (mph) 1 1 3 1.8 1 1 4 2.5 1 1 3 1.8 1 1 3 1.8 1 1 5.5 3.4 2 3 3 1.8 2 3 4 2.5 2 5 4.5 2.8 2 5 5 3.1 2 5 5.5 3.
Hill Interval Hill Interval Program Level 1 Time Incline Speed (kph) Speed (mph) Hill Interval Program Level 2 Time Incline Speed (kph) Speed (mph) Hill Interval Program Level3 Hill Interval Program Level Time Incline Speed (kph) Speed (mph) Time Incline Speed (kph) 4 Hill Interval Program Level 5 Speed (mph) Time Incline Speed (kph) Speed (mph) 1 1 3 1.8 1 1 3 1.8 1 1 3 1.8 1 1 3 1.8 1 1 5 3.1 2 3 5 3.1 2 3 5 3.1 2 3 5 3.1 2 5 5 3.1 2 5 5 3.
Fat Burn Speed and incline change Fat Burn Level 1 Incline (KPH) (MPH) Level 2 Incline (KPH) (MPH) Level 3 Incline (KPH) (MPH) Level 4 Incline (KPH) (MPH) Level 5 Incline (KPH) (MPH) Level 6 Incline (KPH) (MPH) Level 7 Incline (KPH) (MPH) Level 8 Incline (KPH) (MPH) Level 9 Incline (KPH) (MPH) Level 10 Incline (KPH) (MPH) 1 0.0 1.5 0.9 0.0 2 0.0 2.0 1.2 0.0 3 0.0 2.5 1.5 1.0 4 1.0 3.5 2.1 1.0 5 1.0 2.0 1.2 1.0 6 1.0 3.0 1.8 2.0 7 1.0 2.0 1.2 2.0 8 2.0 4.0 2.5 2.0 9 2.0 2.0 1.2 2.