
Instruction manual


26
5.6 Measuring Range Settings
The conductivity controller has 6 different measuring ranges. You need to select a
range which is the most suitable for conductivity reading of your
applications/samples. The factory default is 2000 µS (0 to 2000 µS/cm).
The measuring range you select here will affect the way the controller behaves in
the measurement mode and calibration mode. In measurement mode, if the
conductivity reading of the controller is above the selected measuring range, the
LCD shows “Or” (over range) error. In calibration mode, the controller adjusts
calibration tolerance based on full scale of the selected measuring range. The
calibration is carried out only for the selected measuring range.
WARNING: If you change the measuring range of the controller after calibration is
done, the controller will reset back to its factory default calibration.
Press ▲ or ▼ key to access other setup screens or press ▲ and ▼ key
simultaneously (escape) to return to measurement mode.
11
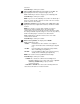
From measurement mode press ENT
key to enter setup mode as described in
section 5.1. The LCD shows the first
screen of setup mode (rAng). Press
ENT key to access measurement range
setting (rAng).
2
The upper display shows the currently
selected measuring range. The factory
default is 2000 µS. The lower display
shows the currently configured cell
constant (k). (Refer section 4.2 for
setting cell constant)
Press ▲ or ▼ key to select the desired
measuring range. Press ENT key to
confirm your selection.
The controller reverts to rAng screen.
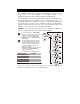
Measuring range Resolution
0.000 to 2.000 µS/cm 0.001 µS/cm
0.00 to 20.00 µS/cm 0.01 µS/cm
0.0 to 200.0 µS/cm 0.1 µS/cm
0 to 2000 µS/cm 1 µS/cm
0.00 to 20.00 mS/cm 0.01 mS/cm
0.0 to 200.0 mS/cm 0.1 mS/cm
SETUP
HOLD
ENT
1
µS
HOLD
SETUP
2
µS
HOLD
SETUP
2
µS
HOLD
SETUP
2
µS
HOLD
SETUP
2
mS
HOLD
SETUP
2
mS
HOLD
SETUP
2
ENT
ENT
ENT
ENT
ENT
ENT