
User Guide


Instruction Manual CON 510
11
5.2 Manual Temperature Compensation
NOTE: For manual temperature compensation, you must deactivate the ATC mode to ‘nO’ as shown in SETUP sub-
menu P3.3.
5.2.1 Setting a manual temperature compensation value
To set manual temperature compensation value, you need to determine and enter the
desired temperature value into the meter. This value is based on which reading will be
manually temperature compensated. You may select any temperature between 0 and 100
°C (32 to 212 °F). Default value is 25.0 °C
.
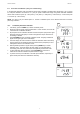
1. Switch the meter on if necessary. Press MODE to select any measurement mode.
2. If necessary, select ATC to OFF as described in Section 5.1. Note the [ATC] indicator
should not appear on the display.
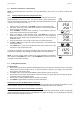
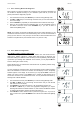
3. Press CAL/MEAS to enter into either conductivity or TDS calibration mode. The
[CAL] indicator will appear above the upper display.
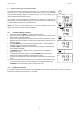
4. While in Conductivity or TDS calibration mode, press MODE key to enter into
temperature calibration mode. The upper display shows the current temperature
setting and the lower display shows the default value 25.0 °C (77.0 °F) or its last set
temperature value.
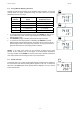
5. Check the temperature of your sample solution using an accurate thermometer.
6. Use MI/▲ or MR/▼ key to offset and match the temperature to the measured value
of the sample solution.
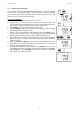
7. Press ENTER key to confirm the set temperature value and the meter returns to the
conductivity or TDS measurement mode.
The meter will now display your newly set temperature value in the lower display and will
compensate Conductivity or TDS readings accordingly based on this set temperature.
NOTE: To exit this program without confirming the manual temperature compensation
value, DO NOT press ENTER key in step 7. Press CAL/MEAS key instead and note that
no change is being made at this stage.
5.3 Taking Measurements
To take readings:
1. Always rinse the probe with de-ionized or distilled water before use and after each sample to remove any impurities
adhering to the probe body. Shake or air dry. To avoid contamination or dilution of your sample, rinse probe with a
small volume of your sample solution.
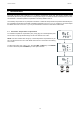
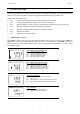
2. Press ON to switch on the meter and the [MEAS] indicator appears on the top of the LCD.
3. Dip the probe into the sample. Ensure that the solution level is above its upper steel band. Stir the probe gently in
the sample to create a homogenous sample.
4. Allow time for the reading to stabilize. Note the reading on the display.
5. Press MODE to toggle between Conductivity and TDS measurement.
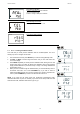
Taking measurements with READY indicator selected on
If the READY indicator has been activated, the [READY] indicator lights whenever the reading has stabilized. You may
switch the READY indicator on or off by following the sequence as described in SETUP sub-menu P3.1.
Taking measurements with the Auto-Hold feature selected on
When a reading has stabilized for more than 5 seconds, the Auto-Hold feature automatically “freezes” the displayed
reading and the [HOLD] indicator appears. Press HOLD once to release the reading. You may deactivate the Auto-Hold
feature as described in SETUP sub-menu P3.1.
o
C
ATC
o
C
A
TC
MEAS
o
C
CAL
.
CAL
.
.
uS
READY
.
.
E
N
T
E
R
R
A
N
G
E
M
O
D
E
C
A
L
M
E
A
S
M
O
D
E