
User Guide


Instruction Manual CON 510
16
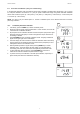
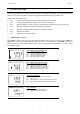
7.3 P2.0: Viewing Electrode Diagnosis
Main program 2.0 shows the effective cell constant for each range being calibrated. The
cell constant is adjusted according to your calibration options that let you check the
probe’s parameters for diagnostic purposes.
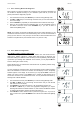
1. From measurement mode, press SETUP key to enter into setup [SETUP] mode.
2. Use MI/▲ or MR/▼ key to scroll through sub-menus until you view main-menu ELE
P2.0 on the display.
3. Press the ENTER key repeatedly to view the effective cell constant for each range.
4. When you have scrolled through all calibration data, you will automatically return to
the SETUP main-menu P2.0. Press CAL/MEAS key if you wish to return to
measurement [MEAS] mode.
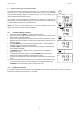
NOTE: Cell constants of electrode will degrade with time and usage depending on your
maintenance and wear and tear of the electrode being used. You can use this feature to
prompt you the need for a new probe prior to total failure. Recommended value as an
indicator for a replacement of probe is either 0.60 or 1.40 (±40% of 1.000).
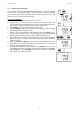
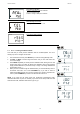
7.4 P3.0: Meter Configuration
P3.1: READY indicator and Auto-Hold function
Program P3.1 allows you to select “READY ON”, “READY OFF” and activate the Auto-
Hold function. “READY” indicator is a useful feature that prompts you whenever your
measured reading has stabilized. Once activated you will see [READY] indicator lights
up whenever your readings have stabilized. At this moment, you may depress MI/▲ to
store the reading into meter’s memory.
Select “READY OFF” for instantaneous measurement with no [READY] indicator being
lighted up on the display.
You may activate the Auto-Hold function which automatically freezes measured reading
after it has stabilized for more than 5 seconds. Once the display is frozen, the [HOLD]
indicator appears on the display. At this moment, you may depress MI/▲ to store the
reading into meter’s memory. Press HOLD once to release the held reading and to
access other functions in the measurement mode. You may deactivate this feature by
selecting either “READY ON/OFF”.
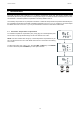
1. From measurement mode, press SETUP key to enter into setup [SETUP] mode.
2. Use MI/▲ or MR/▼ key to scroll through the sub-menus until you view SETUP
main-menu P3.0 on the display.
3. Press ENTER key to select sub-menu P3.1 with upper display showing “rdY”.
4. Use MI/▲ or MR/▼ key to select the appropriate configuration you require.
Selecting ON switches the READY indicator on; OFF switches the READY indicator
off; ON and HOLD together switches the Auto-Hold feature on.
5. Press ENTER to confirm selection and to proceed to Program P3.2. If you do not
wish to continue P3.2, press CAL/MEAS to return back to the measurement [MEAS]
mode.
SETUP
SETUP
.
.
READY
.
READY
SETUP
.
READY
ON
OFF
ON
HOLD
SETUP
E
N
T
E
R
R
A
N
G
E
C
A
L
M
E
A
S
E
N
T
E
R
R
A
N
G
E
SETUP
.
SETUP
.
SETUP
K=
.
K=
.
.
K=
.
E
N
T
E
R
R
A
N
G
E
C
A
L
M
E
A
S