
User Guide


Instruction Manual DO 100
42
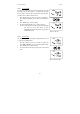
10. Using the installation tool, screw the membrane
lock back into the cap. Tighten the lock firmly over
the membrane and O-ring, but do not over tighten.
11. Inspect the membrane for wrinkles. If wrinkles
exist, remove the membrane and repeat steps 8 –
11.
12. Fill the membrane cap with water and inspect the
bottom for leaks. If water drops are leaking from
the membrane, re-seal the membrane on the O-
ring (repeat steps 8 – 11, for membrane
replacement only).
13. If the assembly is leak-free, empty the water and
fill the membrane cap with electrolyte to the brim.
14. Tap the side of the housing gently to remove any
air bubble that may be sticking to the membrane.
15. Screw the cap onto the probe. Excess electrolyte
will drain out.
16. Replace probe guard.
17. Calibrate the probe (see section 4) after the %
saturation readings have stabilised.
NOTE
Membranes can only be used once. When a
membrane cap is screwed onto the probe, the
membrane is stretched by the cathode. If the same O-
ring and the membrane is used a second time it will not
fit perfectly onto the cathode. This will result in erratic
readings.
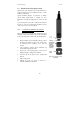
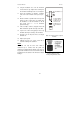
Figure 36: Parts of electrode
showing O-ring, membrane & lock
Close
Open
Installation tool
Insert installation
tool into slots on
membrane lock.
Then unscrew
membrane lock
from membrane
cap
Figure 35: Use Tool to take out (or put in)
membrane