
Instruction manual


11
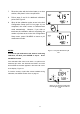
7. Rinse the probe with de-ionized water or a rinse
solution, and place it in the next pH buffer.
8. Follow steps 5 and 6 for additional calibration
points. See Figure 9.
9. When all the calibration points as set in the Unit
Configuration Setup (see P4.2 on page 31) are
completed, the meter returns to Measurement
mode automatically. However, if you wish to
terminate the calibration without completing the
number of points as set in the Unit Configuration
Setup menu, press CAL/MEAS to return to pH
measurement mode.
NOTES:
To exit from pH calibration mode without confirming
calibration, DO NOT press ENTER in step 6. Press
CAL/MEAS instead.
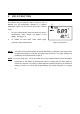
If the selected buffer value is not within ±1.0 pH from the
measured pH value: the electrode and buffer icon blink
and the ERR annunciator appears in the lower left corner
of the display. Figure 10.
To limit the number of pH buffer values available during
calibration, see SETUP section P4.2 on page 31.
Figure 9 - Next point calibration for pH
4.01
Figure 10 - Err message and electrode
icon will appear if incorrect buffer are
used