PITCHFACTOR User Guide WARNINGS Use only with supplied power supply. Avoid spilling liquids onto/into the unit. Do not expose to excessive heat or moisture. Do not open – there are no user serviceable parts inside. This equipment has been tested and found to comply with the limits for a Class B digital device pursuant to Part 15 of FCC rules.
PitchFactor User Guide Table of Contents WARNINGS ......................................................................................................................... 1 Introduction ....................................................................................................................... 4 A Few Words of Advice....................................................................................................... 4 Key Features .............................................................
PitchFactor User Guide Table of Contents Fine-tuning Tempo and Delays ......................................................................................... 38 Saving Presets................................................................................................................... 39 Edited Preset Indication .................................................................................................... 39 Auxiliary Switches ..................................................................
PitchFactor User Guide Introduction Introduction Congratulations on choosing an Eventide Harmonizer brand effects processor. For years we’ve dreamed of putting our rack mount effects in the hands of performing musicians and, in particular, at the feet of guitar players. PitchFactor is the latest realization of that dream; bringing true studio-quality audio, massive processing power, world-class effects, and unmatched flexibility to your live sound.
PitchFactor User Guide Overview Overview 5
PitchFactor User Guide The Basics The Basics There are a few basic concepts that you’ll have to grasp to use PitchFactor successfully. If you read nothing else, please read this section. The Effects There are ten distinct effect types which we call “Effects.” Select an Effect by turning the Encoder knob. Only one Effect can be active at a time. Controlling the Effects Each Effect has parameters that can be modified by turning the ten Control Knobs.
PitchFactor User Guide The Basics Each time that you press and hold the Right Footswitch, the unit will change from one Mode to the other. Using Play Mode When you’re in Play Mode, the Footswitches are used to control the Effect that’s currently loaded. The Left Switch toggles Bypass/Active. An ORANGE LED located above the Left Footswitch indicates that the Effect/Preset is Active (not Bypassed). The action of the Middle Switch depends on the effect type.
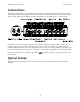
PitchFactor User Guide Connections Connections PitchFactor is designed to be flexible and can support both instrument and line-level inputs and outputs. Rear panel toggle switches allow you to independently select input and output levels. Audio Inputs and Outputs accept standard mono (unbalanced) ¼” phone plugs. PitchFactor can be connected directly to your guitar, behind another pedal, in your Amp’s effects loop or to your mixer’s send/return or insert.
PitchFactor User Guide Connections Guitar > PitchFactor > Amp - Mono In/Mono Out This is the simplest way to connect PitchFactor. Connect your guitar cable to PitchFactor Input 1 and a cable from PitchFactor Output 1 to your amp. Input and Output Level switches (In Lvl & Out Lvl) should be set to GUITAR and AMP. If you are using other stompboxes or pedals, it’s best to connect them in front of PitchFactor. Connect PitchFactor’s Input 1 to the output of the last pedal.
PitchFactor User Guide Connections Guitar > PitchFactor > Amp 1/Amp2 – Mono or Stereo In/Stereo Out Connect your guitar cable to PitchFactor Input 1 and a cable from PitchFactor Output 1 to one amp and a second cable from PitchFactor Output 2 to the other amp. Input Level switch (In Lvl) should be set to GUITAR and Output Level switch (Out Lvl) set to AMP. If you are using other stompboxes or pedals, it’s best to connect them in front of PitchFactor.
PitchFactor User Guide Connections Guitar > Amp Effects Send > PitchFactor > Amp Effects Return If your Amp has an Effects Loop, you can connect PitchFactor’s Input to the Amp Effect Loop Send and PitchFactor’s Output to the Amp Effect Loop Return. Most guitar amp’s Effects Loops run at Line Level so set PitchFactor’s Input and Output Level Switches to “Line.
PitchFactor User Guide Connections Mixer Effects Send> PitchFactor > Mixer Effects Return When connecting PitchFactor to a Mixer, set PitchFactor’s Input and Output Level Switches to “Line.
PitchFactor User Guide Bypass Bypass It’s important to select the PitchFactor Bypass function that works best with your setup. PitchFactor gives you the choice of Bypass type – DSP Bypass or Relay Bypass or DSP+FX Bypass. PitchFactor’s default Bypass setting is DSP Bypass. DSP Bypass When set to [DSP] Bypass, bypassing sends the audio at the DSP’s inputs directly to the outputs without any effects processing.
PitchFactor User Guide Mix Control Note: When connecting PitchFactor to a computer, we suggest that you use a dedicated audio interface (e.g. a Firewire Interface) and to select the type of Bypass that works best for your application. Note: PitchFactor has been carefully designed to not mess with your tone in any of the Bypass settings. Note: With PitchFactor’s power turned off, the relays automatically Bypass the unit.
PitchFactor User Guide Tuner Global Mix The Mix setting is always saved with each Preset. Often however, it can be useful to have the Mix setting uniform for all of the Presets that you’re using. To do this, use the System GLOBAL MIX command. When GLOBAL MIX is ON, the Mix setting saved with the Preset is ignored and the current Mix setting is used for all Presets. Turning GLOBAL MIX ON or OFF. The factory default is OFF.
PitchFactor User Guide The Effects The Effects PitchFactor has ten distinct pitch-based Effects – Diatonic, Quadravox, HarModulator, MicroPitch, H910/H949, PitchFlex, Octaver, Crystals, HarPeggiator, and Synthonizer. Selecting Effects The Effects can be selected by turning the Encoder. Using the Encoder to select Effects is a good way to get a feel for what PitchFactor can do. Turn the Encoder to step through and load each of the Effects.
PitchFactor User Guide The Effects Mix Control Controls the wet/dry signal ratio from 0 (dry signal only) to 100% (wet only). This control works identically for all the effects. See the earlier description of KILLDRY.
PitchFactor User Guide The Effects Diatonic Diatonic pitch shifters track the notes that you’re playing and shift the pitch by the selected harmonic interval based on the Key and Scale that you’ve selected. PitchFactor’s Diatonic Shifter features twin independently-controlled pitch changers (A & B) with independent delays and feedback. Diatonic tracks the notes that you’re playing and automatically adjusts the amount of pitch shift so that the resultant note is in-key.
PitchFactor User Guide The Effects Quadravox Quadravox is similar to Diatonic but delivers up to four pitch shifted voices (A, B, C, D) instead of two. You can select the interval of each voice independently. You can also turn OFF any of the voices. NOTE: It’s possible to select OFF for all four voices. If you do, and the Mix knob is set 100% Wet, there will be no output signal. Pitch Mix Controls the ratio of level PitchA+C to PitchB+D.
PitchFactor User Guide The Effects HarModulator/Chromatic Shift HarModulator combines twin chromatic pitch shifters with modulation to deliver an extremely wide range of effects from the subtle to the insane. Chromatic pitch shifters allow you to set the pitch ratio of each of the voices in semi-tone intervals (12 steps per octave). HarModulator features a six octave range (three up, three down).
PitchFactor User Guide The Effects MicroPitch Fine-resolution pitch shifter for subtle tone-fattening plus delays for interesting slap back effects. Pitch Mix Controls the ratio of the levels of PitchA to PitchB. Pitch A Controls the amount of pitch shift up for voice A from Unison to +50 cents. Pitch B Controls the amount of pitch shift down for voice B from Unison to -50 cents. Delay A/B Controls the amount of time delay for voices A and B in mSec. Key/Depth Sets the modulation depth.
PitchFactor User Guide The Effects H910/H949 This effect emulates the sound and functionality of Eventide’s legendary H910 and H949 Harmonizer™ effects units. The H910 Harmonizer was the world’s first real-time pro-audio pitch changer and introduced the word “glitching” to the pro-audio vocabulary. The H949 was the world’s first de-glitched Harmonizer. Unlike the Diatonic pitch shifters, pitch shifting is in the feedback loop allowing for arpeggiated repeats.
PitchFactor User Guide The Effects PitchFlex Use an Expression Pedal with this effect or use the Flex Switch. Pitch Mix Controls the ratio of the level of PitchA to PitchB. Pitch A/Pitch B Sets pitch shift of voices A and B in the heel position. When “OFF” is selected, the voice is muted at the heel position and the pitch is set to unison. Delay A/Delay B These parameters are for use when using the Flex footswitch to control the pitch change effect for voices A and B.
PitchFactor User Guide The Effects Octaver Octavers traditionally use analog techniques to track the pitch of the input audio signal and synthesize a signal whose musical tone is an octave lower than the original. PitchFactor’s Octaver creates a pair of sub-harmonics, one an octave below the note that you’re playing and the other two octaves below. It also adds an Octave FUZZ generator. The sub-harmonics can be filtered and the filters modulated by the input audio level.
PitchFactor User Guide The Effects Crystals Crystals is a classic Eventide effect – twin reverse pitch changers, with independently adjustable delays and feedback with added reverb. Pitch Mix Controls the ratio of the levels of PitchA to PitchB. Pitch A/Pitch B Controls the amount of pitch shift for A/B in cents (1 cent = 1/100th of a semitone). Delay A/B Controls the length of the reverse time buffers for A/B. With Tempo OFF, delay is displayed in mSec.
PitchFactor User Guide The Effects HarPeggiator HarPeggiator creates dual 16-step arpeggios that combine three elements: 1) dual 16-step pitch-shift sequencer 2) dual 16-step rhythm sequencer 3) dual 16-step effect sequencer HarPeggiator lets you choose from a list of pre-programmed sequences for pitch, rhythm and effect and using the many possible combinations gives you quite a bit of creative control.
PitchFactor User Guide The Effects The first several pitch sequences are fairly straightforward. Here’s a general description of each of these sequences: 1. 2. 3. 4. 5. 6. 7. 8. 9. 10. 11. 12. 13. 14. 15. 16. 17. 18. 19. 20. 21. 22. 23. 24. 25. 26. All steps are one octave up. All steps are one octave down. All steps are a fifth up. All steps are a fourth down. Unison & one octave down. One octave down, unison, one octave up, two octaves up. Two octaves down, one octave down, unison, one octave up.
PitchFactor User Guide 1 2 3 4 5 6 7 8 9 10 11 12 13 14 15 16 1 +1oct +1oct +1oct +1oct +1oct +1oct +1oct +1oct +1oct +1oct +1oct +1oct +1oct +1oct +1oct +1oct The Effects 2 -1oct -1oct -1oct -1oct -1oct -1oct -1oct -1oct -1oct -1oct -1oct -1oct -1oct -1oct -1oct -1oct 3 +P5 +P5 +P5 +P5 +P5 +P5 +P5 +P5 +P5 +P5 +P5 +P5 +P5 +P5 +P5 +P5 4 -P4 -P4 -P4 -P4 -P4 -P4 -P4 -P4 -P4 -P4 -P4 -P4 -P4 -P4 -P4 -P4 5 unison unison unison -1oct unison unison unison -1oct unison unison unison -1oct unison unison unison
PitchFactor User Guide 1 2 3 4 5 6 7 8 9 10 11 12 13 14 15 16 15* +1oct +1oct +1oct +1oct +1oct +1oct +1oct +1oct +1oct +1oct +1oct +1oct +1oct +1oct +m6 +M3 The Effects 16* unison -m2 -M3 -M6 -P4oct -2oct unison unison +1oct unison unison +1oct unison unison unison unison 17* unison -d5 -1oct -1oct unison unison unison unison +1oct +P5 unison unison unison unison unison unison 18* +P5 unison unison unison +P5 unison unison unison +P5 unison unison unison +P5 unison unison unison 19 unison +M2 +M3 +P
PitchFactor User Guide The Effects Delay A/B Selects the rhythm/groove sequence for A/B. The rhythm sequences are a set of 21 selectable presets. The level of the signal at each step is graphically represented by the number of LEDs lit in each column. Turn the control full counterclockwise [Grv OFF] to turn off the rhythm sequence, full clockwise to select a random sequence. The pitch sequences are numbered from [01] to [20] and [RANDM] for the random rhythm.
PitchFactor User Guide The Effects Synthonizer Synthonizer tracks the pitch of the note that you’re playing and generates a synthesized tone at the same pitch. Voice A is an additive synthesizer useful for creating organ or Thereminstyle sounds; Voice B is a subtractive synthesizer for creating classic analog-style synth sounds. Note: Tempo cannot be used with this effect. Note: Synthonizer is mono In only. Use Input 1. Input 2 is disabled. Pitch Mix Controls the ratio of the two synthesized voices A & B.
PitchFactor User Guide Catchup Catchup You would expect that when you turn a Parameter Control Knob, the parameter’s value would change instantly and, unless Catchup is enabled, it does. Instant changes, however, may not be desirable for all situations and users. Consider the following example: You have just loaded a preset based on HarModulator and the preset’s value for the modulation Speed is set to a value of 2 (very slow modulation).
PitchFactor User Guide Expression Pedal Expression Pedal An external Expression Pedal can be connected to the rear panel ¼” phone jack. The Expression Pedal can be set up to control any combination of the ten parameters. For proper operation the Expression Pedal should be a simple linear resistive potentiometer (“pot”) with a maximum value of between 5k Ohms and 25k Ohms. Refer to www.eventide.com for information on recommended expression pedals.
PitchFactor User Guide Expression Pedal Note: The Expression Pedal input supports control voltage inputs from 0V to 3V. Care must be taken to avoid ground loops when using this input with external control voltages. If you hear a “hum” only when you’ve connected a control voltage source to PitchFactor’s Expression Pedal input jack, then it is likely that the device generating the control voltage is grounded to a different ground than your audio ins and outs.
PitchFactor User Guide The Footswitches The Footswitches – Play and Bank Mode PitchFactor’s footswitches are multi-purpose and operate in one of three modes, Play Mode, Bank Mode, and System Mode. In normal use, PitchFactor is in either Play Mode or Bank Mode. System Mode is used to set up MIDI, external controls and various system parameters. Pressing and holding the Right Footswitch switches between Play and Bank Mode.
PitchFactor User Guide The Footswitches Synthonizer Shifts both voices up one octave. Tap Footswitch The “Tap” footswitch is used to tap tempo if Tempo is ON. While tapping with Tempo ON, the updated tempo value is displayed by the Billboard in BPM. While tapping with Tempo OFF, the updated value is displayed in mSec. To turn Tempo ON or OFF, press the Encoder. When Tempo’s state changes, the Billboard will briefly display the appropriate message either “TMP ON” or “TMP OFF.
PitchFactor User Guide The Footswitches The following attributes are saved with Presets and recalled when Presets are loaded: 1) Parameter knob values. 2) Tempo/Tap value.* 3) Tempo On/Off status. 4) Expression pedal mapping. * Note: PitchFactor can be set up to change the Tempo value when a Preset is loaded or to ignore the value saved with the Preset. While Tempo values are always saved with the Preset, you may prefer to have your current Tempo stay the same as you switch from Preset to Preset.
PitchFactor User Guide Tempo Tempo Tempo ON/OFF Tempo is turned ON or OFF by momentarily pressing the Encoder. When Tempo is ON, the Tempo LED flashes at the Tempo rate. With Tempo OFF, the Tempo LED is OFF. Tap Tempo In Play Mode, the Tap Footswitch can be tapped to set the tempo. While tapping, the Billboard displays the updated Tempo. Note: When using an Aux Switch to tap tempo, the Billboard will display the tempo value in both Play and Bank Modes.
PitchFactor User Guide Saving Presets Edited Preset Indication In Bank Mode, whenever a Preset’s parameter values are changed, an LED dot is lit at the upper rightmost corner of the Billboard display. Preset parameters can be changed by: a) turning a Control Knob, b) selecting an Effect by turning the Encoder, c) receiving a MIDI command or, d) moving the Expression Pedal Saving Presets To save a Preset: 1) Press and hold the Encoder for a few seconds. The current Bank# and Preset# are displayed.
PitchFactor User Guide Saving Presets Dumping (Backing-up) Presets and System Settings The currently loaded effect, your stored Presets and your system settings can be dumped to a MIDI device or to a computer using the MIDI’s SysEx facility. SysEx dump is a MIDI System Exclusive Message that can be sent from PitchFactor and recorded by a MIDI sequencer or computer. PitchFactor’s Presets and System Settings can then be restored at a later time.
PitchFactor User Guide Auxiliary Switches Auxiliary Switches The rear panel Aux Switch stereo phone jack supports up to three independent momentary switches using Tip, Ring and Tip+Ring. Aux Switches do not disable PitchFactor’s Footswitches – the local Footswitches are always active. Aux Switches can be programmed to perform a number of functions and they make it easy to connect a dedicated Tap Tempo switch or Speed/Brake switch or Preset Switch.
PitchFactor User Guide System Mode System Mode System Mode is used for settings that cover the overall system such as the Bypass, Aux Switch, MIDI, Expression Pedal, etc. To Enter/Exit System Mode Press and hold the Encoder and Right Footswitch simultaneously for a few seconds to enter and exit the System Mode. Upon exit you’re returned to the previous mode, either Bank or Play. Upon entering System Mode, you’re at the top-level menu selection.
PitchFactor User Guide System Mode System Menu Tree The system mode is divided into four categories [BYPASS], [TUNER], [AUX SW], [MIDI], [GLOBAL], and [UTILITY] which are the top-level menu items that appear when entering system mode. In the following, factory default settings are indicated in (bold) [BYPASS] – Select Bypass Mode After entering System Mode, turn the Encoder to select [BYPASS], then press the Encoder to enter Select Bypass Mode. Turn the Encoder to select either [BYP TYP] or [KILLDRY].
PitchFactor User Guide System Mode [CALIBRT] – Calibrate the Tuner (440 Hz) Press the Encoder to select. Turn the Encoder to adjust the Tuner’s reference frequency. 440 Hz standard is the default. This value will also establish the ‘A’ tuning for the pitch effects. Press the Middle Footswitch once to back-up one level to TUNER menu. Press the Middle Footswitch twice to go to top level System menu.
PitchFactor User Guide System Mode The notion of using an On/Off control source like an Aux Switch to control a variable parameter bears some explanation. Consider a variable parameter like Intensity. After you’ve selected a Parameter Control Knob, you can set two values for the parameter; a minimum value [MIN VAL] and a maximum value [MAX VAL]. Each time the assigned switch is pressed, the parameter value instantly toggles between the minimum and maximum value.
PitchFactor User Guide System Mode For Manual Select simply turn the Encoder to choose the Aux Switch. The choices are: TIP - Aux switch jack tip connection RNG - Aux switch jack ring connection T+R - Aux switch jack tip + ring connection To use the Learn Mode to select the external control source, press the Right Footswitch again. “LEARN” is displayed prompting you to press an Aux Switch for automatic assignment. Press the Right Footswitch again to exit LEARN mode and revert to manual source selection.
PitchFactor User Guide System Mode [RCV CTL] - Receive Continuous Control Message RCV CTL allows external MIDI Continuous Control messages to be used as assignable controls for the Effects parameters and system control. The idea is to first select the PitchFactor parameter or function that you want to externally control (Intensity for example) and then select either MIDI Bend or the MIDI CC with which you want to control it. Here’s how it works: Press the Encoder to select RCV CTL.
PitchFactor User Guide System Mode Note: While it is possible to assign more than one external controller to any parameter, doing so is likely to cause confusion and is not recommended. Keep in mind that, if you have previously assigned a MIDI CC to a control destination, you may want to clear the assignment before setting up a new assignment. To clear, select the destination (parameter) and select the source (MIDI CC) as [---].
PitchFactor User Guide System Mode To Assign the Control Source to a Destination Press the Right Footswitch to select the MIDI Continuous Control that will be assigned to the PitchFactor Control Source. The choices are: OFF – Control Source unassigned. C0 - C99 - MIDI Continuous Controller from 0 to 99. Press the Left and Right Footswitches to toggle between Source and Destination to make as many assignments as you wish. Press the Middle Footswitch once to back-up one level to MIDI menu.
PitchFactor User Guide System Mode [XMT MAP] – Create a MIDI Program Change Transmit Map In Bank Mode, when a Footswitch is used to recall a Preset, a MIDI Program Change message can be transmitted from the MIDI Out jack or USB to control an external device - e.g. another Factor series Stompbox, an Eventide Eclipse, an Eventide H000FW, etc. To Create a MIDI Program Change transmit map Press the Encoder to access the MIDI transmit map for editing.
PitchFactor User Guide System Mode [OUTPUT] – MIDI Transmit/Thru Select (XMT, THRU) Press the Encoder to select. Turn Encoder to select either MIDI out to either transmit (XMT) PitchFactor MIDI data or pass incoming MIDI data thru PitchFactor. Note: if OUTPUT is set to THRU, none of the PitchFactor’s MIDI Transmit functions will be operative. Press the Middle Footswitch once to back-up one level to MIDI menu. Press the Middle Footswitch twice to go to top level System menu.
PitchFactor User Guide System Mode [GLOBAL] – Global Settings [MIX] – Enable Global MIX (ON, OFF) Press the Encoder to select. Turn Encoder to set Global MIX. Mix is always stored with Presets, but the stored value is not used if Global Mix is ON. With Global ON, the current Mix is used for all Presets. Press the Middle Footswitch once to back-up one level to UTILITY menu. Press the Middle Footswitch twice to go to top level System menu. [TEMPO] – Enable Global Tempo (ON, OFF) Press the Encoder to select.
PitchFactor User Guide System Mode [BANKS] – Select the range of Active Preset Banks (1 - 50) Press the Encoder to select. Press the Left Footswitch to select the lower limit and the Right Footswitch to select the higher limit. Turn Encoder to set the lowest and the highest active banks. Only Presets saved in active Banks are available for loading using the Footswitches. All Presets may still be loaded using MIDI program change. Press the Middle Footswitch once to back-up one level to UTILITY menu.
PitchFactor User Guide MIDI Implementation Chart MIDI Implementation Chart Mode 1: Omni On, Poly Mode 3: Omni Off, Poly Mode 2: Omni On, Mono Mode 4: Omni Off, Mono O=Yes X=No Function Transmitted Recognized Basic Channel Default Changed 1-16 1-16 1-16 1-16 Mode Default Messages Altered 3 X X 1 X X Note Number True Voice X X After Touch Key’s Channels X X X X O O Control Change 0 : 127 O O Program Change True# O O O O Pitch Bender System Exclusive System Common Song Pos
PitchFactor User Guide Specifications Specifications Analog I/O Input Impedance 500K ohms (mono) 1 Meg (stereo) Output Impedance 470 ohms Recommended Load Impedance 10K ohms or greater Connectors Input 1 (mono) - ¼ inch mono phone jack Input 2 - ¼ inch mono phone jack Output 1 (mono) – ¼ inch mono phone jack Output 2 – ¼ inch mono phone jack Expression Pedal – ¼ inch mono phone jack Aux Switch – ¼ inch stereo phone jack USB – Type B Socket. Use USB 2.0 cables only.
PitchFactor User Guide Limited Warranty LIMITED WARRANTY Eventide Stompboxes are built to exacting quality standards and should give years of trouble-free service. If you are experiencing problems which are not cleared up or explained as normal in the manual, your recourse is this warranty. What the warranty does and does not cover Eventide Inc.