
User's Manual
• Blinking LED, The Battery pack is nearly fully charged
• LED is OFF, the battery pack is fully charged.
Please note that the LED will not be ON while you are playing without use of the Charge
cable, with the Exception of:
SLOW Blinking LED with no Charge cable attached, this indicates that the battery needs
to be recharged, and is almost completely drained.
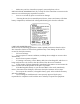
INSTALLATION AND REMOVAL (See Diagram 2)
ATTACHING:
1. Always attach and remove receiver while the console is turned off
2. Gently insert the Zero Receiver dongle into an open controller port on the
Playstation console
3. Make sure that the Zero Controller has a properly attached Battery
compartment (AA compartment, or rechargeable pack) and Press the Link
button. This should will power up your controller. If none of the lights on the
controller are responding remove the battery pack, check batteries and
reinstall.
4. Power up your console, the Link indicator on the Receiver and the Link LED
on the Controller may blink momentarily as they attempt to link up.
5. If the Link indicator do not become a solid light and continue to blink, press
the Link button on the controller, and press down on the top of the Receiver
(diagram 4)
6. Once you have established Link, use the controller normally
Turning off the Back Lit Buttons
The Nyko Zero controller provides a unique feature by which the primary four action
buttons are backlit so they can be recognizable in the dark. This feature can be turned
OFF if you wish.
1) Press and hold down the Link and Vibration buttons simultaneously for 4 seconds.
You will notice that the back lit buttons will turn OFF
2) To turn the backlit buttons back ON, simply press and hold the Link and
Vibration button for 4 seconds, and the lights will turn back ON.
Please note that the default setting for the Zero controller, is for the backlights to be ON.
So every time you turn the controller ON for the first time the backlights will be ON, you
can then choose to turn them OFF if you choose
STORING YOUR ZERO CONTROLLER