
Use and Care Manual

HOMEDEPOT.com
Please contact 1-800-305-1726 for further assistance.
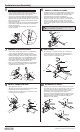
Installation
1
PREPARING FOR INSTALLATION
2
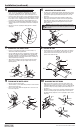
CUTTING THE TUBING
Ƒ Select a cold water supply pipe located as closely as possible to the
appliance. Close the main water shut-off valve.
Ƒ Open a faucet located near the installation to relieve pressure
in the line.
Ƒ Using a utility knife or tube cutter, cut the polyethylene tubing (A) at one of
the marked locations.
2.1
A
A
A
B
3
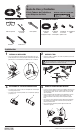
DETERMINING THE WATER INLET TYPE
4
CONNECTING TO A THREADED INLET
Ƒ If a threaded connection is required, use the threaded quick-connect
adapter (C) and skip to step 4.
Ƒ If a polyethylene connection is required, use the quick-connect
coupling (D) and skip to step 5.
C
D
Ƒ Connect the threaded quick-connect adapter (C) onto the water inlet (4.1)
on the back of the refrigerator by threading the adapter onto the water
inlet. Hand tighten and then tighten a quarter turn with a wrench. Do not
overtighten.
Ƒ Insert one end of the polyethylene tubing (A) into the threaded
quick-connect adapter (C) over the captive stiffener. Push the
polyethylene tubing (A) all the way in until the tubing bottoms out.
Ƒ Coil at least 8 ft. of polyethylene tubing (A) behind the refrigerator
to allow the refrigerator to be moved away from the wall for cleaning
and servicing.
Ƒ Run the free end of the polyethylene tubing (A) to the cold water
supply pipe.
4.1
C
C
A
NOTE: When properly cut, the marked line on the tubing (2.1) will be
ush with the push-to-connect opening after it is inserted into the
saddle valve (B).
Use and Care Guide
Polyethylene Ice Maker
Supply Line Kit
Item 0000 000 000
Model 7252-25-14-PTC-EB
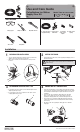
TOOLS REQUIRED PACKAGE CONTENTS
Safety goggles Phillips screwdriver Adjustable wrench
A - 1/4 in. OD x 25 ft.
Polyethylene tubing
B - Quick-connect
saddle valve
C - Threaded
quick-connect
adapter
D - Quick-connect
coupling
Tube cutter Utility knife