
Use and Care Manual

HOMEDEPOT.com
Please contact 1-800-305-1726 for further assistance.
Installation (continued)
5
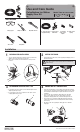
CONNECTING TO A POLYETHYLENE INLET
6
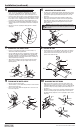
CONNECTING THE SADDLE VALVE
Ƒ Insert one end of the polyethylene tubing (A) into one end of the
quick-connect coupling (D) over the captive stiffener. Push the
polyethylene tubing (A) all the way in until the tubing bottoms out.
Ƒ Connect the other end of the quick-connect coupling (D) onto the water
inlet on the back of the refrigerator by pushing the refrigerator connection
into the quick-connect coupling (D) over the captive stiffener. Push the
polyethylene tubing (A) all the way in until the tubing bottoms out.
Ƒ Coil at least 8 ft. of polyethylene tubing (A) behind the refrigerator to
allow the refrigerator to be moved away from the wall for cleaning and
servicing.
Ƒ Run the free end of the polyethylene tubing (A) to the cold water
supply pipe.
A
D
Ƒ The quick-connect saddle valve (B) should be attached to the top section
of the clamp (6.1). Place the rubber gasket (6.2) around the saddle valve
piercing pin. The gasket (6.2) should t perfectly into the curve of the
clamp (6.1).
Ƒ Back up the piercing pin all the way by turning the saddle valve
handle (6.3) counterclockwise. Insert the other end of the polyethylene
tubing (A) into the quick-connect saddle valve (B) over the captive
stiffener. Push the polyethylene tubing (A) all the way in until the
tubing bottoms out.
A
B
6.3
6.1
6.2
7
ASSEMBLING THE SADDLE VALVE
8
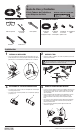
TAPPING THE LINE
Ƒ Connect one side of the bottom clamp (7.1) to the top clamp (7.2)
attached to the saddle valve (B) with a bolt.
Ƒ Place the saddle valve (B) onto the cold water pipe. Position the saddle
valve (B) so the handle is accessible. Holding onto the top and bottom
parts of the clamp with one hand, insert the second bolt with the other.
Hand tighten both bolts evenly until the bottom clamp (7.1) and the top
clamp (7.2) both rmly touch the pipe.
Ƒ Tighten with a screwdriver for the nal few turns. When the rubber
gasket (7.3) on the saddle valve (B) is slightly compressed, stop
tightening the bolts.
B
A
7.3
B
7.2
7.2
7.1
7.1
Ƒ Turn the handle (8.1) on the saddle valve (B) clockwise. You will feel
some resistance when penetrating the pipe wall (8.2), but continue
until the handle cannot be turned anymore. This is the “closed”
position of the saddle valve (B).
A
8.2
B
8.1
9
TURNING ON THE WATER SUPPLY
10
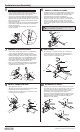
DISCONNECTING THE TUBING
Ƒ Open the main water shut-off valve.
Ƒ Turn the handle (9.1) on the saddle valve (B) slowly in a counterclockwise
direction until it is fully open.
Ƒ Check for leaks at the saddle valve (B) and at the connection on the
back of the refrigerator.
9.1
B
Ƒ Make sure the water is turned off at the main water supply or the
saddle valve (B) is completely closed. If you need to disconnect the
polyethylene tubing (A) from the refrigerator, connector or saddle valve (B),
remove the locking clip (10.1) by pulling it upward. Retain this piece
for later use.
Ƒ Depress the push-to-connect release collar (10.2) and gently pull out the
line. Place the locking clip (10.1) back into the quick-connect outlet on
the saddle valve (B) and quick-connect coupling (D) or quick-connect
adapter (C).
C
B
PUSH
10.1
10.2
D
PUSH
PUSH
10.1
10.2
10.1
NOTE: One of the line markings on the polyethylene tubing (A) will
be ush with the quick-connect saddle valve (B) when inserted fully
and properly.