
Installation Guide


10 For Professional Technical Support call 1-844-241-5521
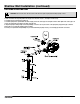
Shallow Well Installation (continued)
13
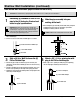
Voltage setting
WARNING: All electrical work should be performed by a
licensed electrician.
This pump is pre-wired at 230 volts.
If the power source is 115 volts, remove the electrical housing
cover.
Flip the switch to 115 volts.
Replace the cover.
Proceed to the Pressure Switch Assembly Instructions section
below.
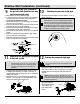
Pressure Switch Assembly Instructions
WARNING: Before wiring the pressure switch, turn off the
power source to which you are connecting to avoid potentially
life threatening electrical shock.
WARNING: It is recommended all electrical work be
performed by a licensed electrician.
WARNING: When wiring from the power source to the
pressure switch, it is recommended that you use either a 14-
gauge or 12-gauge cord.
To complete the installation, you must connect the power source to
the pressure switch. A 30/50 psi pressure switch has been installed
on the pump. The pressure switch allows for automatic operation;
the pump starts when pressure drops to the "cut-in" setting (30 psi
pre-set).
To wire the pressure switch:
Remove the pressure switch cover on pump to expose the wiring
terminals.
Connect the green ground wire of the power supply to the switch
ground terminal.
Connect the power supply wires to the two outside terminals
marked "LINE" and replace the switch cover.
CAUTION: Do NOT use a pressure switch set at a pressure
greater than 50 psi. The pump will not create pressures
greater than 50 psi, if so the pump will never shut off,
resulting in damage to the pump and voiding the warranty.
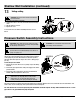
The pump is ready for use. Open a faucet near the pump. Turn on the pump. Water should come out from the faucet in a few minutes. If no
water comes out, turn off the pump and re-prime water from the discharge tee.
For wells between 25 and 70 ft. in depth, deep well installations should be adapted. The deep well installations have one 1-1/4 in.
pipe and one 1 in. pipe between the pump and ejector.