
Replacement Part List

HOMEDEPOT.com
Please contact 1-800-305-1726 for further assistance.
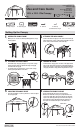
Setting Up the Canopy
1
OPENING THE CANOPY FRAME
□ With a person on each end, lift and partially pull the canopy
frame (C) apart.
C
2
ATTACHING THE SMALL CANOPY
□ Position the small canopy (B) on the center of the frame (C)
and hook the four corners of the small canopy (B) to the four
hooks on the center structure of the frame (C).
B
C
3
ATTACHING THE LARGE CANOPY
□ Unfold the large canopy (A) and place on top of the canopy
frame (C). Ensure that you separate the large canopy (A)
from the small canopy (B).
□ Secure the large canopy (A) to the corners of the canopy
frame (C) using the Velcro connections.
B
C
A
A
4
LOCKING THE FRAME
□ From under the canopy, place one hand on the upper frame
and use the other hand to push the central hub straight up
until it clicks into the central pole. Finish attaching the large
canopy (A) inside the canopy frame using the Velcro loops.
5
ADJUSTING THE CANOPY HEIGHT
□ Press the red button on each leg and raise or lower to adjust
the canopy height.
6
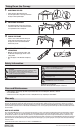
SECURING THE CANOPY IN PLACE
□ Insert a stake (D) into the foot of each canopy leg.
□ Measure out from the each leg to a proper distance and
secure four stakes (D) to the ground. Tie the pre-attached
ropes to the stakes (D) in the ground. Ensure the rope has
the proper tension by adjusting the plastic adjusters on
the ropes. Do not attach the ropes to the drain holes.
D
Drain Holes
D
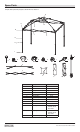
Use and Care Guide
10 ft. x 10 ft. Clia Canopy
PACKAGE CONTENTS
A - Large canopy x1 B - Small canopy x1 C - Canopy frame x1 D - Stake x8 E - Allen key
(for maintenantce only) x1
F - Wheeled storage bag
x1
Item #1002658108
1002658109
1002658106
Model #NS CLIA 100-G
NS CLIA 100-R
NS CLIA 100-B