EDN Series Indoor IP Dome Camera Quick Installation Guide s Copyright © EverFocus Electronics Corp, Release Date: March, 2013
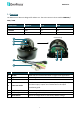
EDN Series 1. Overview The EDN series IP dome is designed for indoor use. The series comes in three models: EDN3160 / 3260 / 3340. Model Name Megapixel P-Iris WDR EDN3160 1.3 MP Yes Yes EDN3260 2 MP Yes Yes EDN3340 3 MP Yes No Camera Body 1 2 3 6 4 7 5 No. Item Name Descriptions 1 IR LEDs 33 IR LEDs for infrared illumination in night vision applications. 2 Light Sensor 3 Lens Detects lights. Varifocal lens with P-Iris control.
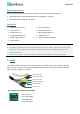
EDN Series System Requirement Before installing, please check that your computer meets this system requirement. • • Operating System: Microsoft Windows XP / Vista (32-bit) / 7 (32-bit) Microsoft Internet Explorer 7 or above Packing List • • • • • • • • • • • EDN Series Camera x 1 Long Screw x 4 Screw Anchor x 4 Hexagon Screwdriver x 1 Power Pigtail Cable x 1 Circle Plate x 1 Terminal Block x 1 RJ-45 Connector x 1 Mounting Template x 1 Software CD x 1 Quick Installation Guide x 1 Note: 1.
EDN Series 3. Installation There are two ways to mount the EDN IP Dome: Wall-Surface Mount and In-Ceiling Mount. Wall-Surface Mount: 1. Paste the supplied mounting template onto a desired location on the wall. Drill the four red cross marks, and the red circle mark only if you wish to run the wires into the wall. Note: The minimum recommended thickness of the wall is 1 cm. 2. Push the four supplied anchors into the four holes on the wall. 3.
EDN Series 4. Unscrew the three screws and take out the camera body. 5. Thread the cables on the side of the camera case. If you want to wire the cables through the wall, run the cables through the hole at the bottom. Bottom Hole Side Hole 6. If you run the cables through the bottom hole in Step 5, screw the circle plate on the side hole for waterproofing. You can simply tighten the circle plate using a coin. Circle Plate 7. Secure the camera case to the wall using the supplied four long screws.
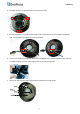
EDN Series 8. Place and screw the camera body back to the camera case. 9. Connect the network, power and other cables to the camera. Refer to 2. Cables. 10. Optionally insert a micro SD / SDHC card to the card slot. See No.5 in 1. Overview. 11. Access the camera live view. See 4. Accessing the Camera. Or using the Test-Out cable to connect a monitor to the camera for setting image aim and focus. 12. Adjust camera lens and angles. a. Use the Zoom / Focus screws to adjust camera lens.
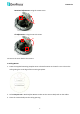
EDN Series Rotational Adjustment: Using the rotate screw. 180° Tilt Adjustment: Using the two tilt screws. 64° 13. Secure the cover back to the camera. In-Ceiling Mount: 1. Paste the supplied mounting template onto a desired location on the wall. Cut a circle on the ceiling along the circle edge of the mounting template. 2. Follow Steps 3 to 6 in Wall-Surface Mount to take out the camera body and run the cables. 3. Place the camera body into the ceiling opening.
EDN Series 4. On the back side, make sure the black plastic clips are slightly above the ceiling board and pointing outward. 5. Tighten the bracket screws from the front side of the camera. 6. Connect the network, power and other cables to the camera. Refer to 2. Cables. 7. Optionally insert a micro SD / SDHC card to the card slot. See No.5 in 1. Overview. 8. Access the camera live view. See 4. Accessing the Camera.
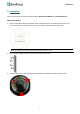
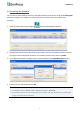
EDN Series 4. Accessing the Camera You can look up the IP address and access the Web interface of the camera using the IP Utility (IPU) software included in the software CD. Please connect the camera in the same LAN of your computer. 1. Install and then start the IPU program . The following dialog box appears. 2. IPU will automatically search the cameras connected in the LAN. The default network values of the cameras will be displayed. By default, the network protocol of the camera is DHCP. 3.
EDN Series 5. To change the IP setting, double-click the values in the column and type the numbers or select an option. Click Set IP Address to save the settings. Note: Most networks uses DHCP to assign IP address, if you are unsure of your network settings, please consult your network administrators for configuration details. 6. To access the camera, highlight the camera and click Connect to Selected IP. The Internet Explorer window pops up. 7. Type the user ID and password to log in.
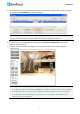
EDN Series 5. Network Connections You can use one of the methods below to connect the camera to the network. Router or LAN Connection This is the most common connection in which the IP camera is connected to a router and allows multiple users on and off site to see the IP camera on a LAN/WAN (Internet). The camera must be assigned an IP address that is compatible with its LAN. By setting up port forwarding on the router, you can remotely access the cameras from outside of the LAN via the Internet.
EDN Series Direct High-Speed Connection In a Direct High-Speed Connection, the camera connects directly to a modem without the need for a router. You need to set the static or dynamic WAN IP address assigned by your ISP (Internet Service Provider) in the camera’s configuration web pages. To access the camera, just type “http://xxx”, where xxx is the IP address given by your ISP. If you have a dynamic IP address, this connection may require that you use DDNS for a reliable connection. Please refer to 7.3.
EDN Series 6. Upgrading Firmware You can upgrade camera’s firmware using the IP Utility software, which is included in the software CD. 1. Follow Step 1 to Step 4 in 5. Assigning an IP Address to log in the camera. 2. Check the box to select the camera and then click Upgrade Firmware. A browsing window appears. 3. Select the firmware file (.evb) and then click Open. The IP Utility will automatically upgrade the firmware. The camera will reboot once the update is complete.
EverFocus Electronics Corp. EverFocus Taiwan: EverFocus Europe - Germany: 12F, No.79, Sec. 1, Shin-Tai Wu Road, Hsi-Chih, Taipei, Taiwan TEL: +886 2 2698 2334 FAX: +886 2 2698 2380 www.everfocus.com.tw marketing@everfocus.com.tw Albert-Einstein-Strasse 1, D-46446 Emmerich, Germany TEL: +49 2822 93940 FAX: +49 2822 939495 www.everfocus.de info@everfocus.