Instruction Manual EN-7517C / EN-7519C 17” / 19” PREMIUM TFT-LCD MONITOR
Please read this manual thoroughly before use, and keep it handy for future reference.
SAFETY INSTRUCTION ………………………………………………………………….. 2~3 CAUTIONS ……………………………………………………………….......................... FCC RF INTERFERENCE STATEMENT ……………………………........................... CONNECTING WITH EXTERNAL EQUIPMENT ………………………………………. REMOTE FUNCTIONS ……………………………………………………………………. 4 5 6 7 CONTROLS AND FUNCTIONS ………………………………………………………….. MOUNTING GUIDE ……………………………………………………………………….. D-SUB CONNECTOR PIN ASSIGNMENTS ……………………………………………. POWER MANAGEMENT ………………………………………………………………….
INSTRUCTION MANUAL ……………………………………………………………………. 1 Important Safety Instruction 1. Read these instructions. 2. Keep these Instructions. 3. Heed all warnings. 4. Follow all instructions. 5. Do not use this apparatus near water. 6. Clean only with dry cloth. 7. Do not block any ventilation openings. Install in accordance with the manufacturer’s instructions. 8. Do not install near any heat sources such as radiators, heat registers,stoves, or other apparatus (including amplifiers) that produce heat. 9.
receptacles and the point where they exit from the apparatus. 11. Only use attachment/accessories specified by the manufacturer. 12. Use only with the cart, stand, tripod, bracket or table specified by the manufacturer or sold with the apparatus. When a cart is used, use caution when moving the cart/apparatus combination to avoid injury from tip-over. 13. Unplug this apparatus during lightning storms or when unused for long periods of time. 14. Refer all servicing to qualified service personnel.
This symbol is intended to alert the user to the presence of uninsulated : dangerous voltage with in the product’s enclosure that may be of sufficient magnitude to constitute a risk of electric shock to persons. This symbol is intended to alert the user to the presence of important operating and maintenance(servicing) instructions in the literature accompanying the appliance. INSTRUCTION MANUAL …………………………………………………………………….
NEVER REMOVE THE BACK COVER Removal of the back cover should be carried out only by qualified personnel. DO NOT USE IN HOSTILE ENVIRONMENTS To prevent shock or fire hazard, do not expose the unit to rain or moisture. This unit is designed to be used in the office or home. Do not subject the unit to vibrations, dust of corrosive gases. KEEP IN A WELL VENTILATED PLACE Ventilation holes are provided on the cabinet to prevent the temperature from rising.
This equipment has been tested and found to comply with the limits for a Class A digital device, pursuant to Part 15 of the FCC Rules. These limits are designed to provide reasonable protection against harmful interference in a residential installation. This equipment generates, uses and can radiate radio frequency energy and, if not installed and used in accordance with the instructions, may cause harmful interference to radio communications.
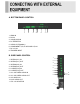
A. BOTTOM PANEL CONTROL 1 2 3 45 6 7 8 1. HDMI IN 2. DVI IN 3. VGA(D-SUB) IN 4. PC STEREO IN 5. AUDIO OUT(Speaker) 6. COMPONENT Y,Pb,Pr & SOUND L,R IN 7. DC 12V IN 8. TRIGGER INPUT B. SIDE PANEL CONTROL 1 1. VIDEO1(AV1) IN 2. VIDEO1(AV1) OUT 3. VIDEO2(AV2) IN 4. VIDEO2(AV2) OUT 5. S-VIDEO(Y/C) IN 6. S-VIDEO(Y/C) OUT 7. AV1 & S-VIDEO AUDIO IN 8. AV1 & S-VIDEO AUDIO OUT 2 3 4 5 6 7 8 9. AV2 AUDIO IN 10. AV2 AUDIO OUT 11.
6 ……………………………………………………………………. INSTRUCTION MANUAL C. REMOTE CONTROLLER (Option) 1. POWER( ) Turn the power ON or OFF. There will be a few seconds delay before the display appears. 2. SOURCE Select pc or video(AV1/AV2/S-Video/Component/HDMI/DVI/PC) sources. 3. AUTO Auto geometry adjustment in PC Source. 4. HOLD Stop the Trigger & Auto switching functions. 5. MUTE Mute the sound. 6. MENU Activates and exits the On Screen Display. 7. EXIT Exit the On Screen Display. 8.
Select AV mode.(AV1, AV2 & S-VIDEO). 24. COMP Select COMPONENT mode. INSTRUCTION MANUAL ……………………………………………………………………. 7 D. FRONT KEY CONTROL 1 / 2. VOL Adjust the volume and menu settings. 3 / 4. ▲ / ▼ These buttons allow user to enter the sub-menu of the activated function. The up(▲) button is HOLD function and stop the Trigger & Auto switching functions. 5. SOURCE/SELECT Select PC or video. Select On Screen Display menu. 6. MENU/EXIT Activate and exit the On Screen Display. 7.
9. POWER LED The power LED lights with green when the power is turned ON. The power is turned off by pressing the power switch again and the power LED goes Red. 8 ……………………………………………………………………. INSTRUCTION MANUAL OSD MENU DESCRIPTION A: CUSTOM MENU (Only Video Input) 1) Press the MENU button and then press the up(▲) or down(▼) button to select the Custom. 2) Press the up(▲) or down(▼) button to select the sub menu. 3) Press the left(◀) or right(▶) button to adjust the picture setting.
Tint: Increase or decrease the tint of the picture. Sharpness: Increase or decrease the sharpness of the picture. A: CUSTOM MENU (For HDMI, DVI & PC Input) 1) Press the MENU button and then press the up(▲) or down(▼) button to select the Custom. 2) Press the up(▲) or down(▼) button to select the sub menu. 3) Press the left(◀) or right(▶) button to adjust the picture setting. 4) Press the MENU button to save. INSTRUCTION MANUAL ……………………………………………………………………. 9 B. Picture / Sound Menu (Only Video Input) 1.
1) Press the MENU button and then press the up(▲) or down(▼) button to select the Picture / Sound. 2) Press the right(▶) or SOURCE/SELECT button. 3) Press the up(▲) or down(▼) button to select the Picture Mode. 4) Press the right(▶) or SOURCE/SELECT button. 5) Press the up(▲) or down(▼) button to select the Picture Mode option. 6) Press the MENU button to save 2. Color Tone 1) Press the up(▲) or down(▼) button to select the Color Tone. 2) Press the right(▶) or SOURCE/SELECT button.
4) Press the MENU button to save. 10 ……………………………………………………………………. INSTRUCTION MANUAL 3. Mute 1) Press the up(▲) or down(▼) button to select the Mute. 2) Press the right(▶) or SOURCE/SELECT button. 3) Press the up(▲) or down(▼) button to select the On or Off. 4) Press the MENU button to save. 4.
1) Press the up(▲) or down(▼) button to select the Volume 2) Press the left(◀) or right(▶) button to adjust Volume setting. 3) Press the MENU button to save. INSTRUCTION MANUAL ……………………………………………………………………. 11 5.
1) Press the up(▲) or down(▼) button to select the Size 2) Press the right(▶) or SOURCE/SELECT button. 3) Press the up(▲) or down(▼) button to select the Size option. 4) Press the MENU button to save. 6. NR 1) Press the up(▲) or down(▼) button to select the NR. 2) Press the right(▶) or SOURCE/SELECT button. 3) Press the up(▲) or down(▼) button to select the On or Off. 4) Press the MENU button to save. 12 …………………………………………………………………….
7. 3D Comb 1) Press the up(▲) or down(▼) button to select the 3D Comb. 2) Press the right(▶) or SOURCE/SELECT button. 3) Press the up(▲) or down(▼) button to select the On or Off. 4) Press the MENU button to save. B. Picture / Sound Menu (For HDMI, DVI & PC Input) 1. Picture Mode 1) Press the MENU button and then press the up(▲) or down(▼) button to select the Picture/Sound. 2) Press the right(▶) or SOURCE/SELECT button. 3) Press the up(▲) or down(▼) button to select the Picture Mode.
4) Press the right(▶) or SOURCE/SELECT button. 5) Press the up(▲) or down(▼) button to select the Picture Mode option. 6) Press the MENU button to save. INSTRUCTION MANUAL ……………………………………………………………………. 13 2-1. Color Tone 1) Press the up(▲) or down(▼) button to select the Color Tone. 2) Press the right(▶) or SOURCE/SELECT button.
3) Press the left(▶) or SOURCE/SELECT button again. 4) Press the up(▲) or down(▼) button to select the Color Tone option. 5) Press the MENU button to save. 14 ……………………………………………………………………. INSTRUCTION MANUAL 2-2.
1) Press the up(▲) or down(▼) button to select the Custom in the Color Tone. 2) Press the Menu button to save. 3) Press the up(▲) or down(▼) button to select the Red(R), Green(G) or Blue(B). 4) Press the left(◀) or right(▶) button to adjust color density. 5) Press the MENU button to save.
INSTRUCTION MANUAL ……………………………………………………………………. 15 3. Size 1) Press the up(▲) or down(▼) button to select the Size. 2) Press the right(▶) or SOURCE/SELECT button. 3) Press the up(▲) or down(▼) button to select the Size option. 4. PC control (Only PC Input) 1) Press the up(▲) or down(▼) button to select the PC. 2) Press the right(▶) or SOURCE/SELECT button. 3) Press the up(▲) or down(▼) button to select the PC sub menu.
4) Press the right(▶) or SOURCE/SELECT button. 5) Press the left(◀) or right(▶) button to adjust the PC setting. 6) Press the MENU button to save. Auto Adjust: Auto geometry adjustment. Phase: Adjust the number of horizontal picture elements. H-Position: Move image horizontally on screen right or left. V-Position: Move image vertically on screen up or down. Frequency: Adjust the vertical noise of screen image. 16 ……………………………………………………………………. INSTRUCTION MANUAL C.
1) Press the right(▶) or SOURCE/SELECT button. 2) Press up(▲) or down(▼) button to select the On or Off. 3) Press the MENU button to save. INSTRUCTION MANUAL ……………………………………………………………………. 17 2.
1) Press the up(▲) or down(▼) button to select the Input Source. 2) Press the right(▶) or SOURCE/SELECT button. 3) Press the up(▲) or down(▼) button to select the Source option. 4) Press the MENU button to save. 3. Size 1) Press the up(▲) or down(▼) button to select the Size. 2) Press the right(▶) or SOURCE/SELECT button. 3) Press the up(▲) or down(▼) button to select the Size option. 4) Press the MENU button to save.
18 ……………………………………………………………………. INSTRUCTION MANUAL 4. Position 1) Press the up(▲) or down(▼) button to select the Position. 2) Press the right(▶) or SOURCE/SELECT button. 3) Press the up(▲) or down(▼) button to select the Position option. 4) Press the MENU button to save. 5.
1) Press the up(▲) or down(▼) button to select the Swap. 2) Press the right(▶) or SOURCE/SELECT button to swap the main image for the sub one. INSTRUCTION MANUAL ……………………………………………………………………. 19 5. Sound Select 1) Press the up(▲) or down(▼) button to select the Sound Select. 2) Press the right(▶) or SOURCE/SELECT button. 3) Press the up(▲) or down(▼) button to select the Sound Select option. 4) Press the MENU button to save.
C. PIP MENU (For HDMI, DVI & PC Input) 1. Input Source 1) Press the up(▲) or down(▼) button to select the Input Source. 2) Press the right(▶) or SOURCE/SELECT button. 3) Press the up(▲) or down(▼) button to select the Input Source option. 4) Press the MENU button to save. 20 ……………………………………………………………………. INSTRUCTION MANUAL D.
1) Press the MENU button and then press the up(▲) or down(▼) button to select the Setup. 1. Reset 1) Press the right(▶) or SOURCE/SELECT button 2) Press the right(▶) or SOURCE/SELECT button again. 3) Press SOURCE/SELECT button to execute the reset. Reset: All settings go to the factory initialization. INSTRUCTION MANUAL …………………………………………………………………….
2. Language 1) Press the up(▲) or down(▼) button to select the Language. 2) Press the right( ) or SOURCE/SELECT button. 3) Press the up(▲) or down(▼) button to select language. 4) Press the MENU button to save. 3. OSD Tone 1) Press the up(▲) or down(▼) button to select the OSD Tone. 2) Press the right( ) or SOURCE/SELECT button 3) Press the up(▲) or down(▼) button to select the OSD Tone option. 4) Press the MENU button to save. 22 …………………………………………………………………….
4. Blue Screen 1) Press the up(▲) or down(▼) button to select the Blue Screen. 2) Press the right( ) or SOURCE/SELECT button. 3) Press the up(▲) or down(▼) button to select the On or Off. 4) Press the MENU button to save. 5. Key Lock 1) Press the up(▲) or down(▼) button to select the Key Lock. 2) Press the right( ) or SOURCE/SELECT button 3) Press the up(▲) or down(▼) button to select the On or Off 4) Press the MENU button to save.
INSTRUCTION MANUAL ……………………………………………………………………. 23 6. Trigger 1) Press the up(▲) or down(▼) button to select the Trigger. 2) Press the right( ) or SOURCE/SELECT button. 6-1. Trigger Enable 1) Press the up(▲) or down(▼) button to select the Trigger Enable. 2) Press the right( ) or SOURCE/SELECT button. 3) Press the up(▲) or down(▼) button to select the On or Off. 4) Press the Menu button to save.
24 ……………………………………………………………………. INSTRUCTION MANUAL 6-2. Trigger Input 1) Press the up(▲) or down(▼) button to select the Trigger Input . 2) Press the right( ) or SOURCE/SELECT button. 3) Press the up(▲) or down(▼) button to select the Trigger Input option. 4) Press the Menu button to save. 6-3. Buzzer 1) Press the up(▲) or down(▼) button to select the Buzzer. 2) Press the right( ) or SOURCE/SELECT button. 3) Press the up(▲) or down(▼) button to select the On or Off. 4) Press the Menu button to save.
INSTRUCTION MANUAL ……………………………………………………………………. 25 6-4. Trigger Time 1) Press the up(▲) or down(▼) button to select the Trigger Time. 2) Press left( ) or right( ) button to adjust Trigger Time setting. 3) Press the MENU button to save. 6-5 Trigger Option 1) Press the up(▲) or down(▼) button to select the Trigger Option. 2) Press the right( ) or SOURCE/SELECT button. 3) Press the up(▲) or down(▼) button to select the Trigger Option setting. 4) Press the Menu button to save.
N/C (Normal Closed): When Trigger cable is opened, Trigger function is activated. N/O (Normal Opened): When Trigger cable is closed, Trigger function is activated. High: When Trigger signal is high(2~5[V]), Trigger function is activated. Low: When Trigger signal is low(0~0.6[V]), Trigger function is activated. 26 ……………………………………………………………………. INSTRUCTION MANUAL 6-6. Display Type 1) Press the up(▲) or down(▼) button to select the Display Type. 2) Press the right( ) or SOURCE/SELECT button.
The Type of Image 2 : Component, HDMI, DVI or PC. INSTRUCTION MANUAL ……………………………………………………………………. 27 7. Auto switching 1) Press the up(▲) or down(▼) button to select the Auto switching. 2) Press the right( ) or SOURCE/SELECT button. 7-1.
1) Press the right( ) or SOURCE/SELECT button. 3) Press the up(▲) or down(▼) button to select the On or Off . 4) Press the Menu button to save. 28 ……………………………………………………………………. INSTRUCTION MANUAL 7-2.
1) Press the up(▲)or down(▼) button to select the Inputs enabled. 2) Press the right( ) or SOURCE/SELECT button. 3) Press the up(▲) or down(▼) button to select the Input. 4) Press the right( ) or SOURCE/SELECT button. 1) Press the up(▲) or down(▼) button to select the On or Off. 2) Press the Menu button to save. INSTRUCTION MANUAL ……………………………………………………………………. 29 7-3.
1) Press the up(▲) or down(▼) button to select the Time. 2) Press the left( ) or right( ) button to adjust the Time setting. 3) Press the MENU button to save. 30 …………………………………………………………………….
Using the VESA standard wall mount design and the 100mm hole pattern on the back panel to install the LCD monitor to the wall. Wall-mount Installation (Option) 1. The Monitor fixing bracket to the monitor using the fixing screws provided. 2. The monitor fixing bracket assembled with monitor INSTRUCTION MANUAL …………………………………………………………………….
▶ PIN ASSIGNMENTS Pin 1 RED VIDEO 9 2 GREEN VIDEO 10 SIGNAL CABLE DETECT 3 BLUE VIDEO 11 GROUND 4 GROUND 12 SDA(for DDC) 5 GROUND 13 H-SYNC.(or H+V SYNC.) 6 RED GROUND 14 V-SYNC. 7 GREEN GROUND 15 SCL(for DDC) 8 BLUE GROUND ▶ ACCESSORIES 1. Power cord 2. Power adaptor (Built-in) 3. User’s manual 4. PC cable 5. Trigger cable (Option) 6. Stereo cable (Option) 7. Remote controller (Option) 8. Batteries (Option) 9. Wall mount (Option) 10.
32 ……………………………………………………………………. INSTRUCTION MANUAL This monitor features a power management system to “power down” upon receipt of the VESA DPMS(The display power management signaling) from a VESA DPMS video card. The VESA DPMS-compliant video card performs this signaling system through not sending horizontal, vertical, or sync signal. This monitor enters an appropriate mode through identifying each of the three modes of the signaling system.
INSTRUCTION MANUAL ……………………………………………………………………. 33 17” 19” 17˝ Diagonal AM-TFT(Active-Matrix) 19˝ Diagonal AM-TFT(Active-Matrix) Pixel pitch(mm) : 0.264(H) x 0.264(V) Pixel pitch(mm) : 0.294(H) x 0.
ELECTRICAL RATINGS Gross Weight : 8.19Kg (18.06 lbs)) Gross Weight : 8.94Kg (19.71 lbs) DC 12V/ 3.0A DC 12V/ 3.5A ▶▶ NOTE : Technical specifications are subject to change without notice. 34 …………………………………………………………………….
Correct Disposal of This Product (Waste Electrical & Electronic Equipment) (Applicable in the European Union and other European countries with separate collection systems) This marking shown on the product or its literature, indicates that it should not be disposed with other household wastes at the end of its working life.
Taiwan - Headquarter Office China - Beijing Office 12F, No.79 Sec.1 Shin-Tai Wu Road, Room 609,Technology Trade Building.