H O M E C L I M B I N G W A L L I N S TA L L AT I O N I N S T R U C T I O N S TO LL F R EE 1 - 80 0 - 4 7 6 - 7 3 6 6 | V O ICE 6 5 1 - 665-9131 | FAX 651-665-9130 | I N FO@ E VE RL ASTCL I MB ING .C OM W W W. EV ER L A S TCL IMB IN G .
H O M E C L I M B I N G W A L L I N S TA L L AT I O N I N S T R U C T I O N S PLEASE READ CAREFULLY BEFORE ASSEMBLING & USING PRODUCTS • Please read instructions in their entirety prior to beginning installation. • These assembly instructions are based on engineering that was designed to support the loading requirements per the Climbing Wall Association (CWA) Standard, 2009.
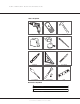
H O M E C L I M B I N G W A L L I N S TA L L AT I O N I N S T R U C T I O N S TOOLS REQUIRED ELECTRIC DRILL STUD FINDER HAMMER TAPE MEASURE SAFETY GLASSES & DUST MASK 7/16” & 5/16” AUGER DRILL BIT PHILLIPS BIT CARPENTER’S SQUARE 5/16” DRILL BIT SOCKET WRENCH LEVEL 3 -4' x 8' BIT Panels 1-1/4” SPADE 3 -4' x 8' Panels MATERIALS REQUIRED 8 -2'' x 4'' X 96'' HX 2” D LUMBER 896” -2'' x 4” 4''WX X96'' HX 2” D LUMBER 296” -2'' x 6” 6''Wx X96'' 2 -2'' x 6'' x 96'' 1-800-476-7366 | INF O@ EV ERL ASTC
H O M E C L I M B I N G W A L L I N S TA L L AT I O N I N S T R U C T I O N S SUPPLIED HARDWARE 4’ W X 4’ H PANELS 2’ W X 6’ H OR 4’ W X 6’ MATS 1-1/2” SCREWS *RED-RELIEF LINE® HAND HOLDS 1-3/4” SOCKET HEAD CAP SCREWS *NOT INCLUDED WITH SUPERIOR WALL KIT HARDWARE SUPPLIED WITH MAT KIT MAT LOCKING® HOLDS 5/16” T-HANDLE ALLEN WRENCH STAR WRENCH 7/32” T-HANDLE ALLEN WRENCH 1-3/4” SCREWS FLAT WASHERS HARDWARE NOT SUPPLIED 3/8” X 5” LAG SCREWS 1-800-476-7366 | INF O@ EV ERL ASTCL IMBING.
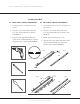
H O M E C L I M B I N G W A L L I N S TA L L AT I O N I N S T R U C T I O N S Installing Your Wall A-1. SINGLE PANEL SUB WALL PREPARATION A-2. MULTI-PANEL SUB WALL PREPARATION 1. Lay out all of the 2’’ x 4’’ boards on a level surface. 1. Lay out all of the 2’’ x 4’’ and 2’’ x 6’’ boards on a level surface. 2. Using the 1-1/4’’ spade drill bit, drill out (3) 1/2’’ deep countersunk holes as shown in. SEE FIGURE 9a. 2.
H O M E C L I M B I N G W A L L I N S TA L L AT I O N I N S T R U C T I O N S A-1. SINGLE PANEL SUB WALL PREPARATION A-2. MULTI PANEL SUB WALL PREPARATION 5. Using your stud finder, find and mark (4) 5. Using your stud finder, find and mark (12) horizontal feet of studs. With the studs being 16’’ horizontal feet of studs.
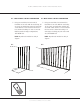
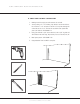
H O M E C L I M B I N G W A L L I N S TA L L AT I O N I N S T R U C T I O N S B. SINGLE PANEL SUB WALL CONSTRUCTION 1. Working from left to right you will construct the sub wall. 2. Start by taking a 2’’ x 4’’ and lining it up with the stud on the farthest left. Level the 2’’ x 4’’ and proceed to drill a 5’’ deep hole through the center hole of the 2’’ x 4’’ and into the stud behind the drywall with your 5/16’’ drill bit. SEE FIGURE 11a. 3.
H O M E C L I M B I N G W A L L I N S TA L L AT I O N I N S T R U C T I O N S B. MULTI-PANEL SUB WALL CONSTRUCTION 1. Working from left to right you will construct the sub wall. 2. Start by taking a 2’’ x 4’’ and lining it up with the stud on the farthest left. Level the 2’’ x 4’’ and proceed to drill a 5’’ deep hole through the center hole of the 2’’ x 4’’ and into the stud behind the drywall with your 5/16’’ drill bit. SEE FIGURE 11a. 3.
H O M E C L I M B I N G W A L L I N S TA L L AT I O N I N S T R U C T I O N S C. INSTALLATION OF CLIMBING PANELS 1. Working from bottom to top, left to right, you will now install the panels for your climbing wall. Align the left side of a panel with the left side of the left most 2’’ x 4’’. SEE FIGURE 13a. 2. Level the Panel. Sink (1) #8 1-3/4’’ screws through the panel into the 2’’ x 4’’using your drill with the Phillips head drill bit. 3.
H O M E C L I M B I N G W A L L I N S TA L L AT I O N I N S T R U C T I O N S D. INSTALLATION OF RED-RELIEF LINE® 1. Using the provided hardware, attach the Red-Relief Line® to the panels at a distance of 3’–31/2’ from the floor as shown in FIGURE 14a 1. The individual pieces of the Red-Relief Line should be touching one another and span the full length of the wall. SEE FIGURE 14b.) 2. *Not included with Superior Wall panels.
H O M E C L I M B I N G W A L L I N S TA L L AT I O N I N S T R U C T I O N S E. INSTALLATION OF HAND HOLDS 1. Place the Hand Hold over the desired hole (T-nut) in your wall, lining up the hand hold with the holes in the climbing wall. 2. Insert hex socket bolt through the hand hold and into the climbing wall. 3. Using the included allen wrench, gently start threading the bolt into the T-nut. Take care not to cross-thread the T-nuts. 4.
H O M E C L I M B I N G W A L L I N S TA L L AT I O N I N S T R U C T I O N S Placing Your Hand Holds WHEN CHOOSING THE LOCATIONS OF YOUR HAND HOLDS, KEEP THESE FEW THINGS IN MIND: • What age climber will be using the wall? Is there a hand/foot hold for the shorter climber and the taller climber? • Make sure the hand and foot hold moves require the climber to move up and down, not just straight across on the wall.
H O M E C L I M B I N G W A L L I N S TA L L AT I O N I N S T R U C T I O N S F. INSTALLATION OF THE MAT LOCKING® SYSTEM 1. Lay mats on the floor so that the bottom straps are closest to the wall and line up with the T-nuts on the wall. Attach the bottom straps to the climbing wall using the bolts and security wrench provided. Choose the grommet hole that allows the strap to have some slack - you may need to angle the straps to reach a nearby T-nut. 2.
H O M E C L I M B I N G W A L L I N S TA L L AT I O N I N S T R U C T I O N S Care & Maintenance The proper care and maintenance of your climbing wall is essential and is your responsibility. Inspect your climbing wall, its components and protective surfacing on a regular basis. These inspections should include, but are not limited to the lists that follow. SURFACE • Panels should be installed according to installation instructions.
H O M E C L I M B I N G W A L L I N S TA L L AT I O N I N S T R U C T I O N S Climbing Wall Rules & Supervisor Guidelines BEFORE CLIMBING: • Supervision is required • Protective mat surfacing must be in place • Remove all jewelry DURING CLIMBING: • Climb safely • Step down from the wall • No jumping • No climbing around, over or under another climber • Have fun! AFTER CLIMBING: • Step away from the mat upon completion of your climb Questions? Concerns? Comments? Call our Customer Service Department at 1.
TO LL F R EE 1 - 80 0 - 4 7 6 - 7 3 6 6 | V O ICE 6 5 1 - 665-9131 | FAX 651-665-9130 | I N FO@ E VE RL ASTCL I MB ING .C OM W W W. EV ER L A S TCL IMB IN G .C O M | 1 3 3 5 ME N D OTA H E I GH TS ROAD , ME N D OTA H E I GH TS, MN 55120 © 2 0 1 4 EVER LAST CLI MBI NG, A PLAYCOR E CO MPA N Y | HO ME CL I MBI N G W A L L I N S TA L L ATI O N I N S TRUCTI O N S REV 12.