
Instructions / Assembly


1-800-476-7366
|
INFO@EVERLASTCLIMBING.COM
|
WWW.EVERLASTCLIMBING.COM
© 2014 EVERLAST CLIMBING, A PLAYCORE COMPANY
HOME CLIMBING WALL INSTALLATION INSTRUCTIONS
10
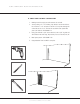
E. INSTALLATION OF HAND HOLDS
1. Place the Hand Hold over the desired hole (T-nut) in your wall, lining up
the hand hold with the holes in the climbing wall.
2. Insert hex socket bolt through the hand hold and into the climbing wall.
3. Using the included allen wrench, gently start threading the bolt into the
T-nut. Take care not to cross-thread the T-nuts.
4. If you feel resistance while starting to thread the bolt, stop, remove
the bolt and readjust the hand hold and bolt angle. If you power
through the resistance, the bolt and t-nut will become cross-threaded
and be locked together. This will cause the hand hold to spin, making
the hold unusable.
5. When the bolt threads are started properly, continue threading the bolt
until it becomes tight, then give another 3/4 of a turn.
6. Repeat steps 1 through 3 for the remainder of your hand holds.
TIP: For best results, spread the different hand holds out evenly
across your wall, separating hand holds by color and size. This
will make your wall more useful and interesting.
5/16” T-HANDLE ALLEN WRENCH
3/8” X 1-3/4” HEX SOCKET BOLTS
ALLEN WRENCH
BOLT
HAND HOLD
PANEL
HAND HOLD INSTALLATION FIGURE 15