
Instructions / Assembly


1-800-476-7366
|
INFO@EVERLASTCLIMBING.COM
|
WWW.EVERLASTCLIMBING.COM
© 2014 EVERLAST CLIMBING, A PLAYCORE COMPANY
HOME CLIMBING WALL INSTALLATION INSTRUCTIONS
12
F. INSTALLATION OF THE MAT LOCKING
®
SYSTEM
1. Lay mats on the floor so that the bottom straps are closest to the wall
and line up with the T-nuts on the wall. Attach the bottom straps to the
climbing wall using the bolts and security wrench provided. Choose the
grommet hole that allows the strap to have some slack - you may need
to angle the straps to reach a nearby T-nut.
2. With the bottom straps attached to the wall, stand the mats up against
the wall.
Important note: The Cordless Mat Locking System is designed
for the mats to rest on the floor. Hanging the mats off the floor will
shorten their life and make them much harder to use.
3. Hook the loop of the nylon webbing over a Mat Locking Hold and hold
it in the correct position on the climbing wall. Make sure the loops are
not pulled too tight, as this will make the locking/unlocking process
more difficult. Where the two mats come together, pass one loop
through the other before hooking it over the Mat Lock Hold.
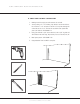
4. Using a drill with a #2 Phillips head bit, screw the three 1-5/8” screws
through the Mat Lock Hold and into the climbing wall, starting with the
top mounting hole first, as shown in FIGURE 16.
5. Repeat steps #3–4 to install the remainder of the Mat Lock Holds on
the wall.
1. Starting with the first Mat Lock Hold, slide the red slider up into the
‘locked’ position as shown in FIGURE 16. Tighten with security wrench.
2. Repeat step #6 for the remainder of the Mat Lock Holds.
CONGRATULATIONS! Your traverse climbing wall is complete.
HAND HOLD INSTALLATION FIGURE 16