
Installation Guide

INSTALLATION INSTRUCTIONS
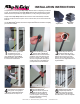
1
Measure and cut your hollow
metal baluster per your
installation instructions. If
using Tap-N-Twist
®
Hollow Metal
Baluster Install Kit, these are Steps
4-6 in the instruction booklet.
2
Before installing the metal
baluster, slide a Slip-N-Grip
®
Baluster Shoe over the bottom
of baluster. Use a Flat Shoe for level
balcony or treads, or use an Angled
Shoe on an angled knee wall. Expect
a tight, rm “grip” on the baluster as
you slip the shoe over the baluster.
3
Repeat Step 2 for the top of
the baluster with the round
pin. Slide a slide a Slip-N-Grip
®
Baluster Shoe over the top of the
baluster, using a Flat Shoe for level
balcony rail, or an Angled Shoe for an
angled handrail.
Congratulations on choosing the Slip-N-Grip
®
Baluster Shoe to complete your staircase
project. The patented design of the Slip-N-Grip
®
Baluster Shoe holds the shoe in place
without the need of special tools, drippy adhesives, or risky cutting and sanding tools.
Simply slide the Slip-N-Grip
®
Baluster Shoe over the ends of the baluster, install the
baluster, and slip the shoes into place. That’s it! You’re done, free to move onto the next
baluster!
Use the Slip-N-Grip
®
Baluster Shoe with our Tap-N-Twist
®
Baluster install kit to simplify
your staircase remodel.
©2019 EverMark, LLC 1050 Northbrook Parkway, Suwanee, GA 30024 www.EverMark-LNL.com
Slip-N-Grip
®
Angled Shoe
Slip-N-Grip
®
Flat Shoe
4
Insert baluster per installation
instructions. If using Tap-N-
Twist
®
Hollow Metal Baluster
Install Kit, these are steps 12-14.
5
Slide the Slip-N-Grip
®
Baluster Shoes into place at
bottom and top of baluster.
No adhesives, allen wrenches, or
tools are required. The top Angled
Shoe will self-adjust to most any
residential stair angle.
6
Repeat previous steps of
the Slip-N-Grip
®
Baluster
Shoes into place at bottom
and top of baluster. No adhesives,
allen wrenches, or tools are required.
Top of Baluster
has Round Pin