
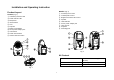
User's Manual


4
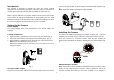
There are 6 auxiliary infrared LEDs adjacent to the camera lens. They are
designed to enhance low light level visibility. When the ambient light level
is lower than 10 Lux, the infrared LEDs will start operating automatically,
while if it is higher than 200 Lux, the infrared LEDs will shut down
automatically. Keep a minimum distance of 30cm between infrared LEDs
and observed object. Otherwise the camera is liable to make wrong
judgement.
5. When the low battery LED lights up, replace batteries immediately.
6. While turning on the ON/OFF switch, the low battery LED will be on
shortly then extinguish.
7. Under normal operation, the power LED should be on.
Setting Up the Monitor
Power Supply
The Monitor uses either 4 AA-size batteries or the AC/DC adaptor.
Note: When replacing batteries or connecting to the AC/DC adaptor, turn off
the Monitor.
Loading the Batteries
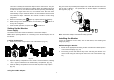
1. Remove the power cavity from the rear of the Monitor. (Fig. 10)
Fig. 10
2. Open the battery compartment cover and fit 4 AA-size batteries, following
+ and – signs as indicated on the inside battery compartment. (Fig. 10)
3. Close the battery compartment cover and refit the power cavity in place.
(Fig. 10)
Using the AC/DC Adaptor
Plug one end of the provided power adaptor into a wall outlet and the other end
into the side of Monitor. The specification of AC/DC adaptor is 6V/500mA
with regulator. (Fig. 11)
Fig. 11
Fig. 11
Note: The AC/DC adaptor shall remain readily operable.
Installing the Monitor
3 types of installation can be made, such as wall mount, free standing and
hang up by string.
Wall Mounting the Monitor
1. Decide on the appropriate mounting location. Drill two holes 48mm apart in
a line and fit wall plugs. (Fig. 12)
2. Insert fixing screws until almost fully home and hang the Monitor over
these screws using the two keyhole slots in the rear of the Monitor. (Fig.
12)
O R