
User's Manual


5
Fig. 12
Free standing the Monitor
The Monitor has the swiveling pivot which allows flexible angle adjustment for
free standing installation.
1. Adjust the swiveling pivot to an appropriate angle for best viewing
condition. (Fig. 13)
Note: To meet various applications, the angle of swiveling pivot can attain
80° and 50°.
2. Place the Monitor to an ideal location.
Fig. 13
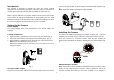
Hanging up the Monitor
On the top of the rear of Monitor, penetrate a string through the hole.
Operating the Monitor
1. Learning the ID code
In order to prevent any unauthorized attempt to operate or disarm your
system, you must configure your system to accept radio signals only from
your own system devices. All Cameras have their unique ID code, the
Monitor must learn their codes individually for the system to operate
correctly.
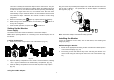
a. Set the number of channel switch to different number on each camera.
When learning the ID code, ensure that the distance among each
Camera cannot be too close so as to avoid interference.
b. Slide the ON/OFF switch to ON position for all connected Cameras.
And turn on the Volume/Power control (Fig. 14) on the Monitor.
Ensure that the Monitor is set in Audio/Video mode.
c. Press the CH selection button (Fig. 15) on the Monitor for a while.
Four channel LEDs (numbered 1 to 4) on the Monitor will all light up
for a moment simultaneously, which implies that the Monitor enters ID
code learn mode.
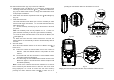
d. The LED for each channel will flash in turn once on the Monitor.
While the channel 1 LED is flashing, press the learn button of the
corresponding Camera, which is set for channel 1, so as to emit the
ID code to the Monitor. Follow the same step for the rest of cameras.
e. If successful, four channel LEDs on the Monitor will all illuminate
shortly before the learnt channel LED(s) flashes. If failure, four
channel LEDs on the Monitor neither flash nor illuminate.
Note: The preset ID code will be memorized permanently despite the
power being disconnected.
2. Cleaning out the ID code
a. Press the CH selection button on the Monitor for a while. Four
channel LEDs (numbered 1 to 4) on the Monitor will all light up for a
moment simultaneously, which implies that the Monitor enters ID
code learn mode.
b. Press the CH selection button again. All of the preset ID codes will
be cleaned out.
3. Upon reception from the Camera, 4 modes can be selected by pressing