
User's Manual


6
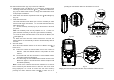
the mode selection button (Fig. 15) on the front of Monitor.
a. Audio/video mode: The Monitor is on continuously, emitting sound
and image. Under this mode, both and LEDs will not illuminate.
(Fig. 15) No matter what mode it is, simply enter Audio/video mode
for impromptu surveillance.
b. Audio mode: The Monitor only delivers audio and LED will light up.
(Fig. 15)
c. Audio-activated mode:
This audio-activated mode allows you to set the sensitivity of audio
level that will trigger the Monitor. To use audio-activated function,
follow these steps:
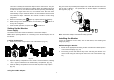
c-1: Set the sensitivity control (Fig. 14) on the Monitor to the level
you prefer.
Note: The sensitivity level can vary between 0 to 9. A value of 0
gives maximum sensitivity, a value of 9 gives minimum sensitivity.
c-2: Press the mode selection button on the front of the Monitor, the
LED lights up.
c-3: When the sound from the Camera reaches the set level, the
Monitor will turn on automatically. It will turn off automatically after 30
seconds.
d. Auto scan mode:
Press the mode selection button on the front of Monitor until ,
LEDs are on.
d-1: Ensure the number of channel switch set for each camera is
different. Slide the ON/OFF switch to ON position for each
camera.
d-2: The Monitor will scan the connection of each enabled camera
and make record at the beginning.
d-3: The video image of each enabled camera will be shown on the
Monitor for approx. 5 seconds and each channel sequence will
be rotated repeatedly.
Note: If some of the cameras had not been switched on or had not
been scanned by the Monitor before or after the auto scan mode
being employed, it is a must to re-enter the auto scan mode by
pressing the mode selection button until , LEDs are on or
pressing the CH selection button on the Monitor to re-scan.
Fig. 14a Fig. 14b
Fig. 15
Judging from the following LED indication may know better what mode it is: