
User's Manual


3
interference or other problems occur, refer to the Troubleshooting. You may
need to select a different location in the room for mounting the Camera.
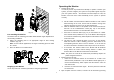
1. Decide on the appropriate mounting location. Drill two holes 32mm apart in
a line and fit wall plugs. (Fig. 6)
2. Insert fixing screws until almost fully home and hang the Camera over
these screws using the two keyhole slots in the rear of the Camera. (Fig. 6)
Fig. 6
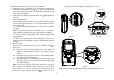
Clipping on the Camera
1. Use the clip as supplied for fixing the Camera on the crib or table edge.
(Fig. 7)
2. Place the clip to the two slots on the top of Camera and lift it up to fit it in
place. (Fig. 7)
Note: For removing the clip, push the clip downward. (Fig. 8)
Fig. 7 Fig. 8
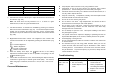
Operating the Camera
1. The ON/OFF slide switch is for turning on and off the power. (Fig. 9)
2. Up to four cameras can be connected to the Monitor. Set the channel
switch (numbered 1~4) that matches to that of the Monitor you plan to
observe. (Fig. 9)
Fig. 9
Note: If more than 2 cameras are in use, do not set the same channel at
the same time.
3. Learning the ID code
In order to prevent any unauthorized attempt to operate or disarm your
system, you must configure your system to accept radio signals only from
your own system devices. All Cameras have their unique ID code, the
Monitor must learn their codes individually for the system to operate
correctly.
Pressing the learn button will emit the ID code to the Monitor, subject to
the Monitor enters ID code learn mode. Refer to page 5 for detailed
instruction.
4. Night Vision Mode (Infrared LEDs)