
Installation Guide


Trim Installation Instructions
Tools and Supplies Needed
• Sharp fine-toothedsaw or a power miter saw
• Miter box
• Back saw
• Hammer
• One inch finishing nails or power finishing nailer
• Nail set
• Paneling adhesive
• Tape measure or ruler
• Level
• Combination
• Square
• Plane
• Protective goggles (to be used when nailing and hammering or when using a saw)
• Caulk
• Stain and/or paint
• Appropriate paint/stain application tools
Conditioning and Prefinishing: Open all packages and expose boards to the room
environment in which they will be used for a minimum of 48 hours. Removing the trim pieces
from the package and separating and exposing them to the room environment will accomplish
effective acclimatization. Finish/seal the trim face prior to installation. Pine trim may be left
unfinished for a natural look or finished using a clear, penetrating sealer, penetrating oil or
semi-transparent stain. A sealer or a clear, polyurethane is recommended for areas of high
traffic or high moisture content. All primed wood composite (MDF) trim should be painted prior
to installation for best results.
Wall Preparation: If walls are in good condition, glue and/or nail trim directly onto the
drywall or plywood. On uneven, cracked, or rough walls, trim should be nailed to a framework
of 1 x 3 or 1 x 4 furring strips of any specie that have been kiln dried. It is not recommended
that trim or plank paneling be applied directly to studs. In rooms that have high moisture
conditions, it is recommended that a vapor barrier is in place between the studs and the
drywall or subwall.
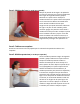
Step 1: Base Trim (sold separately from planks)
Mark position of studs if applying to drywall. Cut base to measured length and apply adhesive
to the back. Place base onto wall bottom with groove for planks facing up. Level base to ensure
it is horizontal. Nail base into studs. If floor is not level, you may need to add a piece of quarter
round or shoe moulding to cover any gaps between the base trim and the floor. If joining two