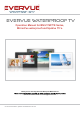
evervue waterproof tv Operation Manual for BN/LT/SP/TK Series, MirrorVue waterproof and SpaVue TV’s. Thank you for choosing Evervue Waterproof Bathroom TV. Questions? Please email us at sales@evervue.com. For more information, please visit www.evervue.
IMPORTANT INFORMATION “ Note to CATV system installer: This reminder is provided to call the CATV system installer’s attention to Article 820-40 of the National Electrical Code that provides guidelines for proper grounding and, in particular, specifies that the cable ground shall be connected to the grounding system of the building, as close to the point of cable entry as practical.” This product utilizes tin-lead solder, and fluorescent lamp containing a small amount of mercury.
10. Move Carefully - When a cart is used, use caution when moving the cart/apparatus combination to avoid injury from tip-over. Sudden stops, excessive force and uneven floor surfaces can cause the product to fall from the trolley. Never attempt to move the TV unless the AC power cord has been disconnected. 11.
Antenna System NOTE: • If an outside antenna is connected to the television equipment, be sure the antenna system is grounded so as to provide some protection against voltage surges and built-up static charges.
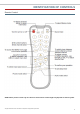
PREPARATIONS Using the Remote Control (Standard) Use the remote control by pointing it towards the remote sensor window of the set. Objects between the remote control and sensor window may prevent proper operation. Note: This illustration is for reference only. The remote sensor may be in different locations on different models. Cautions regarding use of remote control • Do not expose the remote control to shock.
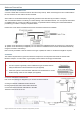
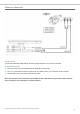
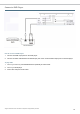
Antenna Connection CABLE TV (CATV) CONNECTION A 75-ohm coaxial cable connector is built into the set for easy hookup. When connecting the 75-ohm coaxial cable to the set, screw the 75-ohm cable to the ANT. Terminal. Some cable TV converter/descrambler is generally provided to the subscriber by the cable TV company. This converter/descrambler is necessary for normal viewing of the scrambled channels. For more specific instructions on installing cable TV, consult your cable TV company.
IDENTIFICATION OF CONTROLS Remote Control NOTE: Above picture is used only for reference. Actual remote control might vary depends on the TV system. All rights reserved Evervue. Information is subjected to change without prior notice.
CONNECTIONS Cautions Before Connecting • Carefully check the terminals for position and type before making any connections. • The illustration of the external equipment may be different depending on your model. • Loose connectors can result in image or color problems. Make sure that all connectors are securely inserted into their terminals. • Refer to the operating manual of the external device as well. • When connecting an external device, turn the power off on the panel to avoid any issues.
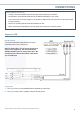
Connect a Camcorder How to connect: Connect the Audio/Video cable between the Audio (L/R)/Video jacks on the unit and camcorder. To playback Camcorder 1. Turn on your LCD TV, press SOURCE button repeatedly to select Video. 2. Turn on you camcorder and set it to output mode. (For details, refer to your camcorder owner’s manual.) 3. Insert the tape into the camcorder and press Play button. Note: The operations of the camcorder may be different and is dependent on your model.
Connect a DVD Player How to connect a DVD Player: 1. Connect the HDMI output jacks on the DVD player. 2. Connect the Audio cable between the AUDIO input jack on the unit and AUDIO output jacks on the DVD player. To play DVD: 1. Turn on your LCD TV, press SOURCE button repeatedly to select YPbPr. 2. Turn on your DVD player. 3. Insert a disc and press PLAY button. All rights reserved Evervue. Information is subjected to change without prior notice.
TURNING THE UNIT ON AND OFF Turning the Unit On and Off Turning On 1. Insert power cord into the wall outlet. 2. Press the Power button on the remote control. 3. The unit will be turned on and you will be ready to use its features. Turning Off 1. With the power on, press the Power button on the remote control to turn off. Note: Your can also use the Power button on the control panel on the main unit. Viewing the MENUs and Displays Your LCD TV has simple, ease-to-use menu, system that appears on the screen.
MEMORIZING THE CHANNELS Your LCD TV can memorize and store all the available channels for both antenna and cable channels. After the available channels are memorized, use CH+/- to scan the channels. Selecting the Signal Source Before your LCD TV can memorize the available channels, you must specify the type of signal source that is connected to the unit. (i.e. an antenna or cable system) 1. Press MENU to display the menu main page. 2. Press CH+/- repeatedly to select Channel page. 3.
BASIC OPERATIONS Changing Channels Using the Channel Buttons (CH+ or CH-) • Press the CH+ or CH- to change channels. • When you press the CH+ or CH-, the unit changes channels in sequence. You will see all the channels that the unit has memorized. • You will not see channels that were erased. Direct Accessing Channels • Press the number buttons to go directly to a channel.
SETTING PICTURE Using the Preset Picture Mode 1. Press MENU to display the menu main page. The picture page will be displayed automatically. 2. Press ENTER or VOL+/- to access the Picture submenu. The Picture Mode item is highlighted automatically. 3. Press ENTER or VOL+/- to select a desired picture mode. You may also use the P.M button to quickly select picture mode. There are three preset picture modes (Bright, Soft and Normal) and one user-set picture mode (User).
SETTING SOUND Customizing the Sound 1. Press MENU to display the menu main page. 2. Press CH+/- repeatedly to select Sound page. 3. Press ENTER or VOL+/- to access the submenu. 4. Press CH+/- to select Bass, Treble or Balance item. 5. Press VOL+/- to adjust the value of the item.
TROUBLESHOOTING Before calling for repair service, check the following items for possible remedies to the encountered symptoms. Symptons Check Item • “Ghost” or double image No Power • • • No Picture Good picture but no sound Good sound but poor color • • • • • • • Check antenna connections at the rear of the unit to see if it is properly connected to the unit. Possible broadcast station trouble. Try another channel. Adjust the contrast and brightness settings. Check the closed captions control.
CARE AND MAINTENANCE LCD Display Panel Information Important Information Regarding Use of Video Games, Computers, Captions or Other Fixed Image Displays. The Extended use of fixed image program material can cause permanent “shadow image” on the LCD panel. This background image is viewable on normal programs in the form of a stationary fixed image. This type of irreversible LCD panel deterioration can be limited by observing the following steps: A. B. C.
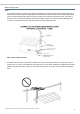
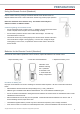
A D F 518mm/20.4” 577mm/22.7” 894mm/35.2” 432mm/16.6” 518mm/20.4” 590mm/23.2” 904mm/35.6” 518mm/20.4” 577mm/22.7” 894mm/35.2” 572mm/22.5” 572mm/22.5” 364mm/14.3” 425mm/16.7” 560mm/22” F G Wall Box Hight Wall Box Depth 49mm/2” 75mm/3” 45mm/1.8” 45mm/1.8” 51mm/2” 86mm/3.3” 45mm/1.8” 83mm/3.3” 64mm/2.5” 90mm/3.5” 49mm/2” 49mm/2” 75mm/3” 364mm/14.3” 425mm/16.7” 560mm/22” 64mm/2.5” 1. Determine the location where to install the TV.